Monday, May 2, 2011
 Pouty Christmas
This tutorial was written by me on 15 December 2009. Any similarities to other tutorials is purely coincidental.
Supplies Needed:
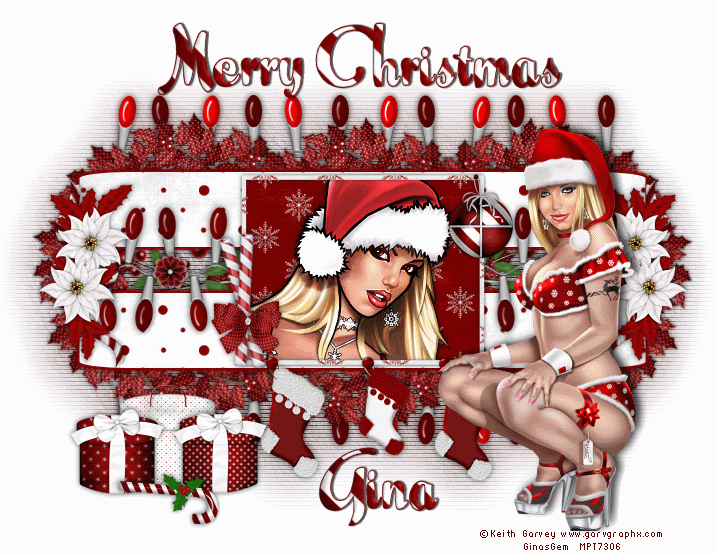
1 close up and 1 tube of choice. I am using the awesome artwork of Keith Garvey. The close up was part of the Xmas package 2009 and the tube was part of the 2008 Xmas package from MPT. You can currently check PSP Tubes Emporium to see if these tubes are available for purchase.
Scrap kit of choice. I am using Candy Cane Dreams made by me. If you would like to purchase it you can here.
Pouty Christmas template made by me, which is included in the supplies.
Screw tube. The one I am using is by Dozi. You can get here from her site here (under eyelets and screws - page 3) Thank you, Dozi!
Font of choice. I used Scarlett Ribbons. (pay font)
Plugins:
Xero Filters - Radiance
AAA Filters - Textures
Eyecandy 4000 - Gradient Glow
Animation Shop
Supplies HERE
*~*~*~*~*~*~*~*~*~*~*~*~*~*~*~*~*~*~*~*~*~*~*~*~*~*~*~*~*~*~*~*~*~*~*
Ok! Let's get started! Open up the template. Highlight the layer Raster 2. Go to selections > select all. Selections > float. Selections > defloat. Open up a paper of choice from the kit. Resize by 80%, smartsize. Copy and paste as a new layer onto your canvas. Go to selections > invert. Hit delete on your keyboard. Deselect. (CTRL+D)
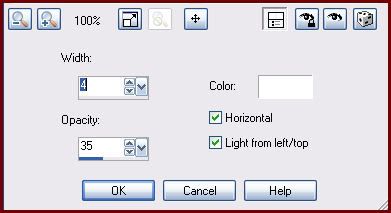
Apply Eyeycandy - Gradient Glow with the following settings:
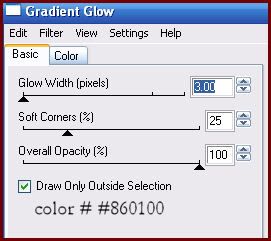
Repeat the gradient glow one more time. Give the layer a drop shadow of H and V 0, Opacity 70, Blur 10.00.
Highlight the Raster 3 (rounded rectangle) layer and repeat all the same steps you completed for the raster 1 layer. Delete both gray rounded rectangle layers.
Highlight the Raster 4 (rectangle) layer. Select, float and defloat. Open up another paper from the kit. Resize by 65%, smartsize. Copy and paste as a new layer onto your canvas. Go to selections > invert. Hit delete on your keyboard. Don't deselect yet!
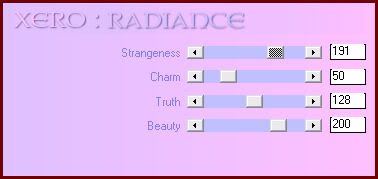
Open up your close up. Resize as necessary, bicubic. Copy and paste as a new layer onto your canvas. Position it to your liking within the selection. Hit delete. Deselect (CTRL+D). Apply Xero - Radiance to your close up with the following settings:
Now go to adjust > sharpness > unsharp mask. Apply with radius set to 5, strength set to 15, clipping set to 1. Give the close up a drop shadow of H and V 0, Oapcity 65, Blur 10.00. Delete the gray rectangle layer.
Highlight the Raster 5 (white frame layer)layer. Select, float and defloat. Open up a paper from the kit. Resize by 65%, smartsize. Copy and paste as a new layer onto your canvas. Go to selections > invert. Hit delete and deselect. Give the layer a drop shadow of H and V 0, Oapcity 70, Blur 6.00. Delete the white rectangle frame layer.
Open up a holly branch from the kit. Hit shift + d to duplicate. Close the original. Resize the duplicate holly branch by 15%, smartsize, ALL LAYERS ticked. Still, on your holly branch image, go to image > canvas size. Go to image > free rotate. Rotate right by 90.00, all boxes unchecked. Change the canvas size to 400 x 400. Now apply Mura Meister Copies with the following settings:
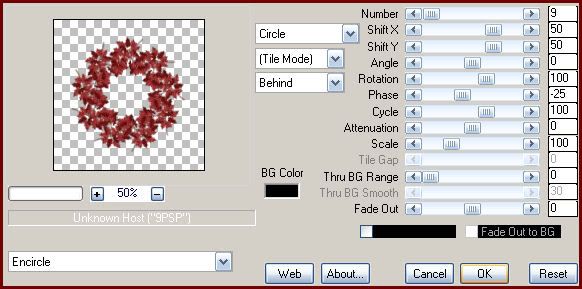
Copy the encircled holly branch. Highlight your white background layer. Paste the encircled holly branch as a new layer onto your canvas. Give it a drop shadow of H and V 0, Opacity 70, Blur 8.00. Duplicate the layer 2 times for a total of 3. Arrange them as in my tag above.
Highlight your top layer. Open up a peppermint from the kit. Resize by 25%, smartsize. Copy and paste as a new layer onto your canvas. Position it at the bottom left corner of the rectangle. Give it a drop shadow of H and V 0, Opacity 55, Blur 5.00. Duplicate the peppermint stick. On the bottom (original) peppermint stick, go to image > free rotate. Rotate left by 15.00, both boxes unchecked. Arrange them as in my tag above.
Open up a bow from the kit. Resize by 15%, smartsize. Copy and paste as a new layer onto your canvas. Position it them on top of the peppermint sticks, towards the bottom. Give it a drop shadow of H and V 0, Opacity 55, Blur 7.00.
Open up a patchwork ball from the kit. Resize by 25%, smartsize. Copy and paste as a new layer onto your canvas. Give it a drop shadow of H and V 0, Opacity 55, Blur 6.00. Position it at the top right corner of the rectangle.
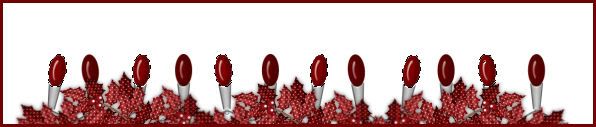
Open up a Christmas Lights from the kit. (if you are animating, the all red ones are best). Resize by 55%, smartsize. Copy and paste as a new layer onto your canvas. Give it a drop shadow of H and V 0, Oapcity 60, Blur 8.00. Position it on top of the rounded rectangles (and underneath your rectangle). Duplicate. Position the duplicated pair, underneath the encircled holly branches, towards the top so that the bulbs are peeking out. (see my tag for reference) Duplicate. Go to image > flip. Merge your 2 bottom light layers together.
Highlight your top layer. Open up a poinsetta arrangement from the kit. Resize by 35%, smartsize. Copy and paste as a new layer onto your canvas. Give it a drop shadow of H -2, V -2, Opacity 60, Blur 8.00. Position it at the left ends of the rounded rectangles. Duplicate. Go to image > mirror.
Open up a glitter flower from the kit. Resize by 8%, smartsize. Copy and paste as a new layer onto your canvas. Give it a drop shadow of H and V 0, Opacity 50, Blur 4.00. Position it to your liking on your middle lights. Duplicate. Go to image > mirror.
Open up 2 stockings of choice. Resize one by 25%, smartsize, and the other by 20%, smartsize. Copy and paste them both as new layers onto your canvas. Give them both a drop shadow of H and V 0, Opacity 55, Blur 7.00. Position the larger one towards the left of the the bottom of the rectangle. (see my tag for reference) Duplicate it and place it at the opposite end of the rectangle. Position the smaller stocking in between the 2 larger ones.
Open up your screw tube of choice. Resize as necessary. Copy and paste as a new layer onto your canvas. Give it a drop shadow of H and V 0, Opacity 45, Blur 3.00. Duplicate 2 times. Position the 3 screws so they look as if the are holding the stockings in place.
Open up a gift boxes that has a handle on top. Resize by 25%, smartsize. Give it a drop shadow of H 0, V 2, Opacity 60, Blur 8.00. Position it to your liking.
Open up 2 gift boxes that have bows. Resize them both by 25%, smartsize. Copy and paste as new layer onto your canvas. Give them both a drop shadow of H 0, V 2, Opacity 60, Blur 8.00. Arrange them in front of the larger gift box.
Open up the candy cane with holly. Resize by 20%, smartsize. Copy and paste as a new layer onto your canvas. Go to image > free rotate. Rotate right by 90.00, both boxes unchecked. Give it a drop shadow of H and V 0, Opacity 55, Blur 5.00. Arrange in front of your gift boxes.
Open up a berries of choice. Resize by 50%, smartsize. Copy and paste as a new layer onto your canvas. Give it a drop shadow of H and V 0, Opacity 65, Blur 8.00. Go to image > free rotate. Rotate right by 90.00, Both boxes unchecked. Position the berries in between your 2 rounded rectangle layers. Now drag the berries layer beneath all of your other layers to right above your white background. Duplicate. Go to image > mirror.
Hide your white background layer. Right click on your canvas, and choose COPY MERGED. Unhide and highlight your white background layer. Paste as a new layer onto your canvas. Is should be your entire tag, as a merged layer. Center it behind all of your other layers. Go to adjust > blur > Gaussian Blur. Apply with a radius of 20. Now go to effects > texture effects > blinds. Apply with the following settings:
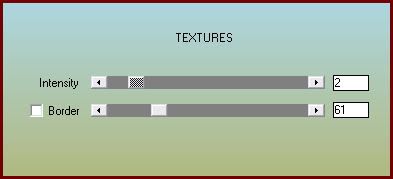
Now, apply AAA Textures with the following settings:
Highlight your top layer. Open up your tube. Resize as necessary, bicubic. Copy and paste as a new layer onto your canvas. Give it a drop shadow of H 5, V -2, Opacity 75, Blur 13.00. Arrange your tube to your liking.
Add any other embellishments of your choosing.
Crop and resize to your liking.
Add your copyright info, watermark and your text.
If you are not animating, save as JPG or PNG.
If you are animating, highlight your merged bottom lights layer. Grab your magic wand tool, tolerance set at 35, feather set at 0.00. Click on all of the lighter red lights so you have marching ants all around, like this:
Don't forget the bottom ones!!
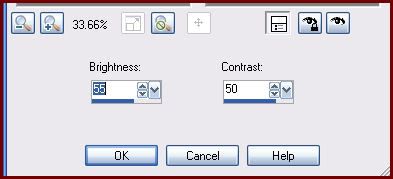
Highlight the lights layer that is on top of your rounded rectangles. Grab your magic wand tool, same settings, and click on all the darker red lights. Now go to adjust > brightness/contrast > brightness contrast. Apply with the following settings;
Now highlight the merged bottom layer lights and adjust brightness/contrast, same settings. Deselect (CTRL+D). Copy merged. Open up Animation Shop. Paste as a new animation in AS.
Back to Paint Shop Pro. Go to edit > undo deselect none. Edit > undo brightness/contrast. Edit > undo layer selection. Edit > undo brightness/contrast. Deselect.
Grab your magic wand tool, same settings. Highlight your merged bottom lights layer. This time click around all of the darker red lights. Apply Brightness/Contrast, same settings. Deselect.
Highlight your middle lights layer, the ones on top of your rounded rectangles. Grab your magic wand tool, same settings. Click on all of the lighter red lights. Adjust > Brightness/Contrast, same settings. Deselect. Copy merged. Paste after frame 1 in AS.
In animation shop, select all frames (CTRL+A). Change the frame properties to 20.
Optimize and save as gif.
I hope you enjoyed this tutorial! If you have any questions, just give me a shout.
Subscribe to:
Post Comments (Atom)
0 comments:
Post a Comment