Monday, May 2, 2011
 It's Gold Outside
This tutorial was written by me on 16 December 2009. Any similarities to other tutorials is purely coincidental.
Supplies Needed:
Tube of choice. I am using the beautiful artwork of Jennifer Janesko. I purchased these tubes when CILM was still open. If you would like to purchase her artwork now, you can at CDO.
Winter Gold scrap kit made by me. It can be purchased here.
UF Mask 45 by urban fairytale. You can download it from her blog here. Thank you!
Misted Trees tube. I got this through a yahoo group. If it is yours, please let me know so I can give you proper credit or take them out of supplies.
Snow Animation
Glitter Pattern made by me
Baby, it's gold outside word art made be me
Font of choice. I used Harrington which can be downloaded here.
Plugins:
Unplugged Tools - Interlace
Penta Filters - VTR2
Animation Shop
Supplies HERE
*~*~*~*~*~*~*~*~*~*~*~*~*~*~*~*~*~*~*~*~*~*~*~*~*~*~*~*~*~*~*~*~*~*~*~*~*~*~*~*~*~*~*~*~*~
Ok! Let's get started! Open up a new transparent image 800 (width) by 600 (height). Floodfill with white.
Open up the rectangle from your supplies. Copy and paste it as a new layer onto your canvas. Go to selections > select all. Selections > float. Selections > defloat. Open up Paper 11 from the kit. Resize by 85%, smartsize. Copy and paste as a new layer onto your canvas. Go to selections > invert. Hit delete on your keyboard. Don't deselect yet.
Open up the Misted Snow Trees from your supplies. Copy and paste as a new layer onto your canvas. Position it to the right of the rectangle. Mirror the Misted Snow Trees. Copy and paste as a new layer onto your canvas. Position it to the left of the rectangle. Hit delete on your keyboard. Highlight the original snow trees layer and hit delete. Deselect. (CTRL+D).
Delete the gray rectangle layer. Hide your white background layer and your paper layer. Merge the 2 misted snow trees layers together. Go to adjust > Hue and Saturation > Colorize. Apply to your merged layer with the following settings:
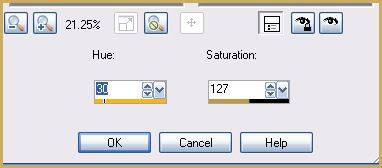
If you like, you can adjust the hue and saturation for a different color.
Highlight your rectangle paper layer and give it a drop shadow of H and V 0, Opacity 65, Blur 10.00. Hide your white background, and merge your visible layers together. (the misted trees and rectangle paper layer.)
Open up the Gold Stitch Frame from the frames folder. Resize it by 70%, smartsize. Grab your freehand selection tool, type: point to point, feather set at 0.00. Carefully select around the top side of the stitches like this:
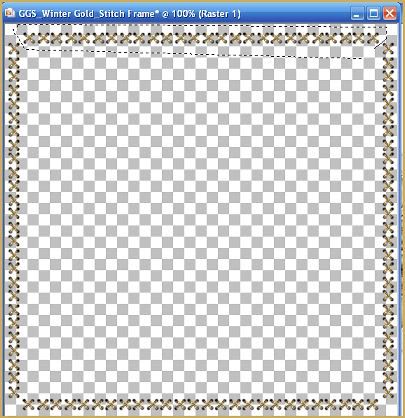
Copy. Paste as a new layer onto your canvas. Give the stiches a drop shadow of H 1, V -1, Opacity 50, Blur 2.00. Position the stitches at the top of your rectangle. Duplicate the stitches. Go to image > flip. Position the duplicated stitches at the bottom of your rectangle. Duplicate the stitches again. Go to image > free rotate. Rotate right by 90.00 degrees, both boxes unchecked. Line the stitches up with the right side of your rectangle. Grab your freehand selection tool again, same settings as before. Select around all of the stitches that are hanging over the side of your rectangle. Hit delete. Duplicate the rotated stitches. Go to image > mirror. Position them at the left sideo f your rectangle. (see my tag for reference)
Open up the twisted beaded rope from the kit. Resize by 35%, smartsize. Copy and paste as a new layer onto your canvas. Go to image > free rotate. Rotate left by 6.00 degrees, both boxes unchecked. Go to adjust > sharpen. Position it on top of your stitches at the left side of your rectangle. Grab your freehand selection tool and select around the ends of the rope that are hanging over the rectangle. Hit delete. Deselect. Give the rop a drop shadow of H -3, V -1, Opacity 50, Blur 4.00. Duplicate the rope. Go to image > mirror. Position the duplicated rope at the right end of your rectangle.
Open up the glitter poinsetta from the kit. Resize by 12%, smartsize. Go to adjust > sharpen. Copy and paste as a new layer onto your canvas. Give it a drop shadow of h and V 0, Opacity 45, Blur 7.00. Position it in the center of the top loop of the left rope. Duplicate the poinsetta. Go to image > mirror.
Open up the Scalloped Circle Frame from the kit. Resize by 45%, smartsize. Go to adjust > sharpness > unsharp mask. Apply with a radius of 5, strength 25, clipping 1. Copy and paste as a new layer onto your canvas. Center it in the middle of your rectangle. Grab your magic wand tool, tolerance set at 100, feather set at 0.00. Go to selections > modify > expand by 3.00. Open up a paper from the kit. Resize by 50%, smartsize. Add a new raster layer to your working image. Copy your paper. Paste into selection (in the new raster layer) Don't deselect yet.
Open up your tube of choice. Resize as necessary, bicubic. Copy and paste as a new layer onto your canvas. Position the tube to your liking within the selection. Hit delete on your keyboard. Deselect. Give your tube a drop shadow of H and V 0, Opacity 65, Blur 10.00. Highlight your scalloped frame and give it a drop shadow of H and V 0, Opacity 70, Blur 10.00. Drag it to the top of your layer palette.
Open up the beaded gold berry string from the kit. Resize by 45%, smartsize. Apply unsharp mask, same settings as before. Copy and paste as a new layer onto your canvas. Position it towards the bottom of the frame. (see my tag above) Give it a drop shadow of H 1, V -2, Opacity 60, Blur 4.00. Grab your freehand selection tool, type - point to point, feather set at 0.00. Carefully select around the ends of the string that are hanging over the frame like this:
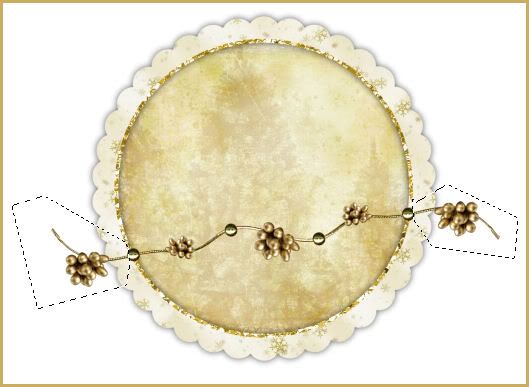
Hit delete on your keyboard. Deselect.
Open up the glass star ornament from the kit. Resize by 25%, smartsize. Apply unsharp mask, same settings as before. Copy and paste as a new layer onto your canvas. Give it a drop shadow of H-2, V -1, Opacity 55, Blur 3.00. Position it towards the bottom left of the frame. Duplicate. Go to image > mirror. Then, image > flip.
Open up the Berries from the kit. Resize by 30%, smartsize. Apply unsharp mask, same settings as before. Copy and paste as a new layer onto your canvas. Go to image > free rotate. Rotate left by 90.00 degrees, both boxes unchecked. Give it a drop shadow of H -2, V -1, Opacity 50, Blur 4.00. Position it at the top of the frame so it is hanging over the left side of the frames. Drag it beneath your frame paper layer. Duplicate the berries. Go to image > mirror. Duplicate the mirrored berries. Go to image > flip. Duplicate the flipped berries. Go to image > mirror. Arrange them as in my tag above.
Highlight your top beaded twisted rope layer. Open up the sequin bead tree from the kit. Resize by 25%, smartsize. Apply unsharp mask, same settings as before. Copy and paste as a new layer onto your canvas. Give it a drop shadow of H and V 0, Opacity 50, Blur 7.00. Position it next to the left side of the scalloped frame. Duplicate the tree. Go to image > mirror. Position the duplicated tree next to the right side of the frame.
Open up the gift box ornament 2 from the kit. Resize by 15%, smartsize. Copy and paste as a new layer onto your canvas. Give it a drop shadow of H 0, V 2, Opacity 45, Blur 5.00. Position it in front of the left tree. Duplicate. Go to image > mirror.
Open up gift box ornament 1 from the kit. Resize by 12%, smartsize. Copy and paste as a new layer onto your canvas. Give it a drop shadow of H and V 0, Opacity 45, Blur 5.00. Position it in front of the left gift box ornament 2, towards the right. Duplicate. Go to image > mirror. (see my tag for reference)
Open up the ice skate ornament from the kit. Resize by 10%, smartsize. Go to adjust > sharpen. Copy and paste as a new layer onto your canvas. Give it a drop shadow of H and V 0, Opacity 55, Blur 6.00. Position it at the left bottom corner of the rectangle. Give it a drop shadow of H -2, V 1, Opacity 45, Blur 4.00. Duplicate. Go to image > mirror. The duplicated skate should be positioned at the bottom right corner of the rectangle.
Open up a ribbon bow from the kit. Resize by 20%, smartsize. Copy and paste as a new layer onto your canvas. Give it a drop shadow of H -1, V 0, Opacity 40, Blur 2.00. Position it at the top of the left ice skate. Duplicate. Go to image > mirror. Position it at the top of the right ice skate.
Highlight your top layer. Open up the beautiful arrangement from the kit. Resize by 15%, smartsize. Apply unsharp mask, same settings as before. Copy and paste as a new layer onto your canvas. Give it a drop shadow of H -2, V 1, Opacity 45, Blur 5.00. Position it at the bottom left of the scalloped frame. Duplicate. Go to image > mirror. (see my tag for reference)
Open up ribbon 1 from the kit. Resize by 25%, smartsize. Copy and paste as a new layer onto your canvas. Give it a drop shadow of H -2, V -1, Opacity 50, Blur 4.00. Duplicate the ribbon. Go to image > mirror. Arrange the ribbons as in my tag above.
Add any other embellishments of your choosing.
Resize all your layers by 85%, bicubic.
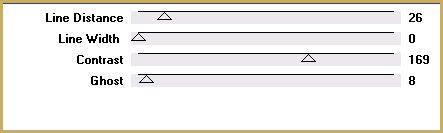
Hide your white background. Copy merged. Highlight and unhide your white background. Paste as a new layer onto your canvas. Center the copy merged layer behind your other layers. Go to adjust > blur > gaussian blur 20.00. Apply Unplugged Tools - Interlace with the following settings:
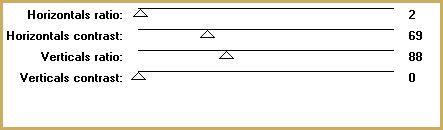
Now apply Penta - VTR2 with the following settings:
Add a new raster layer to your working image. This layer should be above your blurred layer. Open up the glitter pattern. Minimize it. Go to your materials palette and click on patterns. Find the glitter pattern in your drop down menu. Angle should be set to 0, Size - 100. Floodfill your new layer with the glitter pattern.
Apply UF Mask 45 with the following settings:
Fit to Canvas
Source Luminance
Hide all Mask
Delete the mask from your layer palette, answer yes to the pop up box, and merge the group. Resize the mask layer by 85%, smartsize. Give it a drop shadow of H -2, V -1, Opacity 30, Blur 2.00. Now give it a drop shadow of H 1. V 2, Opacity 20, Blur 2.00.
Open up the Baby it's cold outside word art. Highlight your top layer. Copy and paste the word art as a new layer onto your canvas. Position the word art at the top of your tag as in my tag above.
Add your copyright info, watermark and whatever text you like. If you wish the text to match the word art, make the glitter pattern your background, foreground white. Use Harrington as your font, stroke width set at 1.00.
If you are not animating, save as JPG or PNG.
If you are animating, Hide all of your layers EXCEPT for your white background, blurred interlace layer, and your rectangle layer. Merge the visible layers together. This is what you should have:
Open up Animation Shop. Copy and paste this as a new animation in Animation Shop. Duplicate until you have a total of 10 frames. Select all frames (CTRL+A).
Open up the snow animation. Select all frames (CTRL+A). Copy. Highlight your tag animation. Go to edit > paste into selected frame. Arrange the snow over the rectangle. Right click to position the snow.
Back to Paint Shop Pro. Hide your merged layer. Unhide all of your other layers. Merge your visible layers. Copy. Paste as a new animation in AS. Duplicate until you have a total of 10 frames. Select all frames. Copy. Highlight the misted trees with snow animation. Select all frames (CTRL+A). Go to edit > paste into selection. Arrange the new animation over your misted trees animation. Right click to position.
If you wish to can resize your tag smaller in AS.
Optmize and save as gif.
I hope you enjoyed this tutorial! If you have any questions, just give me a shout!
Subscribe to:
Post Comments (Atom)
0 comments:
Post a Comment