Tuesday, May 3, 2011
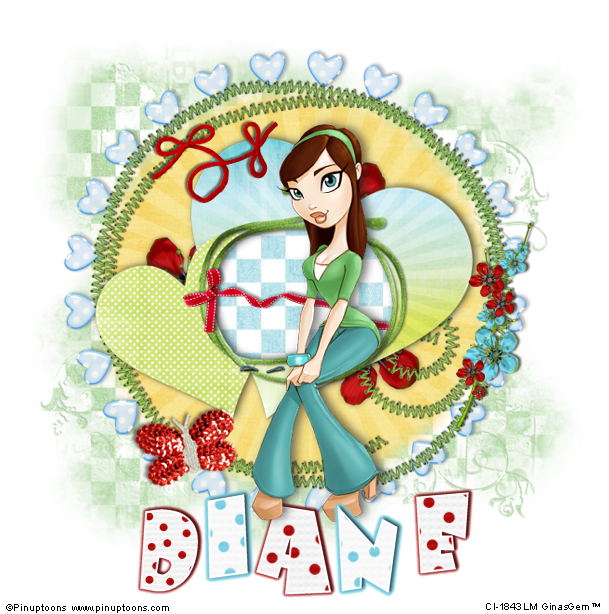
 Playful
This tutorial was written by me on 14 June 2009. Any similarities to other tutorials is purely coincidental.
Supplies Needed:
Tube of choice. I am using the awesome artwork of Rion Vernon (Pinuptoons). This tube was purchased when CILM was still open. You can now find his artwork at CDO.
Scrapkit. I used Playful by Candy's Treats. If you wish to purchase this fantastic kit, you can here. Thank you, Diane!!
Mask by Endless Deep
Font of choice. I used Baby Kruffy which you can download here.
Plugins:
Eyecandy 4000 - Gradient Glow
Supplies HERE
~*~*~*~*~*~*~*~*~*~*~*~*~*~*~*~*~*~*~*~*~*~*~*~*~*~*~*~*~*~*~*~*~*~*~*~*
Ok! Let's get started! Open up a new transparent image 700 x 700. Floodfill with white.
Open up the stiched circle from the kit. Copy and paste as a new layer onto your canvas. Grab your preset shape tool, ellipse - circle. Draw out a circle that fits in the center of the stiched circle. On your layer palette, convert the circle to a raster layer. Grab your magic wand too, tolerance set at 100, feather set at 15. Click on the circle so that there are marching ants all around it. Open up a paper from the kit. Resize by 85%, smartsize. Copy and paste as a new layer onto your canvas. Go to selections > invert. Hit delete on your keyboard 5 -10 times. Deselect. (CTRL+D). Delete the circle shape layer. Highlight the stitched circle. Drag it to the top of your layer palette and give it a drop shadow of H 2, V -1, Opacity 70, Blur 3.00.
Open up clear hearts of choice from the kit. Highlight your white background. Copy and paste the hearts as a new layer onto your canvas. Give the layer a drop shadow of H 3, V 0, Opacity 35, Blur 4.00. Center it behind your stiched circle.
Open up a blossom from the kit. Resize by 40%, smartsize. Copy and paste as a new layer onto your canvas. Give it a drop shadow of H and V 0, Opacity 65, Blur 7.00. Duplicate the blossom Go to image > mirror. Duplicate the mirrored blossom. Go to image > flip. Position the 3 flowers in a rough circle inside the stitched circle.
Open up a Heart Frame from the kit. Resize by 70%, smartsize. Copy and paste as a new layer onto your canvas. Position it in the center of the stitched circle, so that the blossoms are peeking out from behind the frame. Grab your magic wand tool, tolerance set at 100, feather set at 0.00. Click inside the empty space of the frame. Go to selections > modify > expand by 6.00. Open up a paper from the kit. Resize by 85%, smartsize. Copy and paste as a new layer onto your canvas. Selections > invert. Hit delete on your keyboard and deselect. Drag the paper layer beneath your frame layer. Give the frame a drop shadow of H and V 0, Opacity 80, Blur 13.00.
Open up ribbon 1 or 2 from the kit. Resize by 50%, smartsize. Copy and paste as a new layer onto your canvas. Give it a drop shadow of H 2, V 0, Opacity 65, Blur 5.00. Go to image > mirror. Position the ribbon to your liking on the frame opening or see my tag for reference.
Open up a butterfly from the kit. Reszie by 30%, smartsize. Copy and paste as a new layer onto your canvas. Go to image > free rotate. Rotate left by 10.00, both boxes unchecked. Now go to adjust > sharpness > unsharp mask. Apply with radius - 3, strength 40, clipping 2.00. Give the butterfly a drop shadow of H and V 0, Opacity 65, Blur 6.00. Position to your liking at the bottom of the stitched circle.
Open up branches 2 from the kit. Resize by 45%, smartsize. Copy and paste as a new layer onto your canvas. Go to image > mirror. Give it a drop shadow of H 2, V -1, Opacity 65, Blur 4.00. Position on the right side of the stitched circle.
Open up string 1 from the kit. Resize by 35%, smartsize. Copy and paste as a new layer onto your canvas. Give it a drop shadow of H 0, V -2, Opacity 65, Blur 5.00. Position at the top of the stitched circle.
Add any other embellishments of your choosing.
Highlight your white background. Open up a paper from the kit. Copy and paste as a new layer onto your canvas. Apply the mask with the following settings:
Source Luminance
Fit to Canvas
Hide all mask
Delete the mask from your layer palette. Answer yes to the popup box, and merge the group. Resize your mask by 95%, smartsize. Give the mask a drop shadow of H 3, V -2, Opacity 35, Blur 5.00. Center the mask layer behind your tag.
Open up your tube. Resize as necessary, bicubic. Copy and paste as a new layer onto your canvas. Give it a drop shadow of H 4, V -3, Opacity 70, Blur 20.00. Position your tube to your liking.
Crop and resize to your liking.
Add your copyright info and your watermark.
Hide your white background and merged your visible layers.
For the text, open up 2 papers from the kit, preferebly the same paper in 2 different colors. Go to your materials palette, and set your foreground color to white. For your background color, click the pattern tab. Find your first paper of choice in the drop down menu, Angle set to 0, Size set to about 50. (you can play around with this until you find something more suited to your own tastes.
Grab your text tool, stroke width set to 2.00, Create as set to Floating. Type out the first letter of your name. Promote the selection to layer, and deselect. Repeat these steps for the 3rd letter, 5th letter, etc. All the odd numbered letters or your name, or every other letter. Each of these letters should be it's own Raster layer.
Go back to your materials pallette and change your background pattern to your second paper of choice, same settings as before. Leave your foreground as white. Grab your text tool, same settings, and type out the 2nd, 4th, 6th, etc letters of your name. All of the even numbered letters Each of these letters should be it's own layer as well.
Arrange the letters of your name to your liking. Merge all of the letters using the first paper or pattern together. Now, merge all of the letters using your second paper or pattern together.
Highlight the odd numbered letters layer. Choose a darker color that matches the layer. Apply Eyecandy 4000 - Gradient Glow to this layer with the following settings:
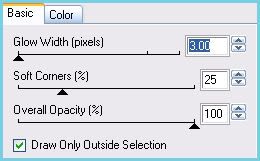
If you like, you can repeat the gradient glow. Give the layer a drop shadow of H 3, V 1, Opacity 70, Blur 5.00.
Highlight the even numbered letters layer. Choose a darker color that matches the layer. Apply Gradient Glow, same settings, using your color of choice. Give the layer a drop shadow of H 3, V 1, Opacity 5.00.
Save as JPG or PNG.
I hope you enjoyed this tutorial! If you have any questions, just give me a shout.
Subscribe to:
Post Comments (Atom)
0 comments:
Post a Comment