Tuesday, May 3, 2011
 Peaches and Cream
This tutorial was written by me on 24 June 2009. Any similarities to other tutorials is purely coincidental.
Supplies Needed:
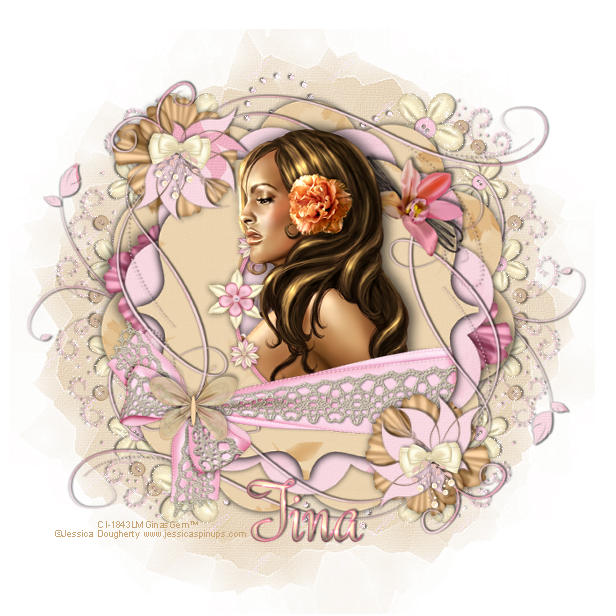
Tube of choice. I am using the beautiful artwork of Jessica Dougherty. This tube was purchased when CILM was still open. You can now find her artwork at CDO.
Scrapkit. I am using the exquisite kit, Vanilla by Tina's Magical World. If you would like to purchase this kit, you can here. Thank you, Tina!!
Template 173 made by me. You will find it here.
Mask 109 by Vix. Check out her site for awesome tuts and resources!
Font of choice. I used Roselyn which you can get here.
Plugins:
Xenofex 2 - Constellation
Supplies HERE
*~*~*~*~*~*~*~*~*~*~*~*~*~*~*~*~*~*~*~*~*~*~*~*~*~*~*~*~*~*~*~*~*~*~*~*~
OK! Let's get started. Open up my template. Duplicate by holding down shift + d. Close the original. Delete the credit info layer.
Highlight the leaf swirls layer. Go to selections > select all. Selections > float. Selections > defloat. Open up a paper from the kit. Copy and paste as a new layer onto your canvas. Go to selections > invert. Hit delete on your keyboard. Deselect (CTRL+D). Give the layer a drop shadow of H 2, V-1, Opacity 60, Blur 2.00. Delete the black leaf swirls layer.
Highlight the flower swirls layer. Select, float and defloat. Copy and paste the same paper you just used onto your canvas. (it should still be on your clipboard). Selections > invert. Hit delete and deselect. Give the layer a drop shadow of H -2, V 1, Opacity 60, Blur 3.00. Delete the black flower swirls layer.
Highlight the large scalloped circle layer. Select, float and defloat. Open up a paper from the kit. Resize by 70%, smartsize. Copy and paste as a new layer onto your canvas. Selections > invert. Hit delete. Deselect. Give the layer a drop shadow of H and V 0, Opacity 75, Blur 12.00. Delete the gray large scalloped circle layer.
Highlight the smaller scalloped circle layer. Select, float and defloat. Open up a paper from the kit. Resize by 70%, smartsize. Copy and paste as a new layer onto your canvas. Selections > invert. Hit delete and deselect. Give the layer a drop shadow of H and V 0, Opacity 75, Blur 9.00. Delete the white smaller scalloped circle layer.
Highlight the oval fill layer. Select, float and defloat. Open up a paper from the kit. Resize by 65%, smartsize. Copy and paste as a new layer onto your canvas. Selections > invert. Hit delete. Deselect. Delete the black oval fill layer.
Highlight the bracket layer. Select, float and defloat. Open up a paper from the kit. Resize by 65%, smartsize. Copy and paste as a new layer onto your canvas. Selections > invert. Hit delete and deselect. Give the layer a drop shadow of H and V 0, Opacity 80, Blur 10.00. Delete the gray bracket layer.
Open up your tube. Resize as necessary, bicubic. Copy and paste as a new layer onto your canvas. Give it a drop shadow of H 5, V -3, Opacity 35, Blur 13.00. Position the tube to your liking. Duplicate your tube. Drag the top tube layer above your flower swirl layer. Highlight the oval fill layer. Select, float and defloat. Hide your top tube layer and highlight your bottom tube layer. Grab your eraser tool, size set to 35, opacity set to 100. Carefully erase the parts of the tube you don't want hanging over the frame. Deselect. Highlight the top tube layer and do the same.
Open up a lace bow from the kit. Resize by 68%, smartsize. Copy and paste as a new layer onto your canvas. Position at the the bottom of the oval frame. Give it a drop shadow of H and V 0, Oapcity 65, Blur 7.00. Highlight your bracket layer. Select, float and defloat. Selections > invert. Highlight the lace bow layer. Grab your eraser tool,s ame settings as before. Carefully erase the parts of the bow you don't want hanging over the bracket. The bow should be below your flower swirl layer.
Open up a vanillabagle from the kit. Resize by 25%, smartsize. Copy and paste as a new layer onto your canvas. Go to image > free rotate. Rotate right by 45.00, both boxes unchecked. Go to adjust > sharpen > unsharp mask. Apply with a radius of 5, strength 25, clipping 1. Give it a drop shadow of H and V -2, Opacity 65, Blur 7.00. Position at the top right corner of the bracket.
Open up flower 8 from the kit. Resize by 35%, smartsize. Copy and paste as a new layer onto your canvas. Give it a drops hadow of H and V 0, Opacity 60, Blur 8.00. Arrange the flower at the top right of the top flower swirl. Drag the flower beneath the flower swirl layer. (see my tag for reference) Duplicate the flower. Go to image > mirror. Then, image > flip.
Open up flower 7 from the kit. Resize by 40%, smartsize. Copy and paste as a new layer onto your canvas. Give it a drop shadow of H and V 0, opacity 55, Blur 10.00. Arrange the flower between the 2 scalloped circles so it is peeking out at the right side. (see my tag for reference) Duplicate. Go to image > mirror. Then, image > flip.
Open up the sweet flowers from the kit. Resize onoe of them by 15%, smartsize, and the other by 10. Copy and paste as a new layers onto your canvas. Give them both a drop shadow of H and V 0, Opacity 55, Blur 6.00. Duplicate the smaller one. Arrange them to your liking ont he oval frame.
Open up a butterfly from the kit. Resize by 20%, smartsize. Copy and paste as a new layer onto your canvas. Give it a drop shadow of H 2, V 0, Opacity 45, Blur 5.00. Position on the knot of the lace bow.
Open up an ornamental flowre from the kit. Resize by 15%, smartsize. Copy and paste as a new layer onto your canvas. Give it a drop shadow of H and V 0, Opacity 55, Blur 5.00. Duplicate. Go to image > mirror. Arrange to your liking ont he flower swirls.
Open up a flower string from the kit. Resize by 45%, smartsize. Copy and paste as a new layer onto your canvas. Give it a drop shadow of H -2. V 1, Opacity 60, Blur 2.00. Position it at the bottom right of our tag. Duplicate the flower string. Go to image > mirror. Duplicate the mirrored flower string. Go to image > flip. Duplicate the flipped flower string. Go to image > mirror.
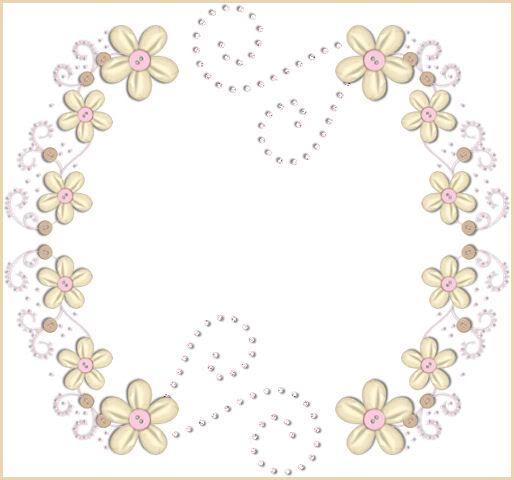
Open up diamond doodle 1 or 2 from the kit. Resize by 45%, smartsize. Go to adjust > sharpen. Copy and paste as a new layer onto your canvas. Give it a drop shadow of H -2, V -2, Opacity 60, Blur 2.00. Position it at top, in between where the flower strings meet. Duplicate it. Go to image > mirror. Then, image > flip. Merge the 4 flower string layers, and the 2 diamond doodle layers together. They should look like this:
Drag the merged layer below all of your other layers to right above your white background.
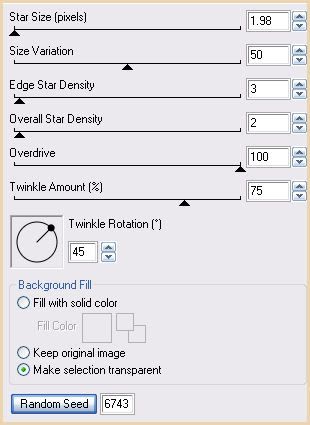
Duplicate the merged layer. On the top layer, apply Xenofex Constellation with the following settings:
Add any other embellishments of your choosing.
Highlight your white background. Open up a paper from the kit. Copy and paste onto your canvas as a new layer. Apply Vix Mask 109 with the following settings:
Source Luminance
Fit to Canvas
Hide all Mask
Delete the mask, answer yes and merge the group. Resize the mask by 95%, smartsize. If you like, you can duplicate the mask so it shows more.
Crop and resize to your liking.
Add your copyright info, watermark and your text.
Save as JPG or PNG.
I hope you enjoyed this tutorial! If you have any questions, just give me a shout.
Subscribe to:
Post Comments (Atom)
0 comments:
Post a Comment