Tuesday, May 3, 2011
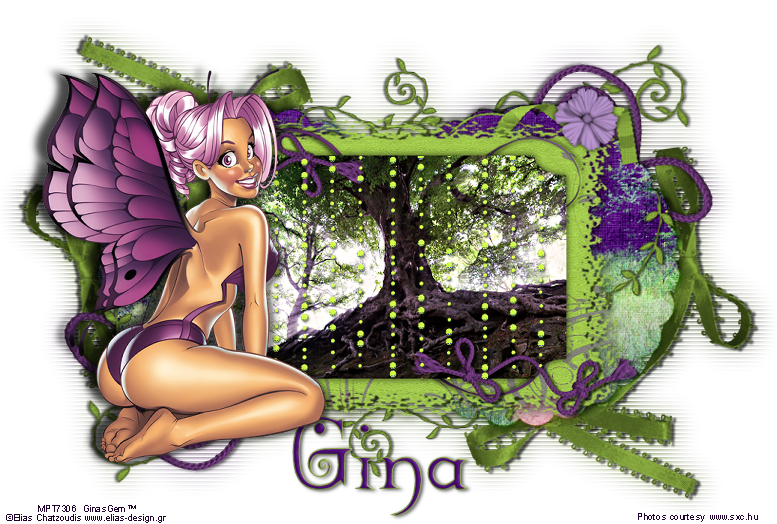
 Fairy Lights
This tutorial was written by me on 29 June 2009. Any similarities to other tutorials is purely coincidental.
Supplies Needed:
Tube of choice. I am using the awesome work of Elias Chatzoudis. I purchased this tube when he was still with MPT. You can now purchase his artwork at PSP Tubes Emporium.
Scrapkit. I am using the lovely kit Charming by Crazy Cakes Scraps. If you would like to purchase this pretty kit, you can here. Thank you, Caitlyn!!
Template 174 made by me. You can find it here.
2 forest images or photos of choice. I got mine from Stock Photo Exchange.
Font of choice. I used Mexacali font. You can download it here.
No outside filters or other supplies needed
*~*~*~*~*~*~*~*~*~*~*~*~*~*~*~*~*~*~*~*~*~*~*~*~*~*~*~*~*~*~*~*~*~*~
OK! Let's get started! Open up my template. Duplicate by holding down shift + d. Close the original. Delete the credit info layer.
Highlight the scalloped circle 1 layer. Go to selections > select all. Selections > float. Selections > defloat. Open up a paper from the kit. Resize by 50%, smartsize. Copy and paste as a new layer onto your canvas. Go to selections > invert. Hit delete. Don't deselect yet!
Open up your first image/photo of choice. Resize so it fits over BOTH scalloped circles. Copy and paste as a new layer onto your canvas. Position to your liking within the selection. Duplicate the photo. Hide the top photo layer and drag it above your scalloped circle 2 layer. Highlight your unhidden and bottom photo layer. Hit delete. Deselect. Change the blend mode of the photo layer to Overlay. Highlight the paper scalloped circle 1 layer and give it a drop shadow of H and V 0, Opacity 70, Blur 12.00. Delete the black scalloped circle 1 layer.
Highlight the scalloped circle 2 layer. Select, float and defloat. Open up the same paper you used for the first scalloped circle. Resize, 50%, smartsize. Copy and paste as a new layer onto your canvas. Position to your liking within the selection. Selections > invert. Hit delete. Don't deselect yet.
Unhide the hidden photo layer. Hit delete. Deselect. Change the blend mode of the photo layer to Overlay. Highlight the paper scalloped circle 2 layer. Give it a drop shadow of H and V 0, Opacity 70, Blur 12.00. Delete the black scalloped circle 2 layer.
Highlight the grunge rectangle layer. Select, float and defloat. Open up a paper from the kit. Resize by 50%, smartsize. Copy and paste as a new layer onto your canvas. Selections > invert. Hit delete on your keyboard. Deselect. Give the layer a drop shadow of H and V 0, Oapcity 70, Blur 10.00. Delete the gray grunge rectangle.
Highlight the clipped rectangle layer. Select, float and defloat. Open up a paper from the kit. Resize by 50%, smartsize. Copy and paste as a new layer onto your canvas. Selections > invert. Hit delete. Don't deselect.
Open up your second photo or image of choice. Resize as necessary, to fit into the selection. Copy and paste as a new layer onto your canvas. Position to your liking within the selection. Hit delete. Don't deselect yet!
Open up a glitter rain from the kit. Resize by 50%, smartsize. Go to adjust > sharpen > sharpen. Copy and paste as a new layer onto your canvas. Position to your liking within the selection. Hit delete. Deselect. Give the glitter rain a drop shadow of H 2, V 0, Opaciyt 65, Blur 2.00.
Highlight the photo layer. Change the blend mode of the photo to Hard Light. Go to adjust > sharpness > unsharp mask. Apply with radius - 5, strength - 25, clipping 1.00.
Highlight the paper clipped rectangle. Give it a drop shadow of H and V 0, Opacity 70, Blur 10.00.
Highlight your white background. Open up a round ribboned frame from the kit. Resize by 70%, smartsize. Copy and paste as a new layer onto your canvas. Give it a drop shadow of H -3, V 0, Oapcity 65, Blur 6.00. Position it behind the left scalloped circle. Duplicate. Go to image > mirror. Then, image > flip. Position the duplicated frame behind the right scalloped frame.
Open up the ivy from the kit. Resize by 65%, smartsize. Copy and paste as a new layer onto your canvas. Go to image > free rotate. Rotate right by 25.00, both boxes unchecked. Give it a drop shadow of H 2, V -1, Oapcity 60, Blur 4.00. Duplicate. Go to image > mirror. Then, image > flip. Position them to your liking behind the ribbon frames.
Open up the ivy again. Resize by 50%, smartsize. Copy and paste onto your canvas. Give it a drop shadow of H -2, V 1, Opacity 60, Blur 4.00. Duplicate. Go to image > mirror. Then, image > flip. Position them to your liking.
Open up string 7 from the kit. Resize by 35%, smartsize. Copy and paste as a new layer onto your canvas. Give it a drop shadow of H 3, V 0, Opacity 65, Blur 4.00. Position to the top of the tag behind the right ribbon frame. Duplicate. Go to image > mirror. Then, image > flip.
Open up a ribbon from the kit. Resize b 35%, smartsize. Copy and paste as a new layer onto your canvas. Give it a drop shadow of H and V 0, Opacity 65, Blur 7.00. Position it at the top of the right scalloped circle. Duplicate. Go to image > mirror. Then, image > flip. Position the duplicated ribbon at the bottom of the left scalloped circle.
Open up a flower from the kit. Resize by 15%, smartsize. Copy and paste as a new layer onto your canvas. Give it a drop shadow of H and V 0, Opacity 65, Blur 7.00. Duplicate. Go to image > mirror. Position them to your liking on the scalloped circles.
Highlight your grunge rectangle layer. Open up a ribbon from the kit. Resize by 50%, smartsize. Copy and paste onto your canvas. Give it a drop shadow of H -2, V 0, Oapcity 65, Blur 3.00 Duplicate. Go to image > mirror. Then, image > flip. Position them to your liking between te grunge rectangle and the clipped rectangle.
Highlight your top layer. Open string 6 from the kit. Resize by 15%, smartsize. Copy and paste onto your canvas. Give it a drop shadow of H -2, V 0, Opacity 50, Blur 3.00. Duplicate. Go to image > mirror. Then, image > flip. Position them to your liking on the top photo.
Add any other embellishments of your choosing.
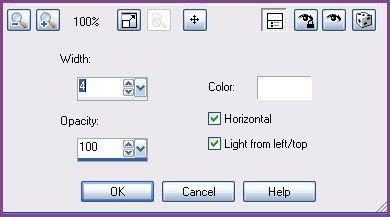
Hide your white background and merge your visible layers. Duplicate the merged layer. On the bottom layer, go to adjust > blur > gaussian blur. Apply with a radius of 10.00. Go to effects > texture effects > blinds and apply with the following settings;
Open up your tube. Resize as necessary, bicubic. Copy and paste as a new layer onto your canvas. Give it a drop shadow of H -9, V -4, Opacity 65, Blur 12.00. Now give it a drop shadow of H 4, V 2, Opacity 35, Blur 8.00. Arrange the tube to your liking.
Crop and resize to your liking.
Add yoru copyright info, watermark and your text.
Save as JPG or PNG.
I hope you enjoyed this tutorial! If you have any questions, give me a shout.
Subscribe to:
Post Comments (Atom)
0 comments:
Post a Comment