Tuesday, May 3, 2011
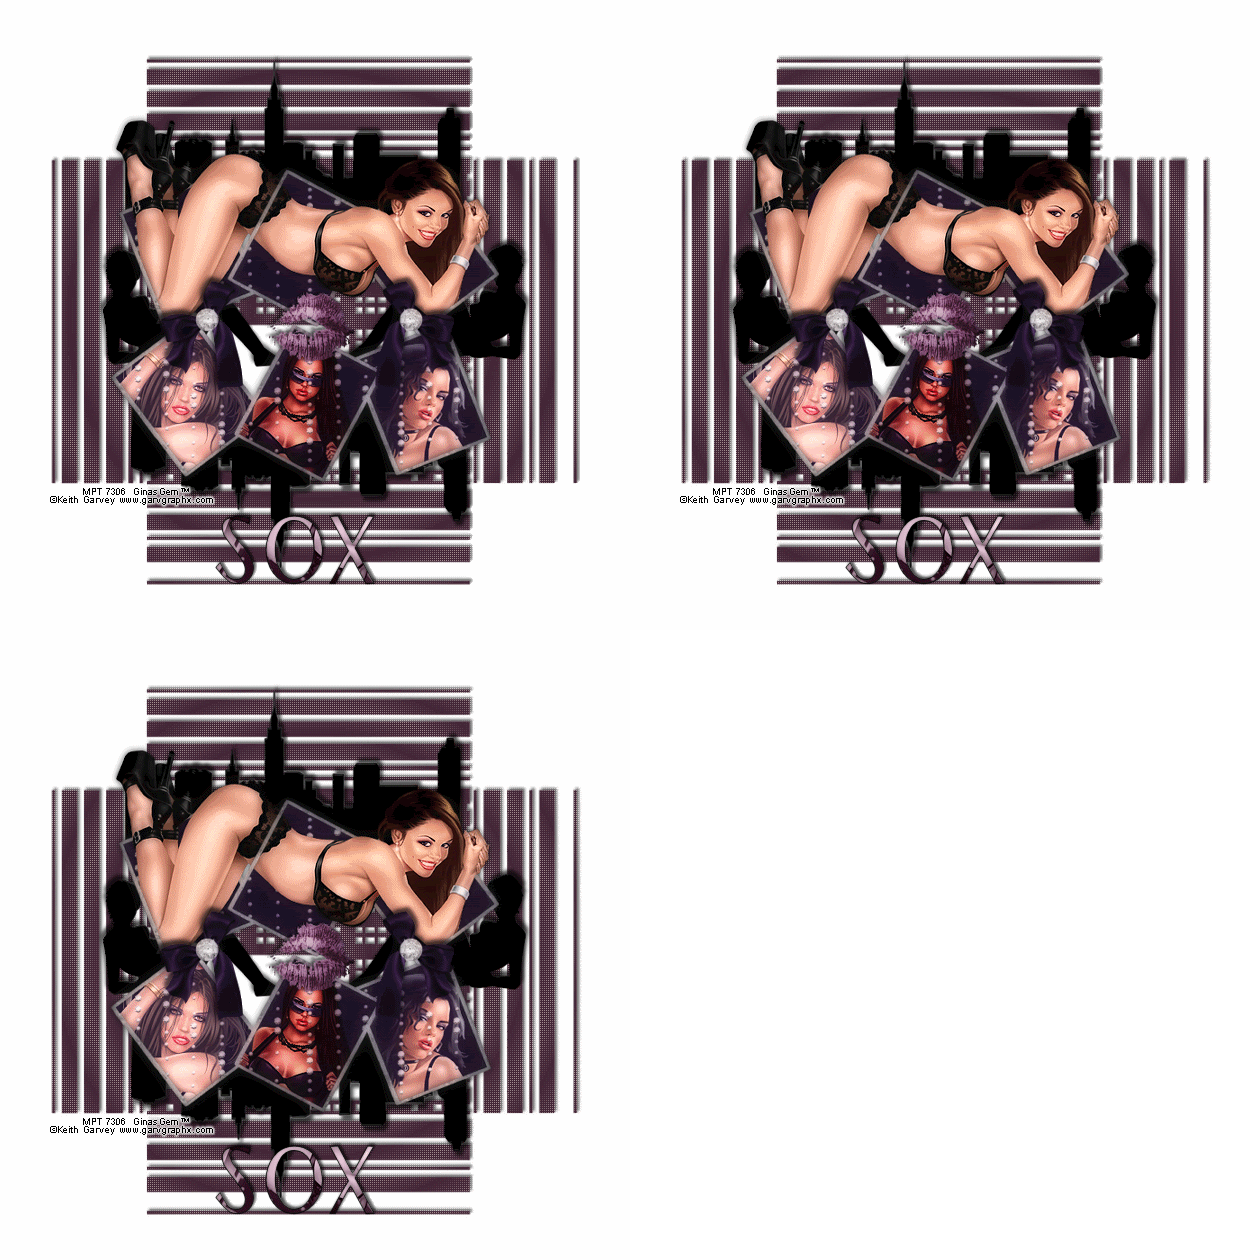
 City Girls

This tutorial was written by me on 16 June 2009. Any similarities to other tutorials is purely coincidental.
Supplies Needed:
4 tubes of choice. I am using the sexy artwork of Keith Garvey. I purchased these when he was still with MPT. You can now get his artwork at PSP Tubes Emporium.
Scrapkit. I am using the awesome kit, Sex in the City by Soxsational Scraps. If you would like to purchase this kit, you can here. Thank you, Tracey!!
Mask 347 by Vix. Check out her site for awesome tuts and resources!!
Font of choice. I used New York. (pay font)
Plugins:
Xero Filters - Soft Mood XL and Soft Vignette
Animation Shop (opt)
Supplies HERE
*~*~*~*~*~*~*~*~*~*~*~*~*~*~*~*~*~*~*~*~*~*~*~*~*~*~*~*~*~*~*~*~*~*~*~
Ok! Let's get started! Open up a new transparent image 700 x 700. Floodfill with white.
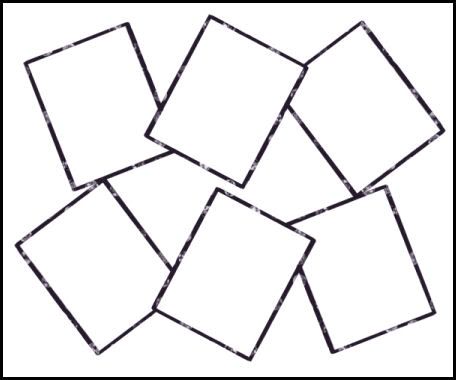
Open up Frame 1 from the kit. Resize by75%, smartsize. Copy and paste as a new layer onto your canvas. Go to image > free rotate. Rotate right by 90.00, both boxes unchecked. Duplicate the frame. Go to image > mirror. Then, image > flip. Arrange the frames like this:

Hide your white background and merge your 2 frame layers together. Higlight your merged frame layer and grab your magic wand tool, tolerance set at 8, feather set at 0.00. Click inside all 6 of the empty spaces of the merged frames layer. Go to selections > modify > expand by 3.00. Open up a paper of choice from the kit. (a solid colored paper will work best). Resize by 70%, smartsize. Copy and paste as a new layer onto your canvas. Selections > invert. Hit delete. Don't deselect yet!
Open up the bling bling from the kit. Resize by 70%, smartsize. Go to adjust > sharpen. Copy and paste as a new layer onto your canvas. Position the bling to your liking within the selection. Hit delete. Deselect. Drag your frame layer to the top of your layer palette.
Open up your main tube of choice. Resize as necessary, bicubic. Copy and paste as a new layer onto your canvas. Position your tube to your liking within the top frames. Give your tube a drop shadow of H and V 0, Oapcity 45, Blur 10.00. Duplicate your tube. Drag the bottom tube layer beneath your frame layer. The top tube layer should be right above your frame layer. Highlight your bottom tube layer. Grab your eraser tool, size 20, opacity 100. Highlight your paper layer. Select, float and defloat. Selections > invert. Hide your top tube layer and highlight your bottom tube layer. Carefully erase the parts of the tube you don't want hanging out of the frames. Deselect. Highlight your top tube layer and carefull erase parts of the tube that are over the frame so it looks as if your tube is intertwined within the frames. (see my tag for reference) Highlight your frame layer and give it a drop shadow of H and V 0, Opacity 80, Blur 10.00.
Highlight your paper layer. Grab your freehand selection, type point to point, feather set at 0.00. Carefully select around the left rectangle. Open up your second tube of choice. Resize, bicubic, to fit within the rectangle. Copy and paste as a new layer onto your canvas. Position to your liking within the selection. Selections > invert. Hit delete and deselect. Change the blend mode of the tube to Overlay. Give the tube a drop shadow of H and V o, Opacity 70, Blur 4.00.
Grab your freehand selection tool again, same settings and select around the middle rectangle. Open up your third tube of choice. Resize, bicubic, as necessary. Copy and paste onto your canvas. Position to your liking within the selection. Selections > invert. Hit delete. Deselect. Change the blend mode to Hard Light. Give the tube a drop shadow of H and V 0, Opacity 70, Blur 4.00.
Grab your freehand selection tool again, same setting,s and select around the right rectangle. Open up your fourth tube of choice. Resize, bicubic, as necessary. Copy and paste onto your canvas. Position to your liking within the selection. Selections > invert. Hit delete on your keyboard. Deselect. Change the blend mode of the tube to Overlay Give the tube a drop shadow of H and V 0, Opacity 70, Blur 4.00. All of your smaller tube layers should be below your frame layer.
Open up skyline 3 from the kit. Resize by 65%, smartsize. Copy and paste as a new layer onto your canvas. Give it a drop shadow of H 4, V -4, Opacity 70, Blur 6.00. Position at the top of your canvas and drag the layer so it is right above your white background. Duplicate the skyline. Go to image > mirror. then image > flip. Position as in my tag above.
Open up lady 2 from the kit. Resize by 35%, smartsize. Copy and paste as a new layer onto your canvas. Give it a drops hadow of H 3, V -2, oapcity 65, Blur 6.00. Duplicate. Go to image > mirror. Position them as in my tag above.
Highlight your top layer. Open up a bow from the kit. Resize by 30%, smartsize. Copy and paste as a new layer otn oyour canvas. Give it a drop shadow of H 2, V -1, opacity 55, Blur 5.00. Duplicate the bow. Go to image > mirror. Position the bows to your liking on the frame.
Open up lips of choice from the kit. Resize by 25%, smartsize. Copy and paste as a new layer onto your canvas. Give them a drop shadow of H and V 0, opacity 60, Blkyur 6.00. Position in the center of your tag.
Add any other embellishments of your choosing.
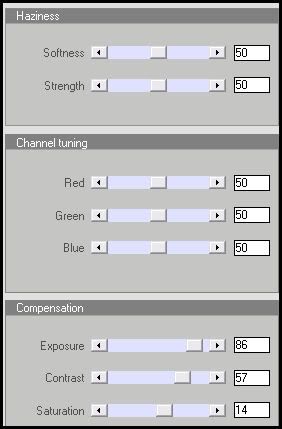
Hide your white background and merge your visible layers. Apply Xero - Soft Mood XL with the following settings:

Go to adjust > sharpness > unsharp mask. Apply with radius set to 5, strength 35, and clipping 1.
Highlight your white background. Choose a medium dark color that matches your tag. Add a new raster layer. Floodfill the new layer with your chosen color. Apply ixs Mask 347 with the following settings:
Source Luminance
Fit to Canvas
Hide all Mask
Delete the mask from your layer palette, answer yes to the popup box and merge the group. Give the mask a drop shadow of H 3, V -2, Opacity 65, Blur 6.00.
Crop and resize to your liking.
Add your copyright info, watermark and your text. If you are not animating, save as JPG or PNG.
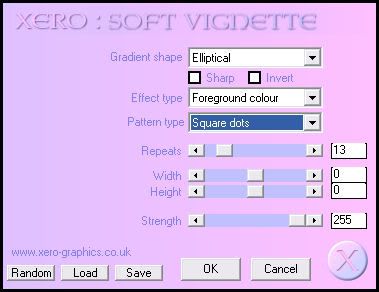
If you are animating, highlight your mask layer. Choose a light color that matches your tag, and make it your foreground color. Apply Xero Soft Vignette with the following settings:

Copy merged. Open up Animation Shop. Paste as a new animation in AS.
Back in Paint Shop Pro. Go to edit > undo Soft Vignette. Apply the filter again, but change repeats to 14. Copy merged and paste after frame 1 in AS.
In Paint Shop, edit > undo. Apply Soft Vignette again, but change repeats to 15. Copy merged and paste after frame 2 in AS.
In Animation Shop, select all frames (CTRL+A). Change the frame properties to 16.
Optimize and save as gif. I hope you enjoyed this tutorial! If you have any questions, just give me a shout.
Subscribe to:
Post Comments (Atom)
ANNA MARINE
- Bright Eyes (1)
ELIAS CHATZOUDIS TUTORIALS
- Burning Love (1)
- Dreams Come True (1)
- Faces of Elias (1)
- Fairy Blossom (1)
- Fairy Lights (1)
- Give Thanks (1)
- Kiss Collector (1)
- Lost in Love (1)
- Sexy Naughty Babe (1)
- Show the Way (1)
- Simply Beautiful (1)
- Spring Fling (1)
- Sweet Valentine (1)
EMERALD de LEEUW TUTORIALS
- Christmas Magic (1)
- Guardian of the Forest (1)
- Snow Queen (1)
GENNADIY KOUFAY TUTORIALS
- Blonde Beauty (1)
- Heavenly Bodies (1)
- It's a Jungle Out There (1)
- Sensual Kiss (1)
GORJUSS TUTORIALS
- Close Your Eyes Gorjuss (1)
- Eternally Alone (1)
- Fading Autumn Sun (1)
- Gorjuss Christmas (1)
- Gorjuss Cloudy Day (1)
- Gorjuss Twinkle (1)
- Holiday Sweet Treats (1)
- Snow Buddies (1)
- Snow Falls (1)
- Spring Kisses (1)
- Strawberry Garden (1)
- Sugar and Spice (1)
- Winter Blessings (1)
- Winter Time (1)
ISMAEL RAC TUTORIALS
- All About Attitude (1)
- Apple Pie (1)
- Baby it's Warm Inside (1)
- Cheeky Diva (1)
- Christmas Wish Kiss (1)
- Do I Dazzle You (1)
- Feel the Music Forum Style (1)
- Glitz (1)
- Polka Dots (1)
- Rock Chic Gal (1)
- Rock Revolution (1)
- Thru My Window (1)
- Vivid Rac (1)
- Wickedly Sexy (1)
- You Know You Wanna (1)
JAMIE KIDD TUTORIALS
- Live Out Loud (1)
- Sugar Lips (1)
JENNIFER JANESKO TUTORIALS
- Addictive Pleasure (1)
- Angelic (1)
- Beautify (1)
- Bring Me to Life (1)
- Cowgirl Kisses (1)
- Delightful (1)
- Elegant Green (1)
- Forces of Nature (1)
- Golden New Year (1)
- Gossamer Beauty (1)
- Gossamer Lotus (1)
- It's Gold Outside (1)
- Peace Love Happiness (1)
- Pink Party (1)
- Porcelain (1)
- Reflected Dreams (1)
- Rustic Beauty (1)
- Seduction (1)
- Starry Eyed (1)
- Storybook Romance (1)
- Sweet Snow Flowers (1)
- Time after Time (1)
- Timeless Beauty (1)
- Twilight (1)
- Twisted Diva (1)
- Valentine Bling (1)
- Vintage Autumn (1)
- Wedding Gaze (1)
- Winter Angel (1)
- Winter Beauty (1)
JESSICA DOUGHERTY TUTORIALS
- Autumn (1)
- Beached (1)
- Blue Angel (1)
- Brrrr (1)
- Cloud Nine (1)
- Earthly Delights (1)
- Moonlit Fae (1)
- Peaches and Cream (1)
- Snow Bunny (1)
- Snow Sexy (1)
- Unwrap Me (1)
- Vintage Dreams (1)
JOSE CANO TUTORIALS
- American Babe (1)
- Bad Thing (1)
- Graffiti (1)
- Summer Fun (1)
- Summer Heat (1)
KEITH GARVEY TUTORIALS
- Be Mine Valentine (1)
- Beautiful Sexy Fun (1)
- Butterfly Song (1)
- Can U See Me (1)
- City Girls (1)
- Damn Sexy (1)
- Dazzling Bettie (1)
- Eternal Style (1)
- Flirty Girly Princess (1)
- Garv Girls are Sexy (1)
- Garv's Girl Garden (1)
- Girly Crush (1)
- Here Comes Trouble (1)
- Huggable (1)
- Irish Pride (1)
- Kiss Me (1)
- Lonely Cupid (1)
- Love Softly (1)
- Pouty Christmas (1)
- Purrrfect (1)
- Sexilicious Toon (1)
- Sexy Devil (1)
- Shamrock Frenzy (1)
- Shy Girl (1)
- Spooky Starry Night (1)
- Stop Dreaming (1)
- Sweet Beauty (1)
- Toxic Candy (1)
- Toxic Rock (1)
MAXINE GADD TUTORIALS
- Noelle (1)
- Stocking Stuffer (1)
- Winter's Bride (1)
OLIVIA TUTORIALS
- Days Gone By (1)
- Made for You (1)
- Mermaid Princess (1)
- Total Bettie (1)
- Valentine Fae (1)
PINUPTOONS TUTORIALS
- All Girl (1)
- April Showers (1)
- Blazing Through (1)
- Brighter Days (1)
- Cutie Pie (1)
- Day Dreamer (1)
- Destined Friends (1)
- Eat Your Heart Out (1)
- Falling For Fashion (1)
- Happy Thanksgiving (1)
- I Ate the Gingerbread Man (1)
- Mele Kalikimaka (1)
- Picture Perfect (1)
- Pink Dreams (1)
- Playful (1)
- Purple Rain (1)
- Sassy (1)
- Simply Springalicious (1)
- Snowflake Season (1)
- Strawberry Delight (1)
- Sweet Tooth (1)
- Ye Olde Autumn Maiden (1)
RACHEL ANDERSON TUTORIALS
- Falling Leaves (1)
- Pixie Dreams (1)
- Winter Fae (1)
SCOTT BLAIR TUTORIALS
- Going My Way (1)
- Soldier Chic (1)
STEVE BAIER TUTORIALS
- Adore (1)
- Autumn's Gift (1)
- Love is a Gift (1)
- Waiting for Love (1)
SUZANNE RICHARDS TUTORIALS
- Beeautiful Day (1)
- Lephrechaun Kiss (1)
TED HAMMOND TUTORIALS
- City Lights (1)
- Don't Tread on Me (1)
- Welcome 2009 (1)
ZINDY NIELSEN TUTORIALS
- Angelic Ornament (1)
- Au' Naturale (1)
- Autumn Leaves (1)
- First Snow (1)
- Good Night Moon (1)
- Here Comes Winter (1)
- Intrigue (1)
- Love Fae (1)
- Make A Wish (1)
- Sweetness (1)
- Wise Snow (1)
FORUM STYLE
MISC. ARTISTS TUTORIALS
- After Dark (1)
- Always My Love (1)
- Baby Doll (1)
- Bootiful Sexy (1)
- Dark Angel (1)
- Dress Me Up (1)
- Faerie Pond (1)
- Feel the Heat (1)
- Feel the Music (1)
- Flight of the Fae (1)
- Hero (1)
- I Love my Online Friends (1)
- It's a Girl Thing (1)
- Kisses From Paris (1)
- Love and Kisses (1)
- Love to be Flirty (1)
- Luna Paradise (1)
- Oops (1)
- Oriental Mystique (1)
- Purple Geisha (1)
- Rock Princess (1)
- Sea-crets (1)
- Smell the Flowers (1)
- Snuggle Garden (1)
- Starlit Dreams (1)
- Tainted Cutie (1)
- Thorns (1)
CHRISTMAS/WINTER TUTORIALS
- All I Want (1)
- Angelic Ornament (1)
- Baby it's Warm Inside (1)
- Beautify (1)
- Blazing Through (1)
- Blue Angel (1)
- Brrrr (1)
- Christmas Magic (1)
- Christmas Wish Kiss (1)
- Curly Girly Christmas (1)
- First Snow (1)
- Graceful Skater (1)
- Here Comes Winter (1)
- Holiday Sweet Treats (1)
- I Ate the Gingerbread Man (1)
- It's Gold Outside (1)
- Mele Kalikimaka (1)
- Milk and Cookies (1)
- Naughty Girl (1)
- Nice to be Naughty (1)
- Noelle (1)
- Peace Love Happiness (1)
- Peace on Earth (1)
- Pouty Christmas (1)
- Santa Baby (1)
- Santa Stop (1)
- Santa's Girlfriend (1)
- Sexy Season (1)
- Snow Buddies (1)
- Snow Bunny (1)
- Snow Falls (1)
- Snow Queen (1)
- Snow Sexy (1)
- Snow Vixen (1)
- Snowflake Season (1)
- Stocking Stuffer (1)
- Sweet Snow Flowers (1)
- Twilight (1)
- Unwrap Me (1)
- Winter Angel (1)
- Winter Beauty (1)
- Winter Blessings (1)
- Winter Fae (1)
- Winter Frost (1)
- Winter Magic (1)
- Winter Time (1)
- Winter's Bride (1)
- Winterlicious (1)
- Wise Snow (1)
NEW YEAR'S TUTORIALS
- Golden New Year (1)
- Happy New Year (1)
- New Year Masquerade (1)
- Welcome 2009 (1)
HALLOWEEN TUTORIALS
- After Dark (1)
- Can U See Me (1)
- Sexy Witch (1)
- Spooky Starry Night (1)
THANKSGIVING/AUTUMN TUTS
- Autumn (1)
- Autumn Leaves (1)
- Autumn's Gift (1)
- Fading Autumn Sun (1)
- Falling For Fashion (1)
- Falling Leaves (1)
- Give Thanks (1)
- Happy Thanksgiving (1)
- Vintage Autumn (1)
- Ye Olde Autumn Maiden (1)
VALENTINE'S DAY TUTORIALS
- Adore (1)
- Be Mine Valentine (1)
- Burning Love (1)
- Cupcake (1)
- Huggable (1)
- Lonely Cupid (1)
- Love Fae (1)
- Marco Love (1)
- My Heart (1)
- Pink Dreams (1)
- Pink Party (1)
- Polka Dots (1)
- Show the Way (1)
- Storybook Romance (1)
- Sweet Valentine (1)
- Valentine Bling (1)
- Valentine Fae (1)
ST. PATRICKS DAY TUTORIALS
- Irish Pride (1)
- Lephrechaun Kiss (1)
- Lucky Charms (1)
- Shamrock Frenzy (1)
JULY 4/PATRIOTIC TUTORIALS
- American Babe (1)
- Apple Pie (1)
- Hero (1)
- Soldier Chic (1)
FTU SCRAP KIT TUTORIALS
- Autumn Leaves (1)
- Blazing Through (1)
- Christmas Magic (1)
- Curly Girly Christmas (1)
- Dress Me Up (1)
- It's a Girl Thing (1)
- Kisses From Paris (1)
- Polka Dots (1)
- Toxic Candy (1)
- Welcome 2009 (1)
- Winter Angel (1)
FREE SUPPLIES/NO SCRAPS
Stores I Sell For
Blog Archive
Followers
Powered by Blogger.
0 comments:
Post a Comment