Wednesday, May 4, 2011
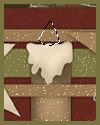
 Peace on Earth
This tutorial was written by me on 22 November 2008. Any similarities to other tutorials is purely coincidental.
Supplies Needed:
The adorable scrapkit Country Christmas by Silent Dreamer Designs, which can be purchased here.
Template 46 made by me which you can get here
Snowfall mask made by me here
Plugins:
Eyecandy 5 Nature - Fire (for animation)
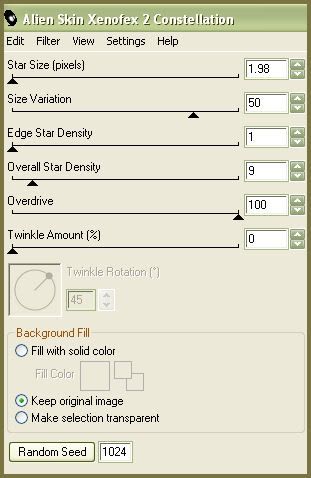
Xenofex 2 - Constellation
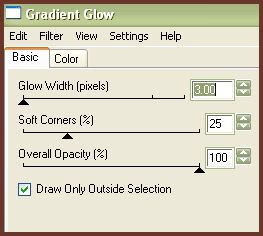
Eyecandy 4 Gradient Glow
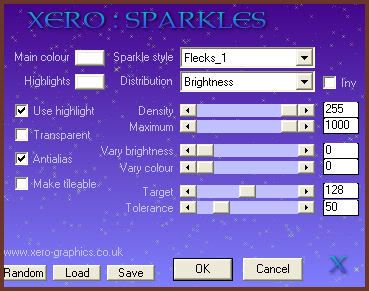
Xero Filters - Sparkle
No other supplies needed
Let's get started! Open up my template. Hold down shift + d to duplicate. Close the original. Delete the credit layer.
Highlight the rounded rectangle 1 layer. Go to selections > select all. Selections > float. Selections > defloat. Open up a paper of choice from the kit. Don't resize. Copy and paste as a new layer onto your canvas. Go to selections > invert. Hit delete on your keyboard. (CTRL+D) Give the layer a drop shadow of H and V 0, Opacity 60, Blur 8.00. Delete the gray rectangle.
Highlight the rectangle 2 layer. Repeat the above steps, using the same paper.
Highlight the circle 1 layer. Select, float and defloat. Open up a paper of choice from the kit. Resize by 68%, smartsize. Copy and paste as a new layer onto your canvas. Selections > invert. Hit delete. Deselect. Give the layer a drop shadow of H and V 0, Opacity 60, Blur 10.00. Delete the gray circle 1 layer.
Open up the gingerbread man from the kit. Resize by 50%, smartsize. Copy and paste onto your canvas. Give it a drop shadow of H and V 0, Opacity 50, Blur 5.00. Apply Gradient Glow with the following settings: (color white)
Position to your liking on the circle.
Highlight the circle 2 layer. Select, float and defloat. Open up another paper from the kit. Resize by 68%, smartsize. Copy and paste onto your canvas. Selections > invert. Hit delete. Deselect. Give the layer a drop shadow of H and V 0, Opacity 60, Blur 10.00. Delete the gray circle 2 layer.
Open up gingerbread man 2. Resize by 50%, smartsize. Copy and paste onto your canvas. Give it a drop shadow of H and V 0, Opacity 50, Blur 5.00. Apply gradient glow with the same settings as before. Position to your liking on circle 2.
Highlight the rectangle layer. Select, float and defloat. Open up a paper from the kit. Resize by 68%, smartsize. Copy and paste onto your canvas. Selections > invert. Hit delete on your keyboard. Deselect. Give the layer a drop shadow of H and V 0, Opacity 60, Blur 10.00. Delete the gray rectangle.
Highlight the top rectangle stripe layer. Select, float and defloat. Open up a paper from the kit. Resize by 68%, smartsize. Copy and paste as a new layer onto your canvas. Selections > invert. Hit delete. Deselect. Give it a drop shadow of H and V 0, Opacity 50, Blur 5.00. Delete the gray top rectangle stripe.
Highlight the bottom rectangle stripe layer, and repeat the same steps as above, using the same paper.
Highlight the middle rectangle stripe layer. Select, float and defloat. Open up another paper from the kit. Resize, 68%, smartsize. Copy and paste onto your canvas. Selections > invert. Hit delete. Deselect. Give it a drop shadow of H and V 0, Opacity 50, Blur 7.00. Delete the gray middle rectangle stripe.
Highlight the star layer. Select, float and defloat. Open up a paper of choice from the kit. Resize by 68%, smartsize. Copy and paste onto your canvas. Selections > invert. Hit delete. Deselect. Give the layer a drop shadow of H and V 0, Opacity 60, Blur 8.00. Delete the black star.
Highlight your top rectangle stripe layer. Open up a candle from the kit. Resize by 25%, smartsize. Copy and paste onto your canvas. Give the candle a drop shadow of H and V 0, Opacity 50, Blur 5.00. Duplicate the candle and mirror it. Position them to your liking or see my tag for reference. (make certain the candles are under the bottom stripe layer)
Highlight your top layer. Open up gingerstar2 from the kit. Resize by 30%, smartsize. Copy and paste onto your canvas. Give it a drop shadow of H and V 0, Opacity 50, Blur 5.00. Duplicate and mirror the star. Position at both ends of the rectangle.
Highlight your white background. Open up the glove from the kit. Don't resize and copy and paste onto your canvas. Give it a drop shadow of H and V 0, Opacity 50, Blur 8.00. Duplicate the glove and mirror it. Position as in my tag above.
Open up the house from the kit. Resize by 50%, smartsize. Copy and paste onto your canvas. Give it a drop shadow of H and V 0, Opacity 60, Blur 8.00. Position it in the middle of your gloves.
Open up gingerangels from the kit. Resize by 60%, smartsize. Copy and paste onto your canvas. Give it a drop shadow of H and V 0, Opacity 50, Blur 5.00. Apply gradient glow, same settings as before. Position on the roof of the house. (see my tag for reference)
Open up a ginger bulb of choice. Resize by 20%, smartsize. Copy and paste onto your canvas. Give it a drop shadow of H and V 0, Opacity 50, Blur 5.00. Duplicate and mirror the bulb. Position them to your liking on the gloves.
Highlight your top layer. Open up the gingerscene from the kit. Resize by 60%, smartsize. Copy and paste onto your canvas. Give it a drop shadow of H and V 0, Opacity 50, Blur 5.00. Apply gradient glow, same settings. Position in front of the star.
Add any other embellishments of your choosing.
Hide your white background and merge your visible layers. Resize your merged layer by 90%, bicubic. Duplicate the merged layer. On the bottom layer, go to adjust > blur > gaussian blur. Apply with a radius of 10.00. On the blurred layer apply Xenofex Constellation with the following settings:
Highlight your top merged layer. Apply Xero Sparkles with the following settings:
Highlight your white background. Add a new raster layer. Choose a light color from your tag. Floodfill the new layer with this color. Apply my snowfall mask:
Source Luminance
Fit to Canvas
Hide all Mask
Delete the mask from your layer palette. Answer yes and merge the group. Give the mask layer a drop shadow of H 1, V -1, Opacity 30, Blur 2.00.
Hide your white background and merge your visible layers.
Crop and resize to your liking.
Add your copyright info, watermark and your text. If you are not animating, save as JPG or PNG.
If you are animating, grab your freehand selection tool, type point to point, feather set at 1.00. Select around the wick of both candles like this:
Apply Eyecandy 5 Nature Fire with the following settings:

Click on the colors tab and select colors of your choosing.
Deselect. Copy merged. Open up animation shop. Paste as a new animation in AS.
Back to Paint Shop Pro. Go to edit > undo select none. Edit > undo Fire. Apply Fire again, but this time hit the random seed button. Deselect. Copy merged and paste after your current frame in AS.
Repeat the above steps 2 more times for a total of 4 frames.
In AS, select all frames (CTRL+A) Change the frame properties to 18.
Optimize and save as gif.
I hope you enjoyed this tutorial. If you have any questions, just give me a shout!
Subscribe to:
Post Comments (Atom)
0 comments:
Post a Comment