Wednesday, May 4, 2011
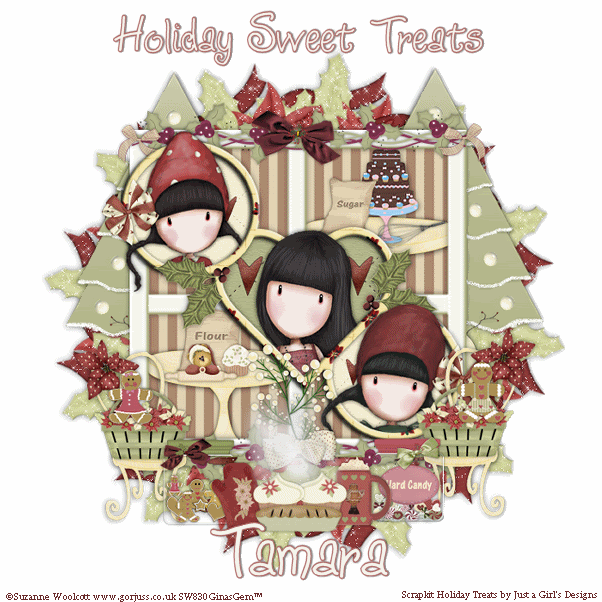
 Holiday Sweet Treats
This tutorial was written by me on 28 November 2008. Any similarities to other tutorials is purely coincidental.
Supplies Needed:
3 tubes of choice. I used the adorable artwork of Suzanne Woolcott. If you wish to use her artwork, you must purchase a license here
Scrapkit. I used the exquisite scrap Holiday Treats by Just a Girl's Designs. You can purchase this element packed kit here Thank you, Tamara!!
Font of choice. I used Ziggy Zoe which you can download here
Plugins:
Xenofex 2 - Constellation
Eyecandy 5 Nature - Smoke (for animation)
No other supplies needed
*******************************************************************************************************
Let's get started! Open up a new transparent image 700 x 700. Floodfill with white.
Open up Frame 1 from the kit. Resize by 70%, smartsize. Copy and paste as a new layer onto your canvas. Grab your magic wand tool, tolerance set at 50, feather set at 0.00. Click inside the empty space of the top circle of the frame. Go to selections > modify > expand by 5.00. Open up a paper of choice from the kit. Resize by 45%, smartsize. Copy and paste onto your canvas and position to your liking within the selection. Go to selections > invert. Hit delete on your keyboard. Deselect. Drag the paper layer beneath your frame.
Highlight your frame layer and grab your magic wand tool again, same settings. Click inside the empty space of the bottom circle of the frame. Repeat the above steps, using the same paper.
Highlight your frame layer. Grab your magic wand tool, and click inside the empty space of the heart of the frame. Go to selections > modify > expand by 5.00. Open up a different paper from the kit and resize by 45%, smartsize. Copy and paste onto your canvas and position to your liking within the frame. Selections > invert. Hit delete on your keyboard and deselect. Drag the paper beneath your frame layer.
Open up your first tube of choice. Resize as necessary, bicubic. Give it a drop shadow of H and V 0, Opacity 50, Blur 8.00. Copy and paste as new layer onto your canvas. Position to your liking within the top circle of the frame. Duplicate the tube and drag one tube layer beneath your frame. Hide your top tube layer. Highlight your frame. Grab your magic wand tool (same settings as earlier) Click inside the empty part of the frame. Go to selections > modify > expand by 1.00. Selections > invert. Highlight your bottom tube layer and grab your eraser tool, size 20, opacity 100. Erase any parts of the tube you don't want sticking out of the frame. Deselect. Unhide and highlight your top tube layer. Erase any parts of the tube that you do not want hanging out of the frame.
Repeat the above steps with the remaining open spaces of your frame.
Highlight your frame layer and give it a drop shadow of H and V 0, Opacity 60, Blur 8.00. Hide your white background and merge your visible layers.
Highlight your white background. Open up the Holiday Treats Store front (the one that is not layered and has all the goodies in the window lol) Highlight the window layer and copy. Paste as a new layer onto your working image.
Resize the window by 90%, smartsize, all layers unchecked. Center it behind your frame layer. Grab your magic wand tool, same settings as earlier. Click inside the four empty spaces of the window. Go to selections > modify > expand by 5.00.
Open up a paper of choice from the kit. Resize by 45%, smartsize. Copy and paste onto your canvas. Selections > invert. Hit delete on your keyboard and deselect. Highlight your window layer and give it a drop shadow of H and V 0, Opacity 60, Blur 10.00.
Back to the Holiday Treats Store Front element. Highlight the table layer and copy. Paste onto your working image. Give the table a drop shadow of H and V 0, Opacity 50, Blur 5.00. Duplicate the table. Drag both table layers beneath your window. Position one table in the left bottom pane of the window, and the other in the upper right pane.
Back to the Store Front element. Highlight the cake layer and copy. Paste as a new layer onto your working image. Give it a drop shadow of H and V 0, Opacity 50, Blur 4.00. Position the cake on the top table.
Open up the wisk from the kit. Resize by 20%, smartsize. Copy and paste onto your canvas. Give it a drop shadow of H and V 0, Opacity 50, Blur 4.00. Position it next to the cake.
Open up the sugar sac from the kit. Resize by 30%, smartsize. Copy and paste onto your canvas. Give it a drop shadow of H and V 0, Opacity 50, Blur 4.00. Position it on the other side of the cake.
Open up the flower sac from the kit. Resize by 35%, smartsize. Give it a drop shadow of H and V 0, Opacity 50, Blur 4.00. Copy and paste onto your canvas. Position it on the bottom table.
Open up the muffin from the kit. Resize by 15%, smartsize. Copy and paste onto your canvas. Give it a drop shadow of H and V 0, Opacity 50, Blur 4.00. Position it next to the flour sac.
Open up the rolling pin with the teddy bear on it. Resize by 30%, smartsize. Copy and paste onto your canvas. Give it a drop shadow of H and V 0, Opacity 50, Blur 4.00. Position it in front of your flour sac.
Hide your frame, and your white background. Merge all visible layers.
Unhide your layers. Highlight your window layer. Open up a garland of choice. Resize by 55%, smartsize. Copy and paste onto your canvas. Give it a drop shadow of H and V 0, Opacity 50, Blur 5.00. Position at the top of the window. Duplicate the garland. Go to image > flip. Position at the bottom of the window.
Open up a bow of choice from the kit. Resize by 10%, smartsize. Copy and paste onto your canvas. Give it a drop shadow of H and V 0, Opacity 50, Blur 3.00. Duplicate the bow and mirror. Position them at the ends of the top garland.
Open up another bow of choice. Resize by 20%, smartsize. Copy and paste onto your canvas. Give it a drop shadow of H and V 0, Opacity 50, Blur 4.00. Position it in the center of the top garland.
Back to the Store Front element. Highlight the chair layer. Copy and paste onto your working image. Give the chair a drop shadow of H and V 0, Opacity 50, Blur 5.00. Duplicate the chair and mirror it. Position the chairs as in my tag above.
Open up a flower of choice. Resize by 20%, smartsize. Copy and paste onto your canvas. Give it a drop shadow of H and V 0, Opacity 50, Blur 4.00. Duplicate the flower and image. Position the flowers on the chair.
Open up the basket from the kit. Resize by 15%, smartsize. Copy and paste onto your canvas. Give it a drop shadow of H and V 0, Opacity 50, Blur 4.00. Duplicate the basket and mirror it. Position both baskets so it looks as if they are sitting on the chairs.
Open up the gingerbread girl and boy. Resize them both by 15%, smartsize. Copy and paste onto your canvas. Give them both a drop shadow of H and V 0, Opacity 50, Blur 3.00. Position them on the baskets.
Open up a berry decoration of choice. Resize by 30%, smartsize. Copy and paste onto your canvas. Give it a drop shadow of H and V 0, Opacity 50, Blur 4.00. Position it in the center of the bottom of the window.
Open up a bow of choice. Resize by 15%, smartsize. Copy and paste onto your canvas. Give it a drop shadow of H and V 0, Opacity 50, Blur 4.00. Duplicate the bow and mirror. Position them to your liking on your frame.
Open up the cookie jar from the kit. Resize by 35%, smartsize. Copy and paste onto your canvas. Give it a drop shadow of H and V 0, Opacity 50, Blur 5.00. Position it in front of the left chair. (see my tag for reference)
Open up the candy jar from the kit. Resize by 25%, smartsize. Copy and paste onto your canvas. Give it a drop shadow of H and V 0, Opacity 50, Blur 5.00. Position the jar in front of your right chair. (see my tag for reference)
Open up a cocoa mug of choice. Resize by 20%, smartsize. Copy and paste onto your canvas. Give it a drop shadow of H and V 0, Opacity 50, Blur 4.00. Position your mug next to the candy jar (see my tag for reference)
Open up the oven mitt. Resize by 10%, smartsize. Copy and paste onto your canvas. Give it the same drop shadow you gave your mug. Position it next to the cookie jar. (see my tag for reference).
Highlight your white background. Open up the Christmas tree from the kit. Copy and paste onto your canvas. Give it a drop shadow of H and V 0, Opacity 50, Blur 10.00. Duplicate the tree and mirror. Position them as in my tag above.
Highlight your white background. Open up christmas flowers 3 from the kit. Resize by 70%, smartsize. Copy and paste onto your canvas. Apply Mura Meister Copies with the following settings:
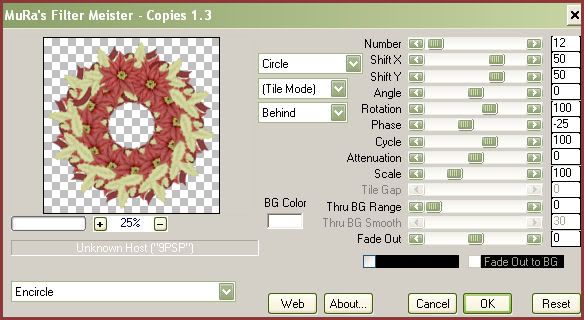
Apply Constellation to the encircled flowers with the following settings:
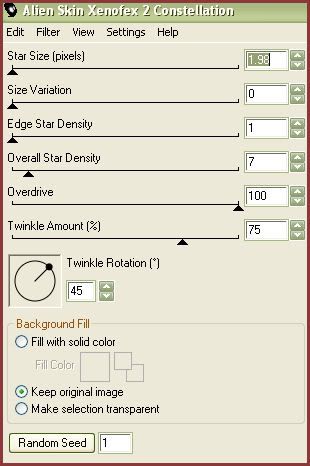
Give the layer a drop shadow of H and V 0, Opacity 50, Blur 10.00. Resize by 95%, smartsize. Postion to your liking.
Hide your white background and merge your visible layers.
Highlight your top layer. Open up the cupcake from the kit. Resize by 25%, smartsize. Copy and paste onto your canvas. Give it a drop shadow of H and V 0, Opacity 50, Blur 4.00. Duplicate the cupcake and mirror it. Position one cupcake next to the cocoa mug and the other one next to the oven mitt.
Open up the pie from the kit. Resize by 25%, smartsize. Copy and paste onto your canvas. Give it a drop shadow of H and V 0, Opacity 50, Blur 5.00. Position the pie in front of the cupcakes. Merge your 2 cupcakes and pie layers together.
Crop and resize to your liking.
Add your copyright info, watermark and your text.
If you are not animating, save as JPG or PNG.
If you are animating, highlight your pie and cupcakes layer. Apply Eyecandy Nature Smoke with the following settings:

Copy merged. Open up Animation Shop. Paste as a new animation.
Back to Paint Shop Pro. Go to edit > undo smoke. Apply smoke again but this time, hit the random seed button and bring the opacity up to 93. Copy merged. Paste after frame 1 in animation shop.
Back to PSP. Go to edit > undo smoke. Apply smoke again, hitting the random seed button again and change the opacity 90. Copy merged. Paste after frame 2 in Animation Shop.
Back to PSP. Go to edit > undo smoke. Apply smoke, hitting the random seed button and change the opacity to 85. Copy merged and paste after frame 3 in Animation Shop.
Select all frames (CTRL+A) Change the frame properties to 20.
Optimize and save as gif.
I hope you enjoyed this tutorial. If you have any questions, just give me a shout! :-)
Subscribe to:
Post Comments (Atom)
0 comments:
Post a Comment