Wednesday, May 4, 2011
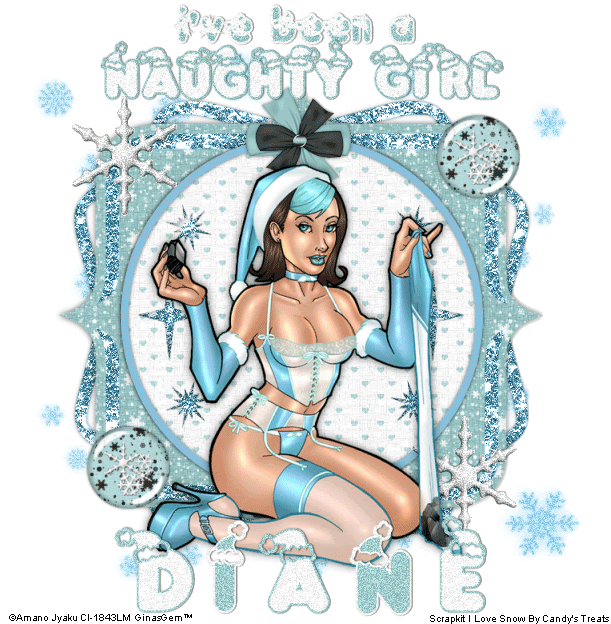
 Naughty Girl
This tutorial was written by me on 26 October 2008. Any similarities to other tutorials is purely coincidental.
Supplies Needed:
Tube of choice. I am using the awesome artwork of Amano Jyaku. I got this tube when CILM was still open. I don't know where you can get his tubes now, so use a different one instead.
Scrapkit I Love Snow by Candy's Treats. If you wish to purchase this snowfully wonderful scrapkit, you can here. (Don't forget to stop by her blog to download the awesome freebie!!!)
Template 13 made by me. You can download it here
Snowflake mask by me which you can get here
Font of choice. I used Kringle which you can download here
Plugins:
DSB Flux Bright Noise
No other supplies needed for this tut
Let's get started! Open up my template and delete the credits layer. Highlight the Bracket frame 1 layer. Go to selections > select all. Selections > float. Defloat. Open up a glitter of choice from the scrapkit. Go to your materials palette and make your back ground pattern, Angle 0, Scale 100. Add a new raster layer. Floodfill this new raster layer witht he glitter. Deselect. (CTRL+D) Give the glittered bracket frame a drop shadow of H and V 0, Opacity 60, Blur 5.00. Delete the gray Bracket frame layer. Repeat the same steps above with the Bracket Frame 2 layer.
Highlight the bracket frame. Select, float and defloat. Open up a paper of choice from the kit. Resize by 68%, smartsize. Copy and paste as a new layer onto your canvas. Go to selections > invert. Hit delete on your keyboard. Deselect. (CTRL+D) Give the paper bracket frame a drop shadow of H and V 0, Opacity 60, Blur 8.00. Delete the gray bracket frame.
Highlight the bracket inlay layer. Select, float and defloat. Open up a contrasting paper of choice. Resize by 68%, smartsize. Copy and paste onto your canvas. Selections > invert. Hit delete on your keyboard. Deselect. Give the papered inlay layer a drop shadow of H and V 0, Opacity 60, Blur 5.00. Delete the white bracket inlay layer.
Highlight the 2 star fill layer. Select, float and defloat. Open up a glitter of choice. On your materials palette, make it the background (same settings as before) Add a new raster layer, and floodfill with the glitter. Deselect. Delete the gray 2 star fill layer. Repeat the same steps with the 4 star fill layer.
Highlight the circle layer. Select, float and defloat. Open up a paper of choice. Resize by 68%,smartsize. Copy and paste as a new layer onto your canvas. Selections > invert. Hit delete. Deselect. Give it a drop shadow of H and V 0, Opacity 60, Blur 4.00. Delete the gray circle layer.
Highlight the circle frame layer. You can leave as is, or select, float and defloat. Open up a paper of choice. Resize by 68%, smartsize. Paste as new layer onto your canvas. Selections > invert. Hit delete and deselect. Give the circle frame a drop shadow of H and V 0, Opacity 60, Blur 6.00.
Open up a bow of choice. Resize by 25%, smartsize. Copy and paste onto your canvas. Give it a drop shadow of H and V 0, Opacity 50, Blur 4.00. Duplicate the bow. Position them to your liking.
Open up a snowflake of choice. Paste as a new layer onto your canvas. Give it the same drop shadow you gave the bow. Duplicate the snowflake, and position them to your liking.
Open up a glossy bead of choice. Resize by 35%, smartsize. Paste onto your canvas and give it the same drop shadow you gave your snowflake. Duplicate the bead and position them to your liking.
Add any other embellishments of your choosing. :-)
Highlight your white background. Add a new raster layer. Choose a medium color from your tube. Floodfill your new layer with this color. Apply my mask, source luminance, fit to layer, hide all mask. Delete the mask from the layer palette, answer yes to the pop up box and merge the group.
Open up your tube. Resize bicubic if necessary. Paste as a new layer onto your canvas. Give the tube a drop shadow of H and V 0, Opacity 65, Blur 11.00.
Crop and resize to your liking. Add your copyright info, watermark and your text.
Highlight your mask layer. Apply DSB Flux Bright Noise with the following settings:
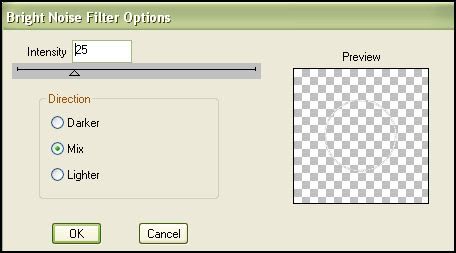
Copy merged. Open up animation shop. Paste as a new animation. Back to Paint Shop Pro. Go to Edit > Undo. Undo Bright Noise. Apply again, but this time click the mix button 2x. Copy merged and paste after your current frame in AS.
Repeat one more time for a total of 3 frames.
Optimize and save as gif.
I hope you enjoyed this tutorial. If you have any questions, just give me a shout!
Subscribe to:
Post Comments (Atom)
0 comments:
Post a Comment