Wednesday, May 4, 2011
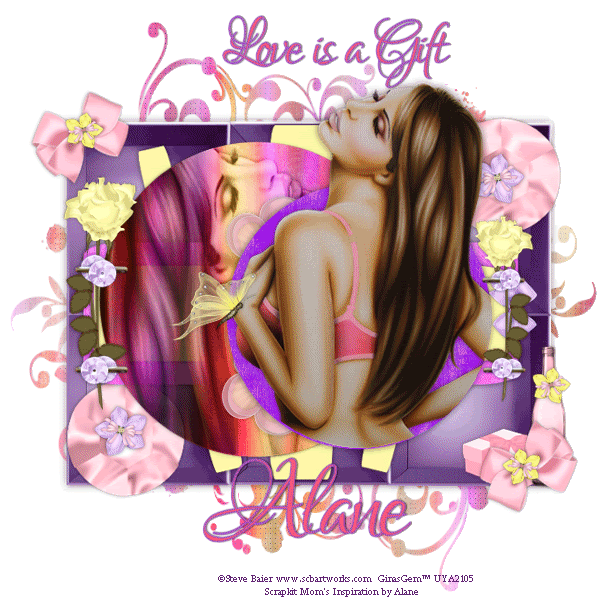
 Love is a Gift
This tutorial was written by me on 19 November 2008. Any similarities to any other tutorials is purely concidental.
Supplies Needed:
Tube of choice. I am using the sensual artwork of Steve Baier. If you wish to use his artwork, you must purchase a license with Up Your Art
Scrapkit. I used the lovely scrapkit Mom's Inspiration by Alane. If you wish to purchase this kit, you can here. Thank you Alane!
Template 48 by AquaRebel315 Designz. You can download this template, plus a lot of other great ones at her blog here
UF Mask 18 by Sunf. You can download the mask here. She's also got other goodies too!
Staple made by me here
Font of choice. I used Lovers Quarrel (pay font)
Plugins:
Eyecandy 5 Textures - Texture Noise (for animation)
Animation Shop (opt)
No other supplies needed.
Let's get started! Open up Aqua's template. Duplicate y holding down shift + d. Close the original. Delete the credits layer. Resize all layers by 90%, smartsize. Go to image > canvas size. Change the canvas to 650 x 650 pixels.
Highlight layer raster 4. Go to selections > select all. Selections > float. Selections > defloat. Open up a paper from the kit. Resize by 15%, smartsize. Copy and paste as a new layer onto your canvas. Go to selections > invert. Hit delete on your keyboard. Deselect (CTRL+D) Give the layer a drop shadow of H and V 0, Opacity 60, Blur 8.00. Delete the raster 4 layer.
Highlight copy and raster 4 and repeat the same steps above using the same paper.
Highlight layer raster 7. Select, float and defloat. Open up another paper from the kit. Resize 15%, smartsize. Copy and paste onto your canvas. Selections > invert. Hit delete. Deselect. Give the layer a drop shadow of H and V 0, Opacity 60, Blur 10.00. Delete the raster 7 layer.
Highlight the raster 5 layer. Select, float and defloat. Open up a paper from the kit. Resize, 15%, smartsize. Copy and paste onto your canvas. Selections > invert. Hit delete. Give the layer a drop shadow of H and V 0, Opacity 60, Blur 10.00. Delete the raster 5 layer.
Highlight the raster 6 layer. Select, float and defloat. Open up a paper from the kit. Resize by 15%, smartsize. Copy and paste onto your canvas. Selections > invert. Hit delete. Give the layer a drop shadow of H and V 0, Opacity 60, Blur 8.00. Delete the raster 6 layer.
Highlight the raster 2 layer. Select, float and defloat. Open up a paper of choice from the kit. Resize, 15%, smartsize. Copy and paste onto your canvas. Selections > invert. Hit delete on your keyboard. Do NOT deselect.
Open up your tube. Don't resize. Copy and paste as a new layer onto your canvas. Postion your tube to your liking within the circle. Hit delete. Deselect. Change the blend mode of the tube to Luminance (legacy). Give the tube a drop shadow of H and V 0, Opacity 50, Blur 8.00. Highlight the paper circle. Give it a drop shadow of H and V 0, Opacity 60, Blur 10.00. Delete the black circle. Merge your circle and tube layer together. Rename it circle noise. (this is to make the animation later easier)
Highlight layer raster 3. Select, float and defloat. Open up a paper from the kit and resize by 15%, smartsize. Copy and paste onto your canvas. Selections > invert. Do NOT deselect.
Open up your tube again. Resize bicubic, as necessary. Mirror your tube. Copy and paste onto your canvas. Position your tube to your liking within the selection.
Grab your eraser tool, size 30, Opacity 90. Carefully erase the parts of the tube you don't want hanging out of the circle. Deselect. Give your tube a drop shadow of H and V 0, Opacity 60, Blur 10.00. Highlight the paper circle and give it the same drop shadow. Delete the gray circle.
Open up an organza flower of choice. Resize by 10%, smartsize. Copy and paste onto your canvas. Give the flower a drop shadow of H and V 0, Opacity 50, Blur 5.00. Duplicate the flower. Go to image > flip. Drag both flowers to just above your circle noise layer and position as in my tag above.
Highlight your top layer. Open up a butterfly of choice. Resize by 10%, smartsize. Copy and paste onto your canvas. Give it a drop shadow of H and V 0, Opacity 50, Blur 5.00. Go to image > mirror. Position the butterfly between the 2 organza flowers (see my tag for reference)
Open up a rose of choice. Resize by 8%, smartsize. Copy and paste as a new layer onto your canvas. Give it a drop shadow of H and V 0, Opacity 50, Blur 5.00. Position on the right edge of the rectangles. Open up the staple. Resize by 90%, smartsize. Copy and paste onto your canvas. Duplicate the staple. Position the staples so it looks as if they are holding the rose in place.
Open up a sequin of choice. Resize by 15%, smartsize. Copy and paste onto your canvas. Give it a drop shadow of H and V 0, Opacity 50, Blur 3.00. Duplicate the sequin 3x for a total of 4. Position 2 on the top staple and 2 on the bottom staple. Drag one top and one sequin under the staple layers.
Open up the rose again. Resize by 10%, smartsize. Mirror the rose and paste onto your canvas. Give it a drop shadow of H and V 0, Opacity 50, Blur 5.00. Position the rose on the left edge of the rectangles. Open up the staple. Don't resize and copy and paste onto your canvas. Duplicate the staple and position like you did the other one.
Open up the sequin again. Resize by 18%, smartsize. Copy and paste onto your canvas. Give it a drop shadow of H and V 0, Opacity 50, Blur 3.00. Duplicate 3x for a total of 4. Position like you did the other ones.
Highlight your white background. Open up a box of choice. Resize by 25%, smartsize. Copy and paste onto your canvas. Give it a drop shadow of H and V 0, Opacity 60, Blur 13.00. Go to image > free rotate. Rotate left by 90.00, both boxes unchecked. Position so it is centered.
Open up a gift box of choice. Resize by 3%, smartsize. Copy and paste onto your canvas. Give it a drop shadow of H and V 0, Opacity 50, Blur 5.00. Position in the right bottom corner of the box.
Open up a bottle of choice from the kit. Resize by 5%, smartsize. Copy and paste onto your canvas. Give it a drop shadow of H and V 0, Opacity 50, Blur 5.00. Position in the right bottom corner of the box, next to the gift box.
Open up a sequin of choice. Resize by 85%, smartsize. Copy and paste onto your canvas. Give it a drop shadow of H and V 0, Opacity 50, Blur 7.00. Duplicate the sequin. Position in the right upper corner and the left bottom corner of the box.
Open up a flower of choice. Resize by 7%, smartsize. Copy and paste onto your canvas. Give it a drop shadow of H and V 0, Opacity 50, Blur 3.00. Duplicate the flower and mirror. Position them over the holes on the sequin.
Open up a bow of choice. Resize by 7%, smartsize. Copy and paste onto your canvas. Give it a drop shadow of H and V 0, Opacity 50, Blur 7.00. Go to image > free rotate. Rotate left by 25.00, both boxes unchecked. Duplicate the bow. Go to image > mirror. Then image > flip. Position the bows in the left upper corner and right bottom corner of the box.
Open up another flower of choice. Resize by 5%, smartsize. Copy and paste onto your canvas. Give it a drop shadow of H and V 0, Opacity 50, Blur 3.00. Duplicate the flower. Go to image > mirror. Position them on the knots of your bows.
Add any other embellishments of your choosing.
Highlight your white background. Open up a paper from the kit. Resize the paper by 18%, smartsize. Copy and paste onto your canvas. Apply UF Mask 18 with the following settings:
Source Luminance
Fit to Layer
Hide all mask
Invert transparency checked.
Delete the mask from your layer palette. Answer yes to the pop up box and merge the group. Go to effects > texture effects > weave. Choose a color from your tube and copy so it's on your clipboard. Apply weave with the following settings, changing the gap color to the one you just copied:
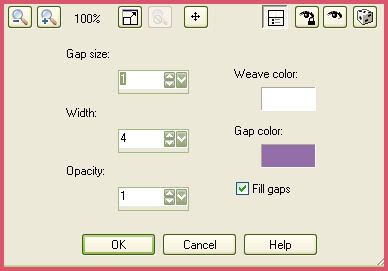
Give the mask a drop shadow of H 1, V 0, Opacity 60, Blur 2.00.
Crop and resize to your liking.
Add your copyright info, watermark, and text. If you are not animating, save as JPG or PNG.
If you are animating, highlight your mask layer. Apply Eyecandy 5 textures, texture noise with the following settings:
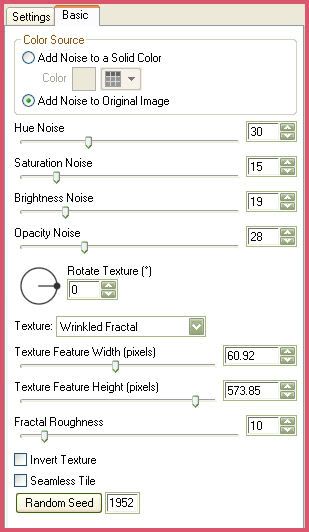
Highlight your circle noise layer. Apply noise to this layer with the same settings. Copy merged. Open up Animation Shop. Paste as a new animation in AS.
Back in Paint Shop Pro, go to edit > undo texture noise. Edit > undo layer selection. Edit > undo texture noise. You should now be on your mask layer. Apply texture noise again, but hit the random seed button. Highlight your circle noise layer and do the same. Copy merged and paste after your current frame in AS.
Repeat the above steps 3 more times for a total of 5 frames. In AS, select all frames (CTRL+A) Change the frame properties to 25.
Optimize and save as gif.
I hope you enjoyed this tut! If you have any questions, just give me a shout. :-)
Subscribe to:
Post Comments (Atom)
0 comments:
Post a Comment