Wednesday, May 4, 2011
 It's a Girl Thing
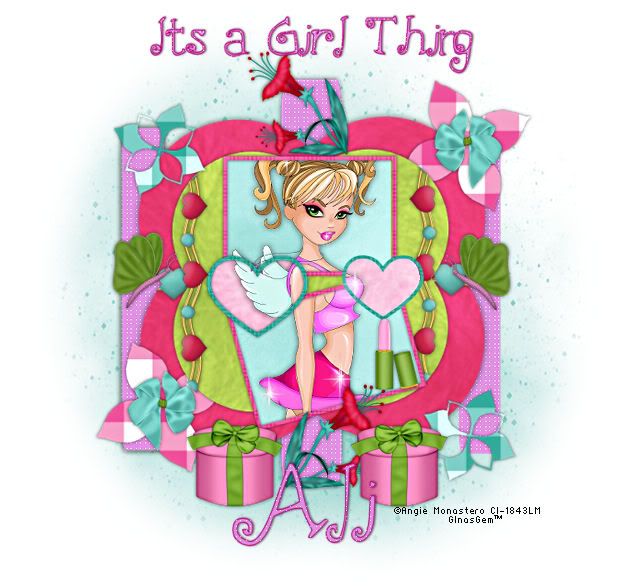 This tutorial was written by me on 8 November 2008. Any similarities to other tutorials is purely coincidental. Supplies Needed: Tube of choice. I am usin the wonderful artwork of Angie Monastero. I got thisd tube when CILM was still open. I don't know where you can get her work now, so just use a tube you like instead. Scrapkit One for the Girls by Designs by Ali. You can download this awesome freebie kit here Template 31 by me which you can download from my blog here Mask by Becky. Unfortunately, her site is now closed. :-( You can get the mask here Font of choice. I used First Crush which you can download here Plugins Penta Filters Dot and Cross No other supplies needed Let's get started! Open up my template and duplicate (SHIFT +D) Close the original. Delete the credfits. Highlight the rectangles layer. Go to selections > select all. Selections > float. Selections > defloat. Choose a medium color from your tube. (I used color #c67cc5) Add a new raster layer. Floodfill the new layer with your chosen color. Deselect. (CTRL+D)Apply Penta Dot and Cross with the following settings: 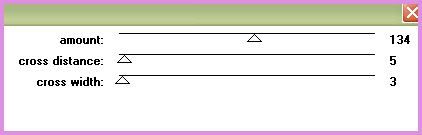 Give the rectangles a drop shadow of H and V 0, Opacity 60, Blur 8.00. Highlight the big circly square layer. Select, float and defloat. Open up a paper of choice from the kit. Resize by 95%, smartsize. Copy and paste as a new layer onto your canvas. Go to selections > invert. Hit delete on your keyboard. Do NOT deselect. Open up a ribbon heart of choice. Resize by 60%, smartsize. Copy and paste onto your your canvas. Position it in the middle of the big circly square. When you are satisfied with your placement, hit delete. Deselect. Give your ribbon heart and drop shadow of H and V 0, Opacity 40, Blur 3.00. Highlight your paper circly square and give it a drop shadow of H and V 0, Opacity 60, Blur 10.00. Delete the gray big circly square. Highlight the 4 petal flower 1. Select, float and defloat. Open up a paper of choice. Resize by 95%, smartsize. Copy and paste onto your canvas. Selections > invert. Hit delete. Deselect. Give it a drop shadow of H and V 0, Opacity 50, Blur 5.00. Delete the gray flower. Highlight 4 petal flower 2 and repeat the same steps. Highlight the small circly square. Select, float and defloat. Open up a paper that contrasts with the one you used for the bigger circly square. Resize, 95%, smartsize. Copy and paste onto your canvas. Selections > invert. Hit delete. Do NOT deselect. Open up another ribbon heart of choice. Resize by 40%, smartsize. Copy and paste onto your canvas. Go to image > free rotate. Rotate right by 90.00, both boxes unchecked. Position it on the right side of the circly square. (see my tag for reference) Hit delete. Deselect. Give te ribbon heart a drop shadow of H and V 0, Opacity 40, Blur 3.00. Duplicate the ribbon heart. Go to image > mirror. Position it on the left side of the circly square. Highlight the smaller paper circly square. Give it a drop shadow of H and V 0, Opacity 60, Blur 8.00. Delete the gray small circly square. Ok, it might seem to get a little tricky here, but if you stick with me, we'll get through it . . . I promise! LOL Highlight the frame fill layer. Select, float and defloat. Open up a paper of choice from the kit. Resize by 95%, smartsize. Copy and paste as a new layer onto your canvas. Selections > invert. Hit delete. Do NOT deselect. Open up your tube. Resize, bicubic if necessary. Paste your tube onto your canvas, and position to your liking. Duplicate your tube. On your bottom tube layer, hit delete. Deselect. Drag the top tube layer above your heart fill layer. Highlight the heart fill layer. Select, float and defloat. Open up a different paper than the last one from your kit. Resize 95%, smartsize. Copy and paste onto your canvas. Selections > invert. Hit delete. Do NOT deselect. Highlight the top tube layer. Hit delete. Deselect. Give both tube layers a drop shadow of H and V 0, Opacity 40, Blur 5.00. Highlight the frames outline layer. Select, float and defloat. Open up a paper of choice from the kit. Resize by 95%, smartsize. Copy and paste onto your canvas. Selections > invert. Hit delete. Deselect. Give the frames a drop shadow of H and V 0, Opacity 50, Blur 5.00. Delete the white frames outline. Highlight the heart frames outline. Select, float and defloat. Open up a paper from the kit. Resize 95%, smartsize. Copy and paste onto your canvas. Selections > invert. Hit delete. Deselect. Give them the same drop shadow you gave your rectangle frames. Delete the white heart frames. Highlight the flower 1 layer. Select, float and defloat. Open up a paper from the kit. Resize by 95%, smartsize. Copy and paste onto your canvas. Selections > invert. Hit delete. Deselect. Give it a drop shadow of H and V 0, Opacity 50, blur 5.00. Delete the gray flower. Highlight the flower 2 layer and repeat the same steps. Open up a bow of choice from the scrapkit. Resize by 25%, smartsize. Copy and paste as a new layer onto your canvas. Give it a drop shadow of H and V 0, Opacity 40, Blur 3.00. Duplicate the bow. Go to image > mirror. Position the bows over in the middle of the 4 petal flowers. Open up a beautiful flower of choice. Resie by 25%, smartsize. Copy and paste onto your canvas. Give it the same drop shadow you gave your bow. Duplicate the flower. Go to image > mirror. Position them to your liking. Open up gift box of choice. Resie by 25%, smartsize. Give it the same drop shadow you gave your flower. Duplicate the box. Position them to your liking. Open up a lipstick of choice. Resize by 25%, smartsize. Copy and paste onto your canvas. Give it the same drop shadow you gave your box. Position to your liking. Open up a butterfly of choice. Resize by 25%, smartsize. Paste onto your canvas. Give it the same drop shadow you gave your lipstick. Duplicate the butterfly. Image > mirror. Position them to your liking. Add any other embellishments of your choosing. Highlight your white background. Open up a paper of choice. Copy and paste onto your canvas. Apply Becky's mask: Source Luminance Fit to Layer Hide all mask. Delete the mask from your layer palette. Answer yes and merge the group. Duplicate the mask layer and position them to your liking. Crop and resize to your liking. Add your copyright info, watermark and text. Save as JPG or PNG. I hope you enjoyed this tut! If you have any questions, just give me a shout! |
Subscribe to:
Post Comments (Atom)
0 comments:
Post a Comment