Tuesday, May 3, 2011
 Intrigue
This tutorial was written by me on 15 June 2009. Any similarities to other tutorials is purely coincidental.
Supplies Needed:
Tube of choice. I am using the gorgeous artwork of ZIndy Nielsen. If you wish to use her artwork, you must purchase a license at her site here.
Scrapkit. I am using the gorgeous kit Enchanted by Candy's Treats. If you wish to purchase this exquisite kit, you can here. Thank you, Diane!!
Vix Mask 229. You can download it from her site here.
BabesDesignz_Mask 19. You can download it from her blog here.
Font of choice. I used Bonhear Royale. This is a pay font.
Plugins:
Xero Filters - Soft Vignette
Eyecandy 4000 - Gradient Glow
Xenofex 2 - Constellation
Animation Shop (opt)
*~*~*~*~*~*~*~*~*~*~*~*~*~*~*~*~*~*~*~*~*~*~*~*~*~*~*~*~*~*~*~*~*~*~*~*~*~*~*~*~*~*~*~*~
Ok! Let's get started! Open up a new transparent image 850 x 650. Floodfill with white.
Open up a cloud paper of choice. Resize by 65%, smartsize. Copy and paste as a new layer onto your canvas. Apply Vix Mask 229 with the following settings:
Source Luminance
Fit to Layer
Hide all Mask
Delete the mask from your layer palette. Answer yes to the pop up box and merge the group. Go to selections > select all. Selections > float. Selections > defloat. Open up your tube. Resize, if necessary, bicubic. Copy and paste as a new layer onto your canvas. Position to your liking within the selection. Hit delete 10x. Deselect. Give your tube drop shadow of H 3, V -2, opacity 45, Blur 8.00. Duplicate your tube. Change the blend mode of the bottom layer to Hard Light. Highlight your top tube layer and change the blend mode to Overlay. Highlight your mask layer and give it a drop shadow of H 3, V 0, Opacity 55, Blur 3.00. Hide your white background and merge your visible layers.
Open up frame 3 from the kit. Resize by 55%, smartsize. Copy and paste as a new layer onto your canvas. Center it over the circular opening of the merged layer. Grab your magic wand tool, tolerance set at 100, feather set to 0.00. Click inside the empty space of the frame. Go to selections > modify > expand by 6.00. Open up a paper from the kit. Resize by 35%, smartsize. Copy and paste as a new layer onto your canvas. Go to selections > invert. Hit delete. Don't deselect. Open up your tube again. Mirror it. Resize, bicubic to fit into the frame. Copy and paste as a new layer onto your canvas. Position it to your liking within the frame. Hit delete. Deselect. Change the blend mode of the tube to Overlay. Highlight your frame layer and drag it to the top or your layer palette. Give it a drop shadow of H and V 0, Opacity 65, Blur 10.00. Hide your white background and merge your visible layers together.
Open up frame 6 from the kit. Resize by 75%, smartsize. Copy and paste as a new layer onto your canvas. Position it to the right of your canvas. Grab your magic wand tool, tolerance set to 5, feather set to 5.00. Click inside all of the empty spaces of the frame. Open up a paper from the kit. Resize by 50%, smartsize. Copy and paste as a new layer onto your canvas. Position to your liking within the selection. Hit delete. Don't deselect. Open up your tube again. Resize as necessary, bicubic. Copy and paste as a new layer onto your canvas. Hit delete. Deselect. Change the blend mode of your tube to Multiply. Highlight your frame layer and give it a drops hadow of H 3, V 0, oapcity 55, Blur 7.00. Hide your white background and your merged layer. Merge your frame 6 layer, paper and tube layers together. Duplicate this layer. Go to image > mirror. Arrange them as in my tag above.
Open up the ladder from the kit. Copy and paste as a new layer onto your canvas. Give it a drops hadow of H 2, V 0, Opacity 60, Blur 3.00. Duplicate. Go to image > mirror. Position the ladders beneath your merged frame 6 layers.
Open up the flower stem from the kit. Resize by 65%, smartsize. Copy and paste as a new layer onto your canvas. Give it a drop shadow of H 3, V 0, Opacity 60, Blur 4.00. Go to image > mirror. Position as in my tag above.
Open up bow 1 from the kit. Resize by 30%, smartsize. Copy and paste as a new layer onto your canvas. Give it a drop shadow of H -2, V 0, Opacity 60, Blur 3.00. Position it to your liking on the round frame.
Open up element 1 from the kit. Resize by 35%, smartsize. Copy and paste as a new layer onto your canvas. Give it a drop shadow of H -2, V 0, Opacity 60, Blur 3.00, Duplicate. Go to image > mirror. Position them to your liking.
Open up Flower 1 from the kit. Resize by 85%, smartsize. Copy and paste as a new layer onto your canvas. Go to image > free rotate. Rotate left by 25.00. Give it a drop shadow of H and V 0, Opacity 65, Blur 7.00. Position the leaves behind your tag so they are peeking out. (see my tag for reference) Duplicate. Go to image > mirror.
Open up curly ribbon 2 and 3. Resize them by 60%, smartsize. Copy and paste as new layers onto your canvas. Give them both a drop shadow of H 1, V-2, Opacity 60, Blur 4.00. Duplicate each ribbon. Go to image > mirror. Then, image > flip. (for both of them) Position them to your liking. Drag all 4 ribbon layers to right above your white background layer.
Open up Cloud Sparkle 2. Resize by 65%, smartsize. Copy and paste as a new layer onto your canvas. Apply Graident Glow with the following settings:
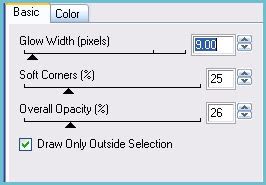
Give the cloud a drop shadow of H 2, V -1, Opacity 12, Blur 3.00. Position the cloud at the top right of the tag. Drag it beneath all of the layers to right above your white background. Duplicate. Go to > image > mirror. Then image > flip.
Open up Cloud Sparkle 1. Resize by 65%, smartsize. Copy and paste onto your canvas. Apply Gradient Glow, same settings as earlier. Give the cloud a drop shadow of H -2, V -1, Opacity 12, Blur 3.00. Position the cloud at the left top of your tag. Duplicate. Go to image > mirror. Then, image > flip. Drag both cloud layers beneath all of the layers to right above your white background. Merge your 4 cloud layers together.
Highlight your white background. Open up a paper from the kit. Copy and paste as a new layer onto your canvas. Apply BabesDesignz_Mask 16 with the following settings:
Source Luminance
Fit to Canvas
Hide all Mask
Delete the mask , answer yes to the pop up box and merge the group. Apply Gradient Glow, same settings as earlier. Give the mask a drop shadow of H 2, V 0, Opacity 25, Blur 3.00. Resize the mask by 95%, smartsize.
Crop and resize to your liking.
Add your copyright info, watermark, and your text. If you are not animating, save as JPG or PNG.
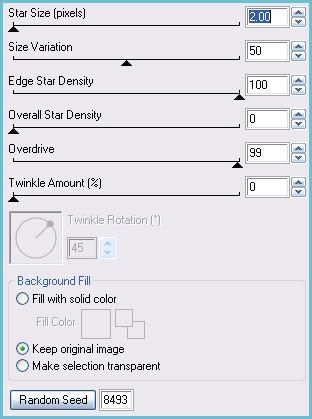
If you are animating, highlight your merged clouds layer. Apply Xenofex 2 - Constellation with the following settings:
Copy merged. Open up Animation Shop. Paste as a new animation in AS.
Back in PSP. On your merged cloud layer, go to edit > undo constellation. Apply constellation again, but this time hit the random seed button. Copy merged. Paste after your current frame in Animation Shop.
Repeat the above steps 3 more times for a total of 4 frames.
Optimize and save as gif.
I hope you enjoyed this tutorial! If you have any questions, just give me a shout.
Subscribe to:
Post Comments (Atom)
0 comments:
Post a Comment