Tuesday, May 3, 2011
 Gossamer Lotus
This tutorial was written by me on 11 June 2009. Any similarities to other tutorials is purely coincidental.
Supplies Needed:
Tube of choice. I am using the stunning artwork of Jennifer Janesko. I purchased this tube when CILM was still open. If you would like to purchase her artwork now, you can with CDO.
Scrapkit. I used Jubilee by Creative Intuitionz. If you wish to purchase this beautiful kit, you can here. Thank you, Melissa!!
2 images of choice. I got mine from www.sxc.hu
Font of choice. I used Mea Culpa (pay font).
Plugins:
Xero Filters - Pastellise
VM Natural - Sparkle
Animation Shop (opt)
No other supplies needed
*~*~*~*~*~*~*~*~*~*~*~*~*~*~*~*~*~*~*~*~*~*~*~*~*~*~*~*~*~*~*~*~*~*~*~*~
Ok! Let's get started! Open up a new transparent image 800 (width) by 650 (height). Floodfill with white.
Open up element 30 (frame) from the kit. Resize by 53%, smartsize. Copy and paste as a new layer onto your canvas. Position it towards the right of your canvas. Grab your magic wand tool, tolerance set at 30, feather set at 0.00. Click inside all of the empty spaces of the frame. (don't forget the little spaces beneath the ribbon). Go to selections > modify > expand by 10.00. Open up your first image of choice. Resize as necessary, smartsize. Copy and paste as a new layer onto your canvas. Position to your liking within the frame. Go to selections > invert. Hit delete on your keyboard. Don't deselect.
Duplicate the image. Highlight the top image. Go to selections > invert. Apply Xero Pastellise with the following settings:
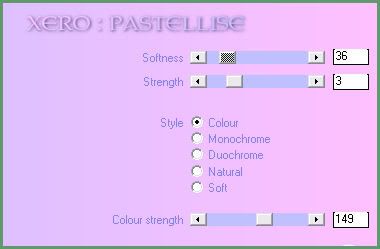
Deselect (CTRL+D). Change the blend mode to overlay. Highlight your bottom image layer. Colorize to match your frame if you wish. Drag your frame layer to the top of your layer palette. Give it a drop shadow of H and V 0, Opacity 75, Blur 10.00. Hide your white background and merge your visible layers together.
Open up element 29 (another frame) from the kit. Resize by 55%, smartsize. Copy and paste as a new layer onto your canvas. Go to image > free rotate. Rotate left by 75.00, both boxes unchecked. Position the frame so that the ribbon overlaps ribbon on the merged frame layer.
Grab your magic wand tool, same settings as before. Click inside all of the empty spaces of the frame. Go to selections > modify > expand by 10.00. Open up your second image of choice. Resize as necessary, smartsize. Copy and paste as a new layer onto your canvas. Position to your liking within the selection. Go to selections > invert. Hit delete on your keyboard. Don't deselect.
Duplicate your image. Go to selections > invert. Highlight your top image layer. Apply Xero Pastellise, same settings as before. Deselect. Change the blend mode to Overlay. Highlight your bottom image layer. Colorize it to match your frame if you wish. Highlight your frame layer. Drag it to the top of your layer palette and give it a drop shadow of H and V 0, Opacity 75, Blur 10.00. Hide your white background and merge your visible layers.
Open up element 38 (journaling book) from the kit. Resize by 65%, smartsize. Copy and paste as a new layer onto your canvas. Go to image > mirror. Position towards the top right of your canvas. (see my tag for reference) Give it a drop shadow of H 3, V -2, Opacity 75, Blur 10.00. Drag it beneath your merged layer.
Open up element 53 (box) from the kit. Resize by 55%, smartsize. Copy and paste as a new layer onto your canvas. Position towards the bottom left of your canvas. (see my tag for reference) Give it a drop shadow of H -3, V2, Opacity 75, Blur 10.00. Drag it beneath your merged layer.
Open up element 24 (flower) from the kit. Resize by 40%, smartsize. Copy and paste as a new layer onto your canvas. Give it a drop shadow of H and V 0, Opacity 65, Blur 7.00. Duplicate. Go to image > flip. Position them on top of your box. (see my tag for reference)
Open up element 18 and 19 (flowers) from the kit. Resize 18 by 40%, smartsize, and 19 by 35%, smartsize. Copy and paste as new layers onto your canvas. Mirror both of them. Give them both a drop shadow of H -3, V -1, oapcity 65, Blur 5.00. Position them towards the top left of the tag. (see my tag for reference) Drag them beneath your merged layer.
Highlight your top layer. Open up element 43 (flower cluster) from the kit. Resize by 25%, smartsize. Copy and paste as a new layer onto your canvas. Give it a drop shadow of H and V 0, Opacity 60, Blur 7.00. Position at the top where the 2 frames meet.
Open up element 54 (ribbon) from the kit. Resize by 30%, smartsize. Copy and paste as new layer onto your canvas. Go to image > free rotate. Rotate right by 15.00, both boxes unchecked. Give it a drop shadow of H and V 0, Opacity 60, Blur 5.00. Position at the bottom of the left frame.
Open up element 9 (flower branch) from the kit. Resize by 40%, smartsize. Copy and paste as a new layer onto your canvas. Go to > image > free rotate. Rotate right by 90,
both boxes unchecked. Give it a drop shadow of H -2, V 0, oapcity 65, Blur 3.00. Position on top of the ribbon. Duplicate. Go to image > mirror. Position at the bottom of the right frame.
Open up element 50 (butterfly) from the kit. Resize by 20%, smartsize. Copy and paste as a new layer onto your canvas. Go to image > mirror. Give it a drop shadow of H and V 0, Opacity 65, Blur 6.00. Position on the top right corner of the right frame.
Open up elements 18 and 19 again. Resize one by 15%, smartsize, and the other by 20%, smartsize. Give them both a drop shadow of H 3, V -1, Opacity 60, Blur 5.00. Position them side by side at the bottom right corner of the right frame.
Add any other embellishments of your choosing.
Open up your tube. Resize as necessary, bicubic. Copy and paste as a new layer onto your canvas. Give it a drop shadow of h and V 0, Opacity 75, Blur 20.00. Position to your liking.
Crop and resize to your liking.
Add your copyright info, watermark and your text. If you are not animating, save as JPG or PNG.
If you are animating, highlight your merged frames and images layer. Apply VM Natural - sparkle with the following settings:
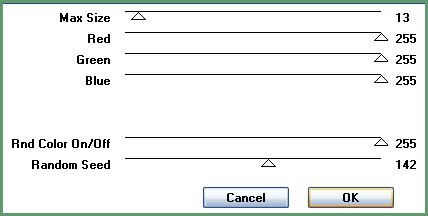
Copy merged. Open up Animation Shop. Paste as a new animation in AS.
Back to PSP, go to edit > undo sparkle. Apply sparkle again, same settings, except slide random seed to 84. Copy merged. Paste after frame 1 in AS.
In PSP, go to edit > undo. Aply Sparkle again, b ut slide random seed to 212. Copy merged and paste after frame 2 in AS.
Backt o PSP, edit > undo sparkle. Apply sparkle again, but slide random seed to 17. Copy merged and paste after frame 3 in AS.
In Animation Shop, select all frames (CTRL+A). Change the frame properties to 15.
Optimize and save as gif.
I hope you enjoyed this tutorial! If you have any questions, just give me a shout.
Subscribe to:
Post Comments (Atom)
0 comments:
Post a Comment