Wednesday, May 4, 2011
 Eternally Alone
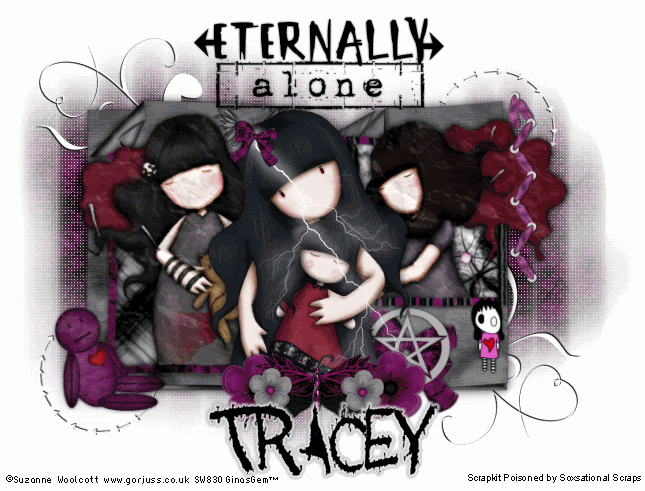
This tutorial was written by me on 28 September 2008. Any similarities to other tutorials is purely coincidental.
Supplies Needed:
3 tubes of choice. I am using the adorable artwork of Suzanne Woolcott. If you wish to use her artwork, you must purchase a license here
Scrapkit. I am using the most awesome scrapkit called Poisoned by Soxsational Scraps. If you wish to purchase this scrapkit you can at her blog or at her store. Thank you, Tracey!!
Mask made by me
Font of choice I used Acquaintance. You can download it here
Plug Ins:
Alien Skin Xenofex 2 Crumple and Lightning.
Xero Bad Dream
Ok! Let's Begin! Open up a new transparent image 700 x 500. Floodfill with white. From your scrapkit, open up the Poisoned book. Paste as a new layer onto your canvas. Give it a drop shadow of H and V 0, Opacity 75, Blur 15.00.
Grab your preset shape tool, rectangle. Foreground color set to white, background null, width 10.00. Draw out a rectangle. Over at your layer palette, convert to raster layer. Go to Selections > Select all. Selections > Float. Defloat. Open up a paper of choice from the scrapkit. Paste as a new layer onto your canvas. Go to Selections > Invert. Hit delete on your keyboard. Deselect. (CTRL+D) Delete the white rectangle.
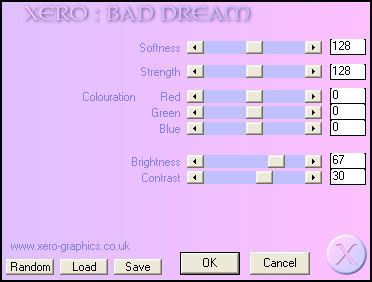
Highlight the paper rectangle. Grab your magic wand tool, tolerance 30, feather 0.00. Click inside the empty space of the frame so you have marching ants all around the inside of the rectangle. Go to Selections > Modify > Expand by 5.00. Open up another paper of choice. Paste as a new layer onto your canvas. Position to your liking within the frame. Go to Selections > Invert. Hit delete on your keyboard. Deselect. (CTRL+D) Drag the paper layer under the frame. If you like apply xero bad dream with the following settings:
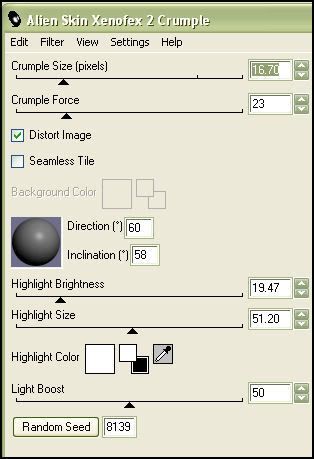
Open up your first tube of choice. Resize as necessary, bicubic. Paste as a new layer onto your canvas. Give your tube a drop shadow of H and V 0, opacity 75%, Blur 13.00. Position your tube within the frame to your liking. Grab your magic wand tool again. Highlight the frame layer and click inside. Go to Selections > Invert. Highlight your tube layer. Grab your eraser tool and erase the parts of your tube that you don't want hanging over your frame. Deselect. Highlight the frame layer and give it a drop shadow of H and v 0, Opacity 75%, Blur 10.00. Hide your white background, and the poisoned book layer. Merge your visible layers. Apply Xenofex 2 Crumple with the following settings:
Make another frame and repeat the same steps with another tube. When you are done, position the frames to your liking within the poisoned book.
Open up a pin of choice from your scrapkit. Paste as a new layer onto your canvas. Go to Image > Free Rotate. Rotate left by 25.00, both boxes unchecked. Position to your liking. Give it a drop shadow H 1, V 0, Opacity 65, Blur 2.00. Erase a small part in the middle of the pin so it looks as if it is holding your frame in place. Duplicate and mirror the pin. Position to your liking on your other frame.
Open up the ribbon from the scrapkit. Resize by 40%, smartsize. Paste onto your canvas and position to your liking. Give it the same drop shadow you gave your pin.
Open up the ButterflyHeartDoodle from the scrapkit. Resize by 20%, smartsize. Paste onto your canvas, and position to your liking. Give it the same drop shadow you gave your ribbon.
Open up the voodoo doll from the scrapkit. Resize by 30%, smartsize. Paste as a new layer onto your canvas and give it a drp shadow of H and V 0, Opacity 60, Blur 6.00. Position to your liking.
Open up a cross of choice from the scrapkit. Resize by 30%, smartsize. Paste as a new layer onto your canvas. Give it a drop shadow of H and V 0, Opacity 70, Blur 3.00. Position to your liking.
Open up a bow of choice. Resize by 30%, smartsize. Paste onto your canvas and position to your liking. Give it the same drop shadow you gave the cross.
Open up the Poisoned doll from the scrapkit. Resize by 20, smartsize. Paste onto your canvas and position to your liking. Give it the same drop shadow you gave your voodoo doll. Add any other embellishments of your choosing. When you are satisfied, hide your white background and merge your visible layers. Resize your merged layer by 85%. Go to Adjust > Sharpness > Unsharp Mask. Radius 5, Strength 10, Clipping 1.
HIghlight your white background layer. Open up a paper of choice. On your canvas, Go to Layers > New Raster Layer. On your new layer, go to Selections > Select all. Copy your paper and paste into selection on your working canvas. Deselect (CTRL+D)
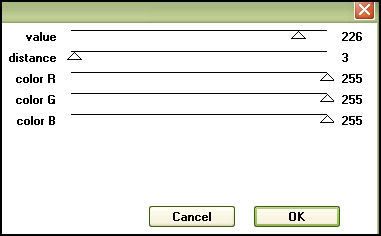
Apply the mask. Delete the mask, answer yes and merge the group. Apply a texture of choice. Duplicate the mask layer, and on the top layer, apply Penta Color Dot with the following settings:
Give the bottom mask layer a drop shadow of H and V 0, Opacity 70, Blur 20.00.
Open up some doodles of choice and resize and position to your liking. Hide your white background and merge your visible layers.
Highlight your top layer. Open up your main tube layer. Resize as necessary, bicubic. Paste as a new layer onto your canvas. Position to you liking. Give it a drop shadow of H and V 0, opacity 70, Blur 15.00.
Add your copyright info, watermark and text. Crop and resize to your liking. If you are not animating. Save as PNG or JPG. If you are, then let's continue.
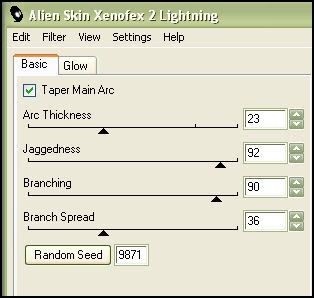
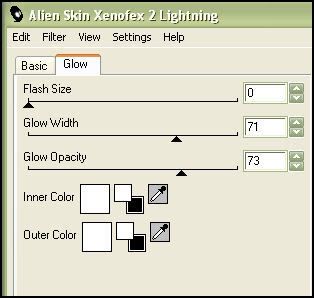
Highlight your tube layer. Apply Xenofex 2 Lightning with the following settings:
Copy merged and open up Animation Shop. Paste as a new animation in AS. Back to PSP, go to Edit > Undo Lightning. Redo Lightning, but this time hit the random seed button. Copy merged and paste after the current frame in AS. Repeat this step until you have a total of 5 frames.
In AS, select all frames (ctrl+a). Change the frame properties to 15. Optimize and save as gif.
I hope you enjoyed this tutorial. If you have any questions, leave me a shout or send me an email.
Subscribe to:
Post Comments (Atom)
0 comments:
Post a Comment