Wednesday, May 4, 2011
 Blazing Through
This tutorial was written by me on 26 September 2008. Any similarites to other tutorials is purely coincidental.
Supplies Needed:
Tube of choice. I am using the awesome artwork of Rion Vernon. I got this tube when CILm was still open. You can find him at CDO now.
Scrapkit. I am using the awesome freebie kit Winter Wishes by Monica of Scrapsational Scraps. You can download this kit at their blog
Mask by Rachel of Enchanted by Darkness
Font of choice. I used Ice Caps, which you can find here
Filters
Alien Skin Xenofex 2 Constellation
Ok! Let's begin! Open up a new transparent image of 650 x 650. Floodfill with white. Open up Frame 5 from the scrapkit. Resize by 80%, smartsize. Paste as a new layer onto your canvas. I colorized my frame to match my tube's snowboard but this it totally optional. Grab your magic wand tool, tolerance set at 20.00, feather 0.00. Go to Selections > Modify > Expand by 5.00. Open up the snowscape picture. Paste as a new layer onto your canvas. Position to your liking within the frame. Go to Selections > Invert. Hit delete on your keyboard. Do NOT Deselect!!
Open up a Raindrop of choice from your scrapkit. Resize by 50%, smartsize. Paste as a new layer onto your canvas, and position to your liking over the picture. Hit delete on your keyboard. Do NOT deselect yet!!
Open up a sparkle overlay of choice from the scrapkit. Resize by about 70%, smartsize. Paste as a new layer onto your canvas. Position to your liking. Hit delete on your keyboard. Deselect (CTRL+D) Drag your frame layer to the top of your palette. Give it a drop shadow of Ha nd V 0, Opacity 60%, Blur 15.00. Highlight your raindrop layer and ad give it a drop shadow of H 1, V 0, Opacity 30, Blur 2.00.
Open up a diamond of choice. Resize by about 40%, smartsize. Paste onto your canvas. Give it a drop shadow of H and V 0, Opacity 50, Blur 3.00. Duplicate the diamond. Position them to your liking.
Open up a bow of choice. Resize by 40%, smarsize. Apply EyeCandy Nature Icicles with the following settings:
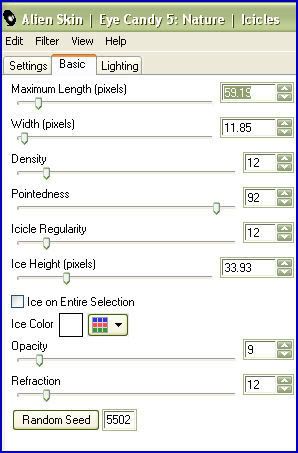
Give the bow the same drop shadow you gave your raindrops.
Open up a bubble tube of choice. Resize by 60%, resize. Position to your liking. Give it the same drop shadow you gave your bow.
Open up your tube. Resize as necessary, bicubic. paste onto your canvas and position to your liking. Give it a drop shadow of H and V 0, Opacity 75, Blur 15.00.
HIghlight your white background layer. Open up a paper of choice from the scrapkit. Go to Layers > New Raster Layer. WIth your new layer highlighted, go to selections > select all. Copy the paper, and on your canvas, right click and choose, paste into selection. Deselect (CTRL + D)
Go to Layers > Load/Save Mask form disc. Apply Rachel's Mask with the following settings:
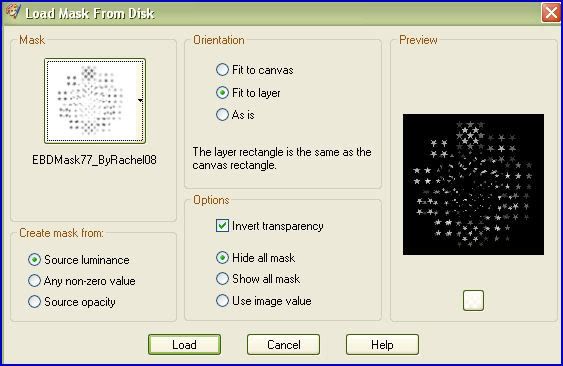
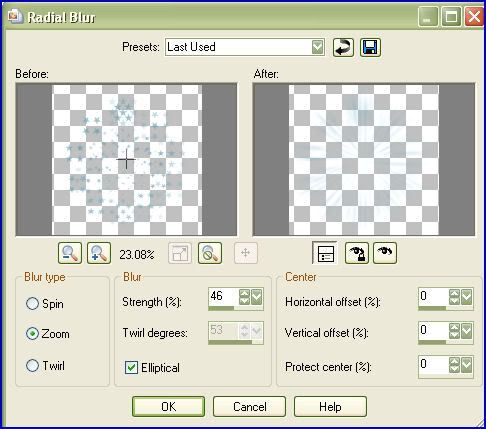
Over at your layer palette, delete the mask, answer yes, and merge the group. Resize the mask by 95%, smartsize. Position the mask to your liking. (I colorized the mask to match my tube's snowboard, but this is totally optional) Duplicate the mask. On the original layer, go to Adjust > Blur > Radial Blur. Apply with the following settings:
Apply a texture of choice to your mask, and a drop shadow of H and V 0, Opacity 25, Blur 15.00.
Add your copyright info, watermark and text. Crop and resize to your liking. If you are not animating, then save as a JPG or PNG. If you are animating, let's continue.
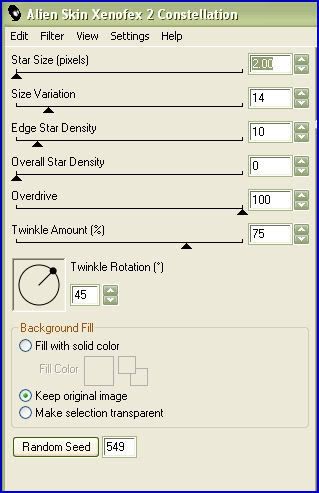
Highlight your Rain drop layer. Apply Xenofex Constellation 2 with the following settings:
Copy merged. Oen up Animation Shop. Paste as a new animation in AS. Back to PSP. Go to Edit > Undo Constellation.. Redo Constellation but this time hit the random seed button. Copy merged and paste after frame 1 in AS. Repeat this step one more time for a total of 3 frames. In AS, Select all frames (CTRL+A) Change the frame properties to 11. Optimize and save as gif.
I hope you enjoyed this tutorial. If you have any questions or comments, leave me a shout, or send me an email! :-)
Subscribe to:
Post Comments (Atom)
0 comments:
Post a Comment