Monday, May 2, 2011
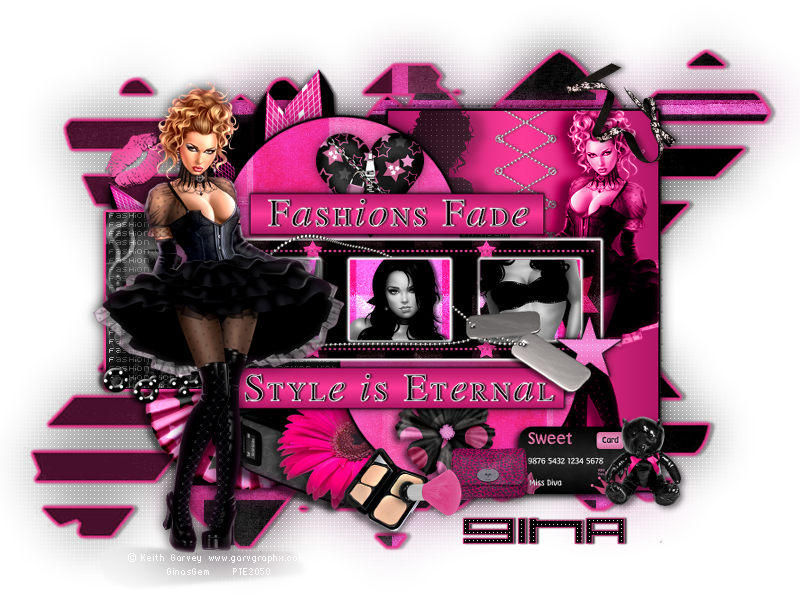
 Eternal Style

This tutorial was written by me on 3 May 2011. Any similarities to other tutorials is purely coincidental.
Supplies Needed:
2 tubes and 1 close up of choice. I am using the sexy artwork of Keith Garvey. If you wish to use his artwork, you must purchase a license with PSP Tubes Emporium.
Scrap Kit. I am using The London Look made by me. If you would like to purchase this kit, you can here, here, here, here , here or here.
Template 199 made by me. You can grab it here.
Vix Mask 105. Thank you!
Fashion Victim Word Art made by me
Font of choice. I used Karelia. You can grab it here.
Plugins:
Xero Filters - Bad Dream XL, Greyscaler, Fritillary (freeware)
Penta Filters - Dot and Cross
Alien Skin - Eyecandy 4000 Gradient Glow
Supplies HERE
****************************************************************************
Ok! Let's get started! Open up my template. Duplicate by holding shift + d. Close the original. Delete the credit layer info.
Highlight the Large Rectangle 1 layer. Go to selections > select all. Selections > float. Selections > defloat. Go to your materials palette. Change your foreground color to #e94c9d, and your background color to #f494dc. Click on your background color and make a gradient: Style - Linear, Angle 90, Repeats 1, Invert UNCHECKED. Add a new raster layer to your working image. Floodfill the new layer with your gradient. Don't deselect yet.
Open up your first tube of choice. Resize as necessary, bicubic. Mirror your tube. Copy and paste as a new layer onto your canvas. Position at the right end of the rectangle. Go to selections > invert. Hit delete on your keyboard. Deselect.
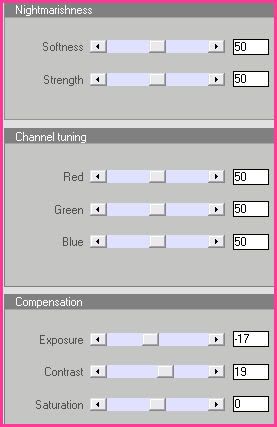
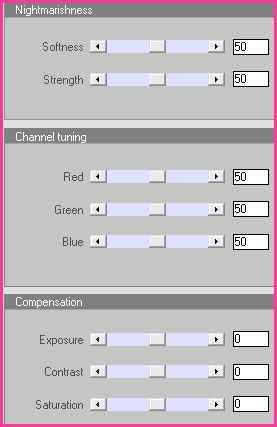
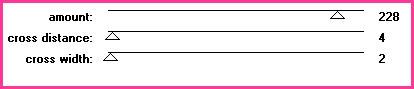
Making certain you are on your tube layer, select, float and defloat. Go to your materials palette. Change your foreground color to #000000, and your background color #555555. Click on your background color and make a gradient: Style - Linear, Angle 45, Repeats 1, Invert Unchecked. Add a new raster layer to your working image. Floodfill the new layer with your gradient. Apply Penta Filters - Dot and Cross with the following settings:

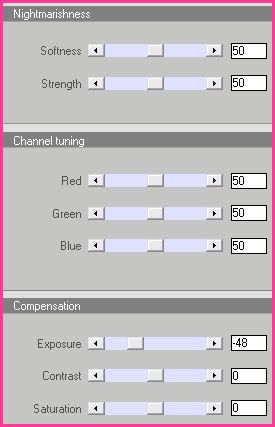
Mirror the gradient tube shadow. Position at the left end of the rectangle. Give it a drop shadow of H 7, V 0, Opacity 35, Blur 10.00. Highlight your tube layer and apply Xero Filters Bad Dream XL with the following settings:
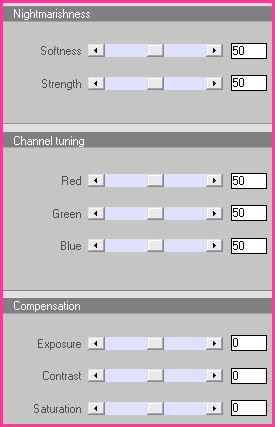
Go to adjust > sharpness > unsharp mask. Apply with a radius of 5, strength 10, clipping 2. Give your tube a drop shadow of H -7, V 0, Opacity 65, Blur 15.00. Change the blend mode of the tube to Luminance (Legacy).
 |
 Repeat the Gradient Glow one more time. Give the layer a drop shadow of H and V 0, Opacity 65, Blur 20.00. Delete the Large Rectangle 1 template layer.
Highlight the Arrows layer. Give the layer a drop shadow of H 0, V -1, Opacity 50, Blur 2.00.
Highlight the Large Rectangle 2 layer. Select, float and defloat. Go to your materials palette. Change your foreground color #000000, and your background color to #555555. Click on your background color and make a gradient, Style Linear, Angle 0, Repeats 1, Invert Unchecked. Add a new raster layer to your working image. Floodfill the new layer with your gradient. Don't deselect yet.
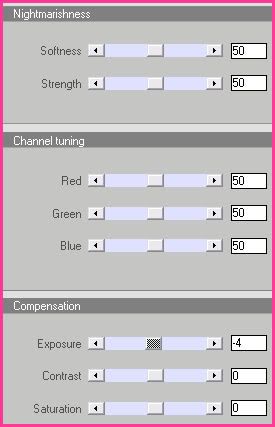
Open up your close up. Resize, if necessary, bicubic. Copy and paste as a new layer onto your canvas. Position towards the left of the rectangle. Duplicate the close up layer. Drag the duplicate close up layer above your thin rectangle layer. Hide the top close up layer and highlight the bottom one. Go to selections > invert. Hit delete on your keyboard. Deselect. Apply Xero Filters - Bad Dream XL to the close up with the following settings:
Apply Unsharp mask, same settings as before. Change the blend mode of the close up to Luminance (Legacy) and lower the opacity to about 50.
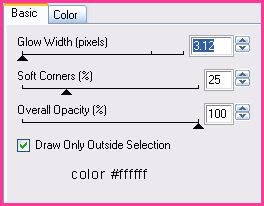
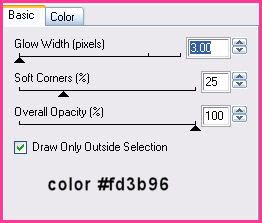
Highlight the Gradient Large Rectangle 2 layer. Apply Eyecandy 4000 - Gradient Glow with the following settings:

Repeat the gradient glow one more time. Give the layer a drop shadow of H and V 0, Opacity 65, Blur 20.00. Delete the Large Rectangle 2 template layer.
Highlight the Circle 1 layer. Select, float and defloat. Open up a paper from the kit. (I used paper 20) Resize the paper by 45%, bicubic. Copy and paste as a new layer onto your canvas. Position the paper to your liking within the selection. Selections > invert. Hit delete on your keyboard. Deselect. Apply Xero Bad Dream XL to the paper with the following settings:

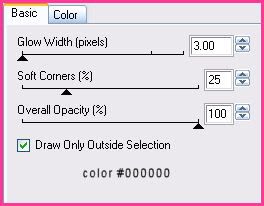
Apply Gradient Glow, color black, same settings as before. Repeat the gradient glow one more time. Give the layer a drop shadow of H and V 0, Opacity 65, Blur 25.00. Duplicate the paper circle layer. Go to image > mirror. Then, image > flip. Delete the Circle 1 and 2 template layers.
Highlight the Thin Rectangle layer. Select, float and defloat. Go to your materials palette, and change your foreground color to #e94c9d and your background color to #f494dc. Click on your background color and make a gradient. Style - Linear, Angle 0, Repeats 1, Invert Unchecked. Add a new raster layer to your working image. Floodfill the new layer with your gradient. Don't deselect yet. Unhide the hidden close up layer from earlier. Go to selections > invert. Hit delete on your keyboard. Deselect. Apply Xero Bad Dream XL to the close up with the following settings:

Change the blend mode of the close up to Luminance (Legacy) and lower the opacity to about 50.
Highlight the gradient thin rectangle and apply Gradient Glow, color black, same settings as before. Give the layer a drop shadow of H and V 0, Opacity 50, Blur 8.00. Delete the Thin Rectangle template layer.
Delete the Middle Circle layer.
Highlight the Rectangle layer. Select, float and defloat. Open up a paper from the kit. (I used paper 6) Resize by 60%, bicubic. Copy and paste as a new layer onto your canvas. Selections > invert. Hit delete. Deselect. Apply Xero Bad Dream XL to the paper rectangle with the following settings:
Apply Eyecandy Gradient Glow with the following settings:
Repeat the gradient glow one more time. Give the layer a drop shadow of H and V 0, Opacity 65, Blur 10.00. Delete the Rectangle template layer.
Highlight the Dotted Line 1 layer and give it a drop shadow of H 0, V -1, Opacity 50, Blur 2.00.
Highlight the Dotted Line 2 layer and give it a drop shadow of H 0, V 1, Opacity 50, Blur 2.00.
Highlight the squares layer. Select, float and defloat. Open up a paper from the kit. (I used paper 5) Resize by 60%, bicubic. Copy and paste as a new layer onto your canvas. Selections > invert. Hit delete on your keyboard. Deselect. Apply Xero Bad Dream with the following settings:

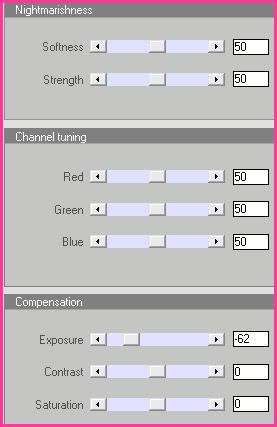
Highlight the white squares layer. Grab your magic wand tool, feather set at 0, tolerance set at 0. Click on the left square, so that there are marching ants all around it. Open up your second tube of choice. Resize if necessary, bicubic. Copy and paste as a new layer onto your canvas. Position the tube to your liking within the selection. Selections > invert. Hit delete on your keyboard. Drag the tube layer above your squares paper layer. Apply Xero Greyscaler with the following settings:
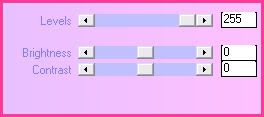
Now apply Xero Bad Dream with the following settings:
Give the tube a drop shadow of H 2, V 0, Opacity 60, Blur 5.00.
Repeat from Magic Wand until above drop shadow with the middle and right squares. Delete the Squares template layer.
Highlight the Star 1 layer. Select, float and defloat. Go to your materials palette, and change your foreground color to #f494dc, and your background color to #f9c9ee. Click on your background color and make a gradient, Style - Linear, Angle 0, Repeats 1, Invert Unchecked. Add a new raster layer to your working image. Floodfill your new layer with the gradient. Deselect. Apply Penta Filters Dot and Cross, same settings as before. Apply Gradient Glow with following settings:
Give the layer a drop shadow of H and V 0, Opacity 50, Blur 6.00. Repeat all the same steps with the Star 2 layer. Delete the template Star 1 and 2 layers.
Highlight the Gradient Rectangle 1 layer and apply Gradient Glow, same settings you just used. Give it a drop shadow of H and V 0, Opacity 65, Blur 10.00. Repeat the same steps with the Gradient Rectangle 2 layer.
Highlight the Word Art layer and give it a drop shadow of H 2, V 0, Opacity 65, Blur 2.00.
Highlight your white background layer. Open up the cityscape from the scrap kit. Resize by 45%, smartsize. Copy and paste as a new layer onto your canvas. Position it to the left of the Large Rectangle 2 layer. Give it a drop shadow of H and V 0, Opacity 50, Blur 10.00.
Open up Botanical Flower 4 from the kit. Resize by 50%, smartsize. Copy and paste as a new layer onto your canvas. Position it towards the bottom of your tag. Drag it below your bottom circle layer. Give it a drop shadow of H -5, V 5, Opacity 50, Blur 10.00.
Open up cell phone 2 from the kit. Resize by 35%, smartsize. Copy and paste as a new layer onto your canvas. Go to image > free rotate. Rotate left by 90 degrees, both boxes unchecked!! Position it the left of the botanical flower. Drag the phone layer beneath the flower layer. Apply Xero Bad Dream with the following settings:
Give the phone a drop shadow of H -5, V 5, Opacity 50, Blur 12.00.
Open up a fan from the kit. resize by 35%, smartsize. Copy and paste as a new layer onto your canvas. Go to image > flip. Position underneath the cell phone. (see my tag for reference) Apply Xero Bad Dream with the following settings:
Give it a drop shadow of H -5, V 5, Opacity 55, Blur 12.00.
Open up a fan from the kit. resize by 35%, smartsize. Copy and paste as a new layer onto your canvas. Go to image > flip. Position underneath the cell phone. (see my tag for reference) Apply Xero Bad Dream with the following settings:
Give it a drop shadow of H -5, V 5, Opacity 55, Blur 12.00.
Open up a flower blossom from the kit. Resize by 30%, smartsize. Copy and paste as a new layer onto your canvas. Position on top of your bottom circle. Give it a drop shadow of H and V 0, Opacity 50, Blur 10.00.
Open up a Zipped Heart from the kit. Resize by 20%, smartsize. Copy and paste as a new layer onto your canvas. Positon it on top of the top circle. Give it a drop shadow of H and V 0, Opacity 50, Blur 10.00.
Open up the Zigzag Chain 1 from the kit. Resize by 53%, smartsize. Copy and paste as a new layer onto your canvas. Position in the center of the vertical rectangle. Give it a drop shadow of H 2, V 0, Opacity 45, Blur 3.00.
Open up a Credit Card from the kit. Resize by 25%, smartsize. Apply unsharp mask, radius 5, strength 20, clipping 2. Copy and paste as a new layer onto your canvas. Position a the bottom of the vertical rectangle. Give it a drop shadow of H 0, V 3, Opacity 50, Blur 12.00.
Open the bear from the kit. Resize by 25%, smartsize. Copy and paste as a new layer onto your canvas. Position it to the right of the credit card. Give it a drop shadow of H 0, V 3, Opacity 50, Blur 8.00.
Open up the handbag from the kit. Resize by 30%, smartsize. Copy and paste as a new layer onto your canvas. Position it the left of the credit card. Give it a drop shadow of H 0, V 3, Opacity 50, Blur 8.00.
Open up the kabuki make up brush from the kit. Resize by 20%, smartsize. Copy and paste as a new layer onto your canvas. Go to image > free rotate. Rotate right by 90 degrees, both boxes unchecked!! Position it to the left of the handbag. Give it a drop shadow of H 0, V 3, Opacity 50, Blur 8.00.
Open up the compact from the kit. Resize by 25%, smartsize. Copy and paste as a new layer onto your canvas. Position it to the left of the Kabuki brush. Drag the compact layer underneath the kabuki brush. Give it a drop shadow of H -4, V 4, Opacity 50, Blur 8.00.
Open up the Circles Deco 1 from the kit. Resize by 44%, smartsize. Copy and paste as a new layer onto your canvas. Position it at the bottom of the Horizontal rectangle. Give it a drop shadow of H -3, V 3, Oapcity 45, Blur 5.00.
Open up the Lipstick Print from the kit. Resize by 40%, smartsize. Copy and paste as a new layer onto your canvas. Position to your liking. Give it a drop shadow of H 2, V 0, Opacity 40, Blur 3.00.
Open up the Dog Tags Chain from the kit. Resize by 50%, smartsize. Copy and paste as a new layer onto your canvas. Position to your liking on top of the rectangle. Give it a drop shadow of H 2, V -2, Opacity 45, Blur 3.00. Grab your freehand selection tool, type point to point, feather set at 0.00. Carefully select around the area of the chain that is covering the grayscaled tubes. Hit delete. Deselect.
Open up ribbon 2 from the kit. Resize by 25%, smartsize. Copy and paste as a new layer onto your canvas. Position at the upper right had corner of the vertical rectangle. Give it a drop shadow of H -2, V0, Opacity 45, Blur 5.00.
Add any other embellishments of your choosing.
Resize all of your layers by 90%, bicubic. Now go to image > canvas size. Change to width 800 pixels, height 600 pixels
Highlight your white background layer. Open up a paper from the kit. (I used paper 21) Copy and paste as a new layer onto your canvas. Apply Xero Bad Dream with the following settings:

Apply Vix Mask 105 with the following settings:
Hide all Mask
Fit to Layer
Source Luminance
Delete the mask from your layer palette, answer yes to the pop up box and merge the group. Duplicate the mask layer. On your bottom mask layer, go to adjust, Blur > gaussian blur. Apply with a radius of 25.00. Apply Penta Dot and Cross with the following settings:
Highlight the unblurred mask layer and apply gradient glow 2 times with the following settings:
Delete your white background layer.
Open up the GG_Fashion Victim Word Art from the supplies. Copy and paste as a new layer onto your canvas. Position it so it fits in the horizontal rectangle. You can change the blend mode of you want or the opacity. . . whatever you like!
Highlight your top layer. Open up your main tube. Resize, if necessary, bicubic. Copy and paste as a new layer onto your canvas. Apply Xero Bad Dream with the following settings:

Highlight your top layer. Open up your main tube. Resize, if necessary, bicubic. Copy and paste as a new layer onto your canvas. Apply Xero Bad Dream with the following settings:
Position the tube to your liking. Give it a drop shadow of H and V 0, Opacity 75, Blur 20.00.
Crop and resize to your liking.
Add your copyright info, watermark and your text.
Save as JPG or PNG.
I hope you enjoyed this tutorial! If you have any questions, just give me a shout or send me an email.
Subscribe to:
Post Comments (Atom)
0 comments:
Post a Comment