Wednesday, May 4, 2011
 Earthly Delights
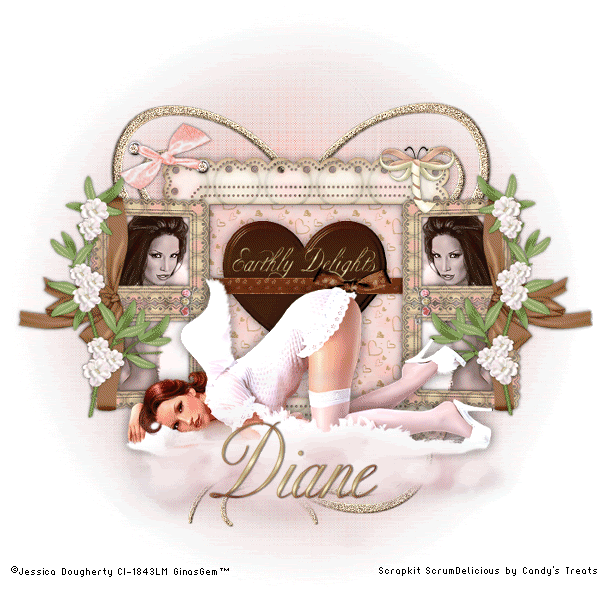
This tutorial was written by me on 14 September 2008. Any similarities to other tutorials is purely coincidental.
Supplies Needed:
2 Tubes of choice. I'm using the beautiful artwork of Jessica Dougherty. I got this art when CILM was still open. You can find her at CDO now.
Scrapkit. I am using the scrapkit ScrumDelicious by Candy's Treats. You can purchase this gorgeous scrapkit here or on her blog here
Cloud tube by Rainbow Coffi
Mask by Becky. Unfortunately her site is now closed. :-(
Small Diamond tube. I got this from a yahoo group. If this is yours, please let me know and I will properly credit you or take it out of my supplies.
Font of choice. I used Copper Alt Caps (pay font)
Filters Needed:
DSB Flux Bright Noise (opt)
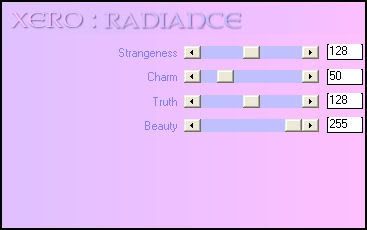
Xero Radiance (opt)
Penta Dot and Cross
Let's begin! Open up a new transparent image 700 x 700. Floodfill with white. Open up Frame 1 and resize by 80%, smartsize. Paste as a new layer onto your canvas. This next step is optional, but I applied Xero Radiance to the frame with these settings:
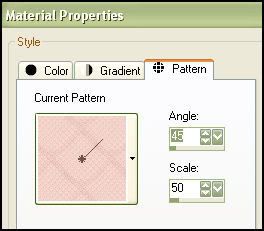
Grab your magic wand tool, tolerance set at 50, feather 0.00. Click inside the empty space of the frame. Go to Selections > Modify > Expand by 4.00. Open up a paper of choice. Minimize it. Set it as your background pattern with these settings:
Go to Layers > New Raster Layer. Floodfill this new layer with your paper pattern. Drag the layer below your frame layer. Do not deselect!
Open up a ribbon of choice. (preferebly one that contrasts with your paper) Resize the ribbon by about 45% smartsize. Paste onto your canvas and postion to your liking. Go to Selections > Invert. Hit delete on your keyboard. Deselect (CTRL+D) Highlight your frame and give it a drop shadow of H and V 0, Opacity 50, Blur 15.00. Highlight your ribbon and give it a drop shadow of H and V 0, Opacity 50, Blur 5.00.
Open up a chocolate heart of choice. Resize by 50%, smartsize. Paste onto your canvas and position it below the ribbon so it looks as if the ribbon is holding the chocolate heart in place. Give it a drop shadow of H and V 0, Opacity 50, Blur 10.00. If you like you can type out text on your chocolate heart, if you did not choose one that has writing on it already. Hide your white background and merge your visible layers.
Open up Frame 4. Resize by 50%, smartsize. Paste as a new layer onto your canvas. Go to Image > Free Rotate. Rotate Left by 90.00 degrees (both boxes unchecked!!)
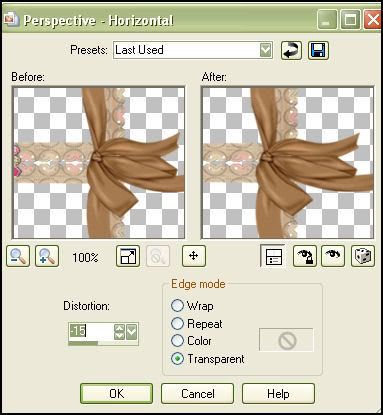
Go to Effects > Geometric Effects > Perspective Horizontal:
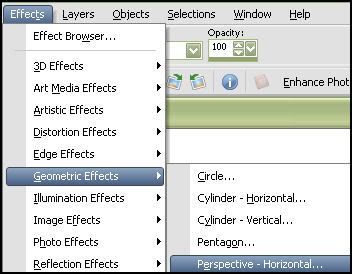
Apply to Frame 4 with the following settings:
Grab your magic wand tool. Click inside the empty spaces of the frame. Go to Selections > Modify > Expand by 3.00. Open up a paper of choice. Paste as a new layer onto your canvas. Go to Selections > Invert. Hit delete on your keyboard. (DO NOT deselect!!) Open up your first tube of choice. Resize if necessary. Paste as a new layer onto your canvas. Position to your liking within the frame. Hit delete on your keyboard. Deselect (CTRL+D)
Give the frame and your tube, a drop shadow of H and V 0, Opacity 70, Blur 5.00. Drag your paper and your tube layers beneath your frame. Hide the big frame layer and your white background and merge visible layers. Duplicate the tube/frame layer. Go to Image > Mirror. Position the tube/frame layers like this:
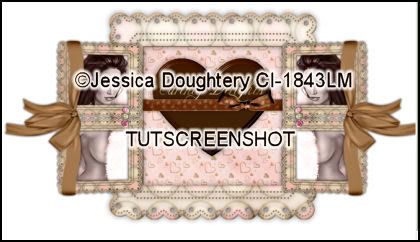
Open up a bow of choice. resize it by 25% smartsize. Paste onto your canvas and go to Image > Free Rotate Right by 15.00. Go to Adjust > Sharpness > Unsharp Mask. Radius 5.00 Strength 15 Clipping 1.00 Position in the upper left corner of your frame. (see my tag for reference) Open up the diamond tube and place over one of the rivets. Duplicate the diamond and position over the other rivet. Give the bow a drop shadow of H and V 0, Opacity 60%, Blur 4.00.
Open up a butterfly of choice. Resize it by 20%, smartsize. Paste onto your canvas and position in the upper right corner of your frame. Give it the same drop shadow you gave your bow.
Open up a flower 11. Resize by about 60%, smartsize. Paste onto your canvas. Go to Image > Free Rotate > Right by 30.00. Go to Adjust > Sharpness > Sharpen. Give it the same drop shadow you gave your butterfly. Duplicate the flowers. Go to Image > Mirror. Position as so:
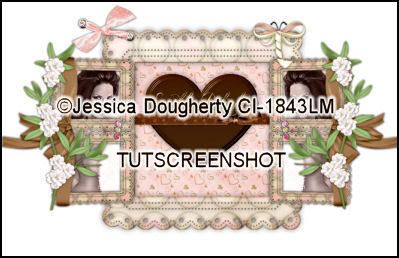
Open up your main tube. Resize if necessary (BICUBIC). Paste onto your canvas. Position to your liking. Give your tube a drop shadow of H and V 0, Opacity 65%, Blur 20.00.
Open up the Rainbow Coffi Cloud Formation. Resize by about 75%, smartsize. Place on top of your tube. If you like, you can colorize the cloud to match your tube. Give the cloud a drop shadow of H and V 0, Opacity 20, Blur 20. Grab your eraser tool, size 71, round, Opacity 12. Lightly erase some parts of the cloud that are covering the tube:
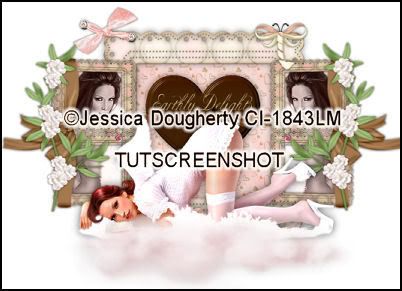
Hide your white background, and merge your visible layers. Highlight your white background. Go to Layers > New Raster Layer. Open up a paper of choice. On your new layer, go to Selections > Select all. Copy your paper. On your canvas, right click and choose, paste into selection. Deselect. (CTRL+D)
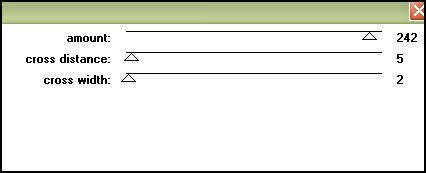
Apply the becky mask. Delete the mask, answer yes and merge the goup. Apply the Penta Filter > Dot and Cross with the following settings:
Go to Effects > Edge Effects > Enhance. Give your mask a drop shadow of H and V 0, Opacity 20, Blur 6.00.
Open up a swirl of choice. Resize and place to your liking (make certain they are above your mask layer.) Merge your swirl layers together.
Crop and resize to your liking. Add your copyright info, watermark and text. If you are not animating, you are done. Save as a PNG or JPG file. If you are animating, let's continue!
Oopen up Animation Shop. In Paint Shop Pro, highlight your swirl layer. Go to DSB Flux, Bright Noise. Apply with the following settings:

Copy Merged and paste as a new layer in AS.
Go to back PSP. Go to Edit > Undo > DSB Flux. Apply Bright noise again, but this time, click the MIX button one time. Copy merged, and paste after the first frame in animation shop. Repeat the above step one more time, so you have a total of 3 frames.
Optimize and save as GIF. I hope you enjoyed this tutorial. If you have any questions, please feel free to ask.
Subscribe to:
Post Comments (Atom)
0 comments:
Post a Comment