Wednesday, May 4, 2011
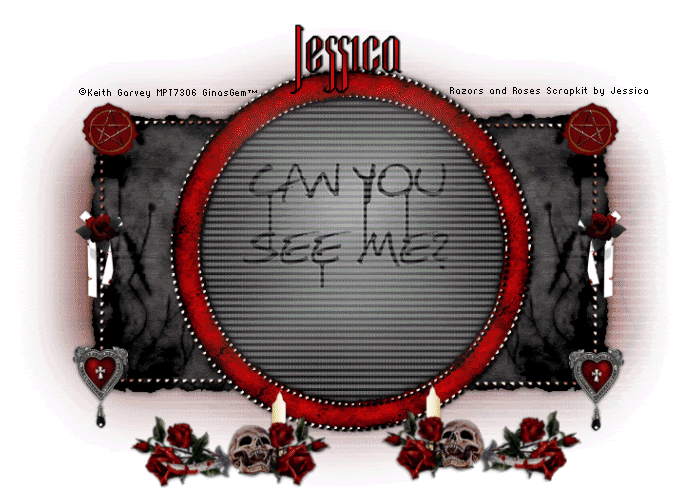
 Can U See Me?
This tutorial was written by me on 10 September 2008. Any similarites to other tutorials is purely coincidental.
Supplies Needed:
Tube of choice. I am using the artwork of Keith Garvey. I got this tube when he was still with MPT. You can find him at PSP Tubes Emporium now.
Scrapkit. I am using an awesome scrap by Jessica called Razor and Roses, which can be purchased at Tantrum Scraps. Also, check out Jessica's Blog for some great goodies! If you don't have this scrapkit, use one of your own using the tut for guidelines. :-)
Template made by me
Animation. I made the animation using 2 of Vix's masks. . . she has AWESOME resources. Check her out!
Font of Choice. I used Luxemborg. You can download it here
Filters Needed:
Animation Shop (opt)
Let's begin! Open up the provided template and delete the credits. Highlight the "circle frame fill" layer. Grab your magic wand tool, tolerance set at 50.00, feather 0.00. Click inside of the circle so there are marching ants all around it. Go to selections > modify > contract by 4.00.
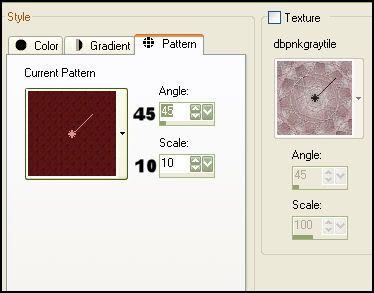
Open up a paper of choice from the scrapkit. Minimize it. Go over to your materials palette. Choose the paper as your background. Set the pattern settings to:
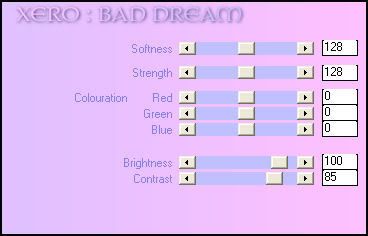
Grab your floodfill tool (the little paint can) and fill the layer with your paper pattern. Deselect (CTRL + D) Apply the filter Xero > Bad Dream with the following settings:
Give the layer a drop shadow with H and V 0, opacity 65%, blur 9.00.
Highlight one of your rectangle layers. Grab your magic wand, same settings as before and click on the rectangle so it has marching ants all around it. Open up another paper of choice. Paste as a new layer onto your canvas. Go to selections > invert. Hit delete on your keyboard. Deselect (CTRL+D) Repeat the same thing with the other rectangle. Apply Xero > Bad Dream to both paper rectangle layers, except change the Brightness to 75. (If you are using Jessica's Kit, I used a red paper but went to effects > Photo Effects > Black and White Film) Give both rectangles a drop shadow of H and V, Opacity 70, Blur10.00. Delete both black rectangle layers.
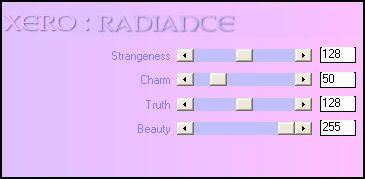
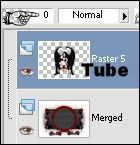
Open up your tube. Resize if necessary (bicubic). Paste as new layer onto your canvas. Position your tube to your liking. I applied Xero > Radiance to my tube but this is totally optional. These are the settings I used:
Give your tube a drop shadow of H 0, V -13, Opacity 50, Blur 10.00.
Open up accent 3 from the scrapkit. Resize by 50%, smartsize. Paste onto your canvas and position at the bottom of your tag to your liking. Duplicate and mirror the accent. (see my tag above for placement)
Open up the waxseal from the scrapkit. Resize by 50%, smartsize. Paste onto your canvas and give it a drop shadow of H and V 0, opacity 50, blur 4.00. Duplicate the seal and mirror it. Place the seals on the top corners of the rectangles. (I opened up the star accent and resized by 15% and placed in the middle of the wax seal)
Open up the charm from the scrapkit. Resize by 50%, smartsize and paste onto your canvas. Give it the same drop shadow you gave the waxseal. Position the charm on the bottom left corner of the left rectangle. Duplicate the charm and mirror it. Place it on the right corner of the right rectangle.
Open up the white bow. Resize to 30% smartsize. Paste onto your canvas and position it in the middle of the left side of the rectangle. Give it the same drop shadow that you gave the charm. Duplicate the bow and mirror it. Place it in the middle of the right side of the right rectangle. Open up a rose of choice. Resize by about 15%. Place it on top of one of the white bows. Give it the same drop shadow you gave the bow. Duplicate the rose and mirror it. Position on top of the other bow. Add other embellishments if you wish.
Highlight your white background. Go to Layers > New Raster Layer. Highlight your new layer on your layer palette. Go to Selections > Select all. Open up a paper of choice. Paste the paper into the selection. Deselect. Apply the mask to the paper layer. Delete the mask, answer yes, and merge the group.
Add your copyright info, watermark, and text. If you are not animating, then you are done. Crop and resize and save as PNG or JPG.
If you are animating, stay with me. Just follow one step at a time and we can get through it. lol
Hide your tube layer and merge all other layers together. Unhide your tube layer and lower the opacity of the layer to ZERO. Copy merged and open up Animation Shop. Paste as a new animation.
Back in Paint Shop Pro, change the opacity of the tube to 20%. Copy merged and paste after the first frame in animation shop.
Back in PSP, change the opacity to 40. Copy merged and paste after Frame 2 in AS.
Back in PSP, change the opacity to 60, copy merged and paste after Frame 3 in AS.
Back in PSP, change the opacity to 80, copy merged and paste after Frame 4 in AS.
You should now have 5 frames in AS. Select all of the frames (CTRL + A) Copy the animation. Paste it as a new animation.
Select all of the frames of the copied animation. (CTRL + A) Go to Animation > Reverse Frames. Copy the reversed animation. Highlight the last frame of the original animation. Paste after frame 5. You should now have 10 frames.
Back to the reversed frame animation. Go to Edit > Undo Reverse Frames. Select all of the frames. Copy and paste after frame 10. You should now have 15 frames.
Back to the smaller animation. (the one with only 5 frames) Select all frames (CTRL + A) Reverse the frames again. Copy and paste after frame 15. You should now have 20 frames.
Highlight Frame 6 and delete it. Highlight Frame 10 and delete it. You should now have 18 frames.
Open up the CanucmeMNG file in animation shop. Select all of the frames (CTRL +A) Copy.
Select all of the frames of your tag animation (CTRL +A) Go to Edit > Paste into selected frame. Paste the canucme animation in the middle of the circle. Select all frames (CTRL +A) Change the frame properties to 30.
Back in PSP. Change the opacity of the tube to 100%. Copy merged. Paste after Frame 5 of your animation. Paste again after Frame 15.
Highlight Frame 1. Change the frame properties to 60.
Highlight Frame 6. Change the frame properties to 60.
Highlight Frame 10. Change the frame properties to 60.
Highlight Frame 16. Change the frame properties to 60.
Delete Frame 20. PHEW!! Pat yourself on the back cause we're done!!! Optimize and save your hard work as a gif.
I hope you enjoyed this tutorial. If you have any questions, please feel free to email me! (I know this one is a bit of a doozy! lol)
Subscribe to:
Post Comments (Atom)
0 comments:
Post a Comment