Wednesday, May 4, 2011
 Curly Girly Christmas
This tutorial was written by me on 2 November 2008. Any similarities to other tutorials is purely coincidental.
Supplies Needed:
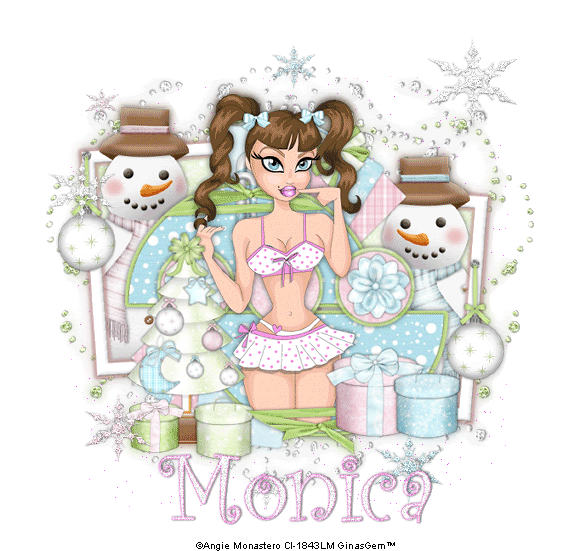
Tube of choice. I am using the awesome artwork of Angie Monastero. I got this tube when CILM was still open. I don't know of anywhere you can get her work now, so just use a tube you like instead.
Scrapkit Winter Wonderland by Monica of Simply Sensational Scraps. You can download this wonderful freebie kit here
Template # 30 by Denz Designz. Download it at her blog here
Font of choice. I used Curlz MT (pay font)
Plugins
DSB Flux Bright Noise
Xero Sparkles
Eyecandy 4000 Gradient Glow
Animation Shop (opt)
No Supplies Needed
Let's begin! Open up Denz template. Duplicate by holding SHIFT +D. Close the original. Go to image > resize. Resize all layers by 90%, smartsize. Go to image > canvas size. Change the canvas size to 700 x 700. Add a new raster layer. Arrange > send to bottom. Floodfill with white. Delete the credits
Open frame 1, from the scrapkit. Highlight your white background. Copy and paste as a new layer onto your canvas. Grab your magic wand tool, tolerance 30, feather set at 0. Click inside one of the empty spaces of the frame. Go to selections > modify > expand by 4.00. Open up a paper of choice from the kit. Copy and paste onto your canvas. Position to your liking within the selection. Selections > invert. Hit delete on your keyboard. Deselect. (CTRL+D) Drag your frame above your paper layer.
Open up one of the snowmen from the kit. Copy and paste onto your canvas. Position to your liking within the frame. Give the snowman a drop shadow of H and V 0, Opacity 60, Blur 5.00. Grab your magic wand tool again. Highlight the frame layer. Click inside the empty part of the frame. Selections > invert. Grab your eraser tool, size 30, Opacity 90. Carefully erase the parts of the snowman you don't want hanging out of the frame. Deselect. Repeat the same steps with the other empty space of the frame.
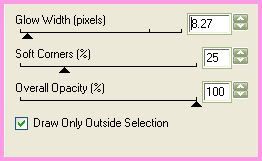
Highlight the frame. Apply gradient glow ( I used color #eaaba9) with the following settings:
Open up a bauble of choice. Resize by 30%, smartsize. Copy and paste onto your canvas. Give it a drop shadow of H and V 0, Opacity 50, Blur 5.00. Duplicate the bauble. Position them to your liking on the frame.
Highlight the strip 4 layer. Go to selections > select all. Selections > float. Selections > defloat. Open up a paper of choice from the kit. Copy and paste onto your canvas. Position to your liking within the selection. Selection > invert. Hit delete on your keyboard. Deselect. Give the layer a drop shadow of H and V 0, Opacity 60, Blur 5.00 Delete the gray strip 4 layer. Repeat the same steps with the rest of the strip layers.
Highlight the circle top 1 layer. Select, float and defloat. Open up a paper from the kit. Copy and paste onto your canvas. Selections > invert. Hit delete. Deselect. Give it a drop shadow of H and V 0, Opacity 60, Blur 10.00. Delete the white circle top1layer.
Highlight the circle top layer. Select, float and defloat. Open up a paper of choice from the scrapkit. Copy and paste onto your canvas. Position to your liking within the selection. Selections > invert. Hit delete on your keyboard. Deselect. Give the layer a drop shadow of H and V 0, Opacity 50, Blur 5.00. Delete the gray circle top layer.
Highlight the circle bottom 1 layer. Select, float and defloat. Open up a paper from the kit. Copy and paste onto your canvas. Selections > invert. Hit delete. Deselect. Give it a drop shadow of H and V 0, Opacity 60, Blur 8.00. Delete the white half circle layer.
Highlight the circle bottom layer. Select, float and defloat. Open up a paper from the kit. Copy and paste onto your canvas. Selections > invert. Hit delete. Deselect. Give it a drop shadow of H and V 0, Opacity 60, Blur 5.00. Delete the gray half circle layer.
Open up a wrap of choice. Resize by 60%,smartsize. Copy and paste onto your canvas. Give it a drop shadow of H and V 0, Opacity 50, Blur 4.00. Position to your liking at the bottom of the bottom half circle. Grab your freeheand selection tool, type point to point, feather 1. Carefully select around the ends of the ribbon that you don't want hanging over the half circle. Hit delete. Deselect. Duplicate the ribbon. Go to image > flip. Position so tha it fits on the top half circle.
Highlight the small circles 1 layer. Select, float and defloat. Open a paper of choice and paste onto your canvas. Selections > invert. Hit delete. Deselect. Give the layer a drop shadow of H and V 0, Opacity 50, Blur 8.00. Delete the white circles.
Highlight the small circles layer. Select, float and defloat. Open a paper of choice and copy and paste onto your canvas. Selections > invert. Hit delete on your keyboard. Give the layer a drop shadow of H and V 0, Opacity 50, Blur 4.00. Delete the gray circles.
Open up a flower of choice. Resize by 30%, smartsize. Copy and paste onto your canvas. Give it a drop shadow of H and V 0, Opacity 50, Blur 4.00. Position the flower in one of the small circles. Duplicate the flower and position it on the other end circle.
Open up 2 boxes of choice from the kit. Resize the first one by 28%, smartsize. Copy and paste onto your canvas. Give it a drop shadow of H and V 0, Opacity 50, Blur 5.00. Position to your liking. Resize the second box by 20%, smartsize. Give it the same drop shadow you gave your other box. Position next to the other box.
Open up a tree of choice. Resize by 55%, smartsize. Copy and paste onto your canvas. Give it a drop shadow of H and V 0, Opacity 50, Blur 5.00. Decorate the tree with some baubles and decorations of choice. (see my tag for reference)
Open up 2 more boxes from the kit. Resize one by 30% and the other by 20%, smartsize. Copy and paste them onto your canvas. Give them the same drop shadow you gave your tree. Position them to your liking underneath the tree.
Open your tube. Resize bicubic, if necessary. Copy and paste onto your canvas. Give the tube a drop shadow of H and V 0, Opacity 60, Blur 12.00. Position your tube to your liking.
Highlight your white background. Open up 2 glitter doodles of choice. Copy and paste your first one onto your canvas. Resize by 70%, smartsize. Give it a drop shadow of H 1, V -1, Opacity 30, Blur 2.00. Duplicate the doodle. Go to image > mirror. Position the doodles to your liking. Copy and paste your second doodle of choice onto your canvas. Resize by 70%. Go to image > free rotate > Left by 90.00, both boxes unchecked. Give it the same drop shadow you gave your other doodle. Duplicate. Image > mirror. Position them to your liking.
Hide your white background and merge your visible layers. Resize your merged layer by 85%, bicubic. Go to adjust > sharpness > unsharp mask with these settings:
Radius 5
Strength 20
Clipping 1
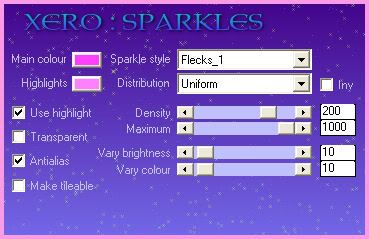
Duplicate the merged layer. On the bottom layer go to adjust > blur > gaussian blur with a radius of 5. Apply xero sparkles with the following settings:
Hide your white background and merge your layers together. Highlight your white background. Open up a few snowflakes of choice. Paste them onto your canvas, and resize and position them to your liking. Give the snowflakes a drop shadow of H and V 0, Opacity 30, Blur 3.00. Merge your snowflakes together.
Crop and resize to your liking. Add your copyright info, watermark and text. If you are not animating, you are done. :-)
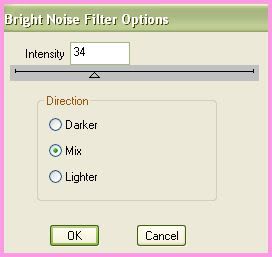
If you are, highlight your snowflake layer. Apply DSB Flux Bright Noise with the following settings:
Copy merged. Open up Animation Shop. Paste as a new animation. Back to PSP. Go to Edit > Undo Bright Noise. Apply Bright Noise again, but this time click the mix button. Copy merged and paste after your current frame in AS. Repeat one more time for a total of 3 frames.
Optimize and save a gif.
I hope you enjoyed this tutorial. If you have any questions, just leave me a shout.
Subscribe to:
Post Comments (Atom)
0 comments:
Post a Comment