Tuesday, May 3, 2011
 Bring Me to Life
This tutorial was written by me on 27 May 2009. Any similarities to other tutorials is purely coincidental.
Supplies Needed:
Tube of choice. (a horizontally placed tube, such as one that is lying down works best) I bought this tube with CILM when they were still open. If you would like to use her artwork, you can now purchase it at CDO.
Scrapkit. I am using Opposites Attract by Candy's Treats. If you wish to purchase this amazing kit, you can here. Thank you, Diane!! Psst. . . check out her blog. . . she always gives away a fab freebie with her special edition kits. :-)
Mask 254 by Vix. Check out her site for awesome tuts and resources!!
Font of choice. I used International Palms. (pay font)
Plugins:
Filter Factory A - Mirror Mirror. If you have Filters Unlimited, just import the filter into that program.
Mehdi Filters - Fur
Xenofex 2 - Constellation and Crumple
Animation Shop (opt)
Supplies HERE
*~*~*~*~*~*~*~*~*~*~*~*~*~*~*~*~*~*~*~*~*~*~*~*~*~*~*~*~*~*~*~*~*~*~*~*
Ok! Let's get started! Open up a new transparent image 750 width x 650 height. Floodfill with white.
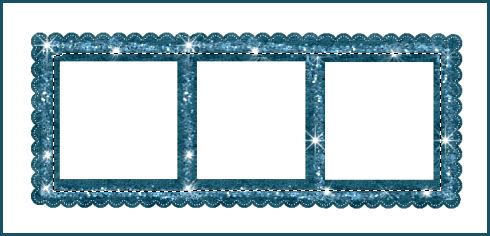
Open up ct- frame2 -Green with Glitter, from the frames folder of the kit. Resize by 70%, smartsize. Copy and paste as a new layer onto your canvas. Go to adjust > sharpness > unsharp mask. Apply with a radius of 5.00, strength 45, clipping 2.00. Gran your selection tool, selection type - rectangle, feather set at 0.00. Select around the inside of the frame like this:
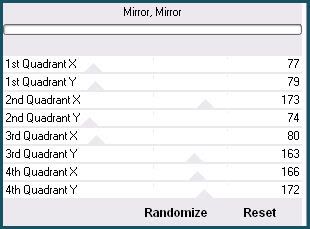
Open up your tube. Don't resize. Mirror it. Copy and paste as a new layer onto your canvas. Postion it so that all or most of the frame is covered by the tube. Go to selections > invert. Hit delete on your keyboard. Don't deselect. Go to selections > invert, again. Go to adjust > blur > gaussian blur. Apply with a radius of 20.00. Deselect. (CTRL+D) Apply Filter Factory A - Mirror Mirror with the following settings:
Drag the blurred tube layer beneath your frame. Select around the frame again, same as before. Open up a paper from the kit. Resize by 65%, smartsize. Copy and paste as a new layer onto your canvas. Position to your liking within the selection. Go to selections > invert. Hit delete and deselect. Make sure your paper layer is above the blurred tube layer. Change the blend mode to Overlay. Hide your white background and your frame layer. Merge the paper and the blurred tube layer together. Unhide your frame and white background layers. Your frame layer should be at the top of your layer palette.
Open up your tube again. Resize as necessary, bicubic. Copy and paste your tube as a new layer onto your canvas. Give it a drop shadow of H -5, V -3, Opacity 55, Blur 12.00. Now give it a drop shadow of H 4, V 2, Opacity 55, Blur 9.00. Position your tube to your liking in front of the frame. Make sure it really like where it is, because you can't move it!! lol
Duplicate your tube. Drag the bottom tube layer beneath your frame. (you should have one tube right above your frame, and one right below) Highlight your top tube layer. Grab your eraser tool, size 40, opacity 100. Carefully erase the parts of the tube you don't want hanging out of the frame. When you are done, highlight your bottom tube and do the same, maing sure not to erase to beyond the borders of the frame. (see my tag for reference) Highlight your frame layer, and give it a drop shadow of H and V 0, Opacity 80, Blur 12.00.
Hide your white backgound and merge your visible layers together.
Open up a ct - string from the kit. Resize by 65%, smartsize. Copy and paste as a new layer onto your canvas. Position the string behind your merged frame layer, in the left upper corner. (see my tag for reference) Grab your magic wand tool, tolerance set at 50, feather set at 0.00. Click inside the middle of the string, and the bottom empty space like this:

Now, go to selections > modify > expand by 4.00. Open up a paper from the kit. Resize by 65%, smartsize. Copy and paste the paper as a new layer onto your canvas. Position it to your liking within the selection. Go to selections > invert. Hit delete on your keyboard. Don't deselect.
Open up the ct - beads from the kit. Resize by 45%, smartsize. Copy and paste as a new layer onto your canvas. Position the beads to your liking within the selection. Hit delete. Deselect. Highlight your string layer and give it a drop shadow of H and V 0, Opacity 65, Blur 8.00. Drag it above your paper and beads layer.
Open up ct - swirl 5 from the kit. Copy and paste as a new layer onto your canvas. Give it a drop shadow of H 2, V -2, Opacity 55, Blur 3.00. Duplicate the swirl. Go to image > mirror. Then, image flip. Position on swirl behind the round string and paper, and the other in the opposite corner. (see my tag for reference)
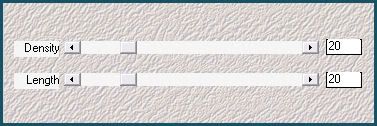
Open up another swirl ( a light colored swirl would work best) from the kit. Copy and paste the swirl as a new layer onto your canvas. Apply Mehdi Fur with the following settings:
Give it a drop shadow of H 2, V -1, Opacity 45, Blur 3.00. Duplicate the swirl. Go to image > mirror. Then, image > flip. Position the fur swirls on top of the black swirls
Open up 2 different blossoms from the kit. Resize one by 90%, smartsize, and leave the other as is. Copy and paste them onto your canvas. Give them both a drop shadow of H and V 0, Opacity 65, Blur 8.00. Position the larger on on top of the bottom right fur swirl. Highlight the smaller blossom and mirror it. Now, flip it. Position it on top of the larger blossom.
Open up a bling circle from the kit. Resize it by 70%, smartsize. Apply unsharp mask, same settings as before. Copy and paste as a new layer onto your canvas. Grab your magic wand tool, tolerance set at 50, feather set at 15.00. Click inside the middle of the bling circle. Open up a paper from the kit. ( a light colored paper would look best) Resize by 50%, smartsize. Copy and paste as a new layer onto your canvas. Position the paper to your liking within the selection. Go to selections > invert. Hit delete 2 times on your keyboard. Deselect. Go to effects > edge effects > enhance. Give the paper a drop shadow of H and V 0, Opacity 50, Blur 10.00. Drag the bling circle above your paper layer, and give it a drop shadow of H 2, V 1, Opacity 60, Blur 3.00. Merge the bling circle and paper layer together. Duplicate. Go to image > mirror. Then, image > flip. Position the bling circles as in my tag above.
Highlight your top layer. Open up a ct ribbon with a safety pin. Resize by 30%, smartsize. Copy and paste as a new layer onto your canvas. Give it a drop shadow of H 2, V -1, Opacity 65, Blur 3.00. Position it at the top of the string.
Open up a ribbon curl from the kit. Resize by 25%, smartsize. Copy and paste as a new layer onto your canvas. Give it a drop shadow of H 2, V -2, Opacity 55, Blur 6.00. Duplicate the curl. Go to image > mirror. Then, image > flip. Position on curl at the right bottom corner of the frame, and the other at the left bottom corner.
Open up a folded ribbon from the kit. Resize by 50%, smartsize. Copy and paste as a new layer onto your canvas. Give it a drop shadow of H and V 0, Opacity 65, Blur 7.00. Position at the bottom of the frame.
Open up a flower from the kit. Resize by 50%, smartsize. Copy and paste as a new layer onto your canvas. Give it a drop shadow of H 2, V -2, Opacity 55, Blur 5.00. Position the flower in the left bottom corner of the frame.
Open up another blossom from the kit. Resize by 30%, smartsize. Copy and paste as a new layer onto your canvas. Give it a drop shadow of H -2, V 2, Opacity 55, Blur 5.00. Position the blossom on top of the flower.
Open up a button from the kit. Resize by 40%, smartsize. Copy and paste as a new layer onto your canvas. Give it a drop shadow of H -2, V 0, Opacity 55, Blur 3.00. Position at the right bottom corner of the frame.
Open up the ct - black gems from the kit. Resize by 40%, smartsize. Copy and paste as a new layer onto your canvas. Give it a drop shadow of H 2, V 0, Opacity 55, Blur 3.00. Position on top of the button.
Open up a ribbon (without a safety pin from the kit). Resize by 20%, smartsize. Copy and paste as a new layer onto your canvas. Give it a drop shadow of H and V 2, Opacity 55, Blur 4.00. Position on top of the black gems.
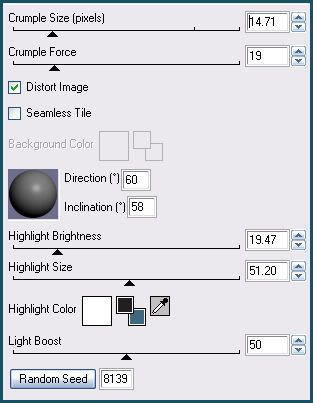
Open up the notepaper from the kit. Resize by 65%, smartsize. Copy and paste as a new layer onto your canvas. Apply Xenofex 2 crumple with the following settings:
Go to image > free rotate. Rotate right by 15.00 degrees, both boxes unchecked. Now apply unsharp mask, same settings as earlier. Give it a drop shadow of H and V 0, Opacity 65, Blur 6.00. Position it at the top of the tag. If you like, type out some text onto the paper and rotate it the same so it fits onto the paper.
Open up the staples from the kit. Resize by 65%, smartsize. Copy and paste as a new layer onto your canvas. Give it a drop shadow of H-2, V 0, Opacity 65, Blur 2.00. Position so they look as if they are holding the notepaper in place.
Open up the ct - swirls from the kit. Resize by 30%, smartsize. Copy and paste as a new layer onto your canvas. Give them a drop shadow of H 2, V 1, Opacity 45, Blur 3.00. Duplicate. Go to image > mirror. Then, image > flip. Position them as in my tag above.
Add any other embellishments of your choosing.
Hide your white background and merge your visible layers. Resize your merged layer by 90%, bicubic. Give the merged layer a drop shadow of H and V 0, Opacity 50, Blur 20.00.
Unhide and highlight your white background. Open up a paper from the kit. Resize by 90%, smartsize. Copy and paste as a new layer onto your canvas. Apply Vix Mask 254 with the following settings:
Source Luminance
Fit to Canvas
Hide all Mask
Delete the mask, answer yes and merge the group. Resize the mask by 87%, smartsize. Position the mask to your liking behind the merged layer. Give it a drop shadow of H 2, V 1, Opacity 65, Blur 3.00. Duplicate the mask. On the bottom mask layer, go to adjust > blur > gaussian blur. Apply with a radius of 10.00. To the blurred mask layer apply mehdi fur, same settings as before.
Crop and resize to your liking.
Add your copyright info, watermark and your text. If you are not animating, save as JPG or PNG.
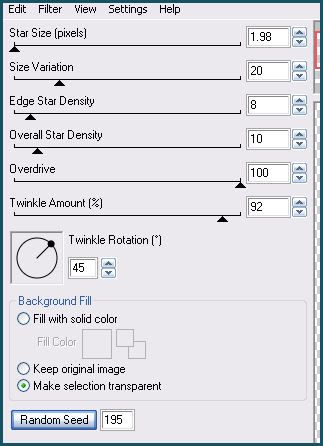
If you are animating, duplicate your blurred fur mask layer. On the top layer, apply xenofex 2 - constellation with the following settings:
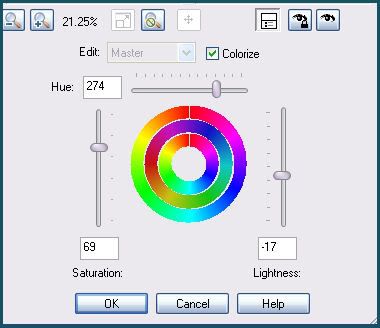
You can either leave the constellation as is, or you can colorize like I did. If you want to colorize, go to adjust > Hue and Saturation > Hue/Saturation/Lightness. Apply with the following settings:
You can play around with the settings if you like, to come up with something of your own. Just remember what settings you chose, so you can apply them again.
Copy merged. Open up Animation Shop. Paste as a new animation in AS.
Back to Paint Shop Pro. Go to edit > undo Color Adjust HSL. Edit > undo Constellation. Apply Constellation, same settings, but hit the random seed button. Go to adjust > Hue and Saturation > Hue/Saturation/Lightness. Apply with the same settings you used before. Copy merged. Paste after your current frame in AS.
Repeat the above steps 3 more times for a total of 5 frames.
In AS, select all frames (CTRL+A). Change the frame properties to 13.
Optimize and save as gif.
I hope you enjoyed this tutorial! If you have any questions, just give me a shout.
Subscribe to:
Post Comments (Atom)
0 comments:
Post a Comment