Tuesday, May 3, 2011
 Amercan Babe

This tutorial was written by me on 4 April 2009. Any similarities to other tutorials is purely coincidental.
Supplies Needed:
3 tubes of choice. I am using the sensual artwork of Joe Cano. I bought this art when he was still with MPT. You can find his art at PSP Tubes Emporium.
American Pride scrapkit by Designs by Ali. If you wish to purchase this patriotic kit, you can here. Thank you, Ali!!
Template 146 made by me which you can download here.
VixMask 248, which you can download from her site here.
2 fonts of choice. I used US Stars n Stripes (go HERE) and Hurrican Swash (pay font)
Plugins:
Tramages - Accelerating Glass (type in Tramages into your search engine)
Animation Shop (opt)
No other supplies needed
*~*~*~*~*~*~*~*~*~*~*~*~*~*~*~*~*~*~*~*~*~*~*~*~*~*~*~*~*~*~*~*~*~*~*~*~*~*~*~*~*~*~*~*~*~*~*~*~*~*~*~*~*~*
Ok! Let's get started! Open up my template. Duplicate by holding down shift + d. Close the original. Delete the credit info layer.
Highlight the 2 rectangles layer. Go to selections > select all. Selections > float. Selections > defloat. Open up a paper from the kit. Resize by 78%, smartsize. Copy and paste onto your canvas. Go to selections > invert. Hit delete on your keyboard. Deselect. Give the layer a drop shadow of H and V 0, Opacity 75, Blur 10.00. Delete the dark gray 2 rectangles layer.
Highlight the circle star fill layer. Select, float and defloat. Open up a paper from the kit. Resize, 78%, smartsize. Copy and paste onto your canvas. Selections > invert. Hit delete and deselect. Delete the light gray circle star fill layer.
Highlight the circle star layer. Select, float and defloat. Open up a paper from the kit. Resize by 78%, smartsize. Copy and paste onto your canvas. Selections > invert. Hit delete and deselect. Give the layer a drop shadow of H and V 0, Opacity 80, Blur 7.00. Delete the gray circle star layer.
Highlight the star fill layer. Select, float and defloat. Open up a paper from the kit. Resize by 60%, smartsize. Copy and paste onto your canvas. Selections > invert. Hit delete and deselect. Delete the white star fill layer.
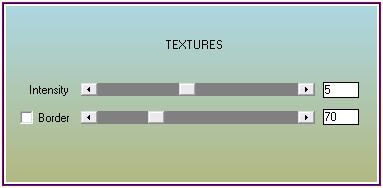
Highlight the star layer. Select, float and defloat. Add a new raster layer. Floodfill the new layer with a color of choice. (I used white) Deselect. Apply AAA Textures with the following settings:
Give it a drop shadow of H and V 0, Opacity 80, Blur 5.00. Delete the black star layer.
Highlight the encircled stars layer. Select, float and defloat. Add a new raster layer. Floodfill the new layer with a color of choice. (I used white for this one, too). Deselect. Apply Textures, same settings. Give the layer a drop shadow of H and V 0, Opacity 60, Blur 4.00. Delete the gray encircled stars layer.
Highlight the square stars layer. Select, float and defloat. Open up a paper from the kit. Resize by 78%, smartsize. Copy and paste onto your canvas. Selections > invert. Hit delete and deselect. Give the layer a drop shadow of H and V 0, Opacity 60, Blur 3.00. Delete the gray square stars layer.
Highlight the circle star layer. Open up a satin ribbon of choice from the kit. Resize by 30%, smartsize. Copy and paste onto your canvas. Position towards the right, upper part of the circle star layer. (see my tag for reference) Give the ribbon a drop shadow of H and V 0, Opacity 50, Blur 6.00. Highlight your circle star layer again. Select, float and defloat. Selections > invert. Highlight your ribbon layer. Grab your eraser tool, size 40, Opacity 90. Erase any parts of the ribbon you don't want hanging out of the circle star. Deselect. Duplicate the ribbon. Go to image > mirror.
Open up a frame of choice. Resize by 30%, smartsize. Copy and paste onto your canvas. Position it in the right, upper corner of the top rectangle. Grab your magic wand tool, tolerance 30, feather set at 1. Click inside the empty space of the frame. Go to selections > modify > expand by 2.00. Open up a paper from the kit. Resize by 35%, smartsize. Copy and paste onto your canvas. Position to your liking within the selection. Selections > invert. Hit delete. Don't deselect!
Open up your first tube of choice. Resize as necessary, bicubic. Copy and paste onto your canvas. Position to your liking within the selection. Hit delete. Deselect. Change the blend mode of the tube to Luminance (Legacy). Give the tube a drop shadow of H 3, V 0, Opacity 60, Blur 4.00. Highlight the frame and give it a dro shadow of H and V 0, Opacity 60, Blur 5.00. Merge the frame, paper and tube layers together. Duplicate. Go to image > mirror.
Copy and paste the same frame onto your canvas. (resized as well) Position it in the right bottom corner of the bottom rectanlge. Repeat the same steps.
Open up a mutli colored flower of choice. Resize by 25%, smartsize. Copy and paste onto your canvs. Give it a drop shadow of H and V 0, Opacity 50, Blur 6.00. Position in between the 2 rectangles on the left (see myt ag for reference) Duplicate. Go to image > mirror.
Open up a single colored flower of choice. Resize by 25%, smartsize. Copy and paste onto your canvas. Give it a drop shadow of H and V 0, Oapcity 50, Blur 3.5. Position it over the multi colored flower. Duplicate. Go to image > mirror.
Open up another single colored flower of choice. Resize by 20%, smartsize. Copy and paste onto your canvas. Give it a drop shadow of H and V 0, Oapcity 50, Blur 2.00. Position it over the bigger sinlge colored flower. Duplicate. Go to image > mirror.
Highlight your top layer.Open up your tube. Resize as necessary, bicubic. Copy and paste onto your canvs. Position in the center of the tag. Give your tube a drop shadow of h and V 0, Opacity 80, Blur 10.00.
Open up the star element 1 layer. Resize by 57%, smartsize. Copy and paste onto your canvas. Give it a drop shadow of H 2, V -1, Opacity 65, Blur 4.00. Center it in between the two bottom star frames.
Open up a bow of choice. Resize by 15%, smartsize. Copy and paste onto your canvas. Give it a drop shadow of H and V 0, Opacity 50, Blur 3.00. Duplicate. Position the bows on the ends of the star element.
Add any other embellishments of your choosing.
Hide your white background and merge your visible layers. Resize your merged layer by 90%, bicubic. Go to adjust > sharpness > unsharp mask. Apply with clipping 1, radius 5, strength 15.
Open up a star mess of choice. Resize by 60%, smartsize. Copy and paste onto your canvas. Give it a drop shadow of H and V 1, Opacity 45, Blur 2.00. Duplicate. Go to image > mirror. Then, image > flip. Duplicate each one 1 time. Position the star mess layers to your liking. Merge the 4 star mess layers together. Drag to right above your whitte background. Resize by 95%, smartsize.
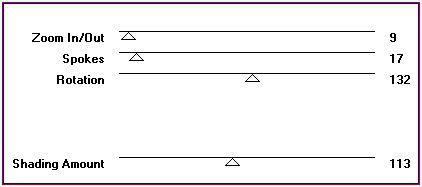
Highlight your white background. Add a new raster layer. Floodfill with a color of choice. (I used white again) Apply AAA Textures, same settings as earlier. Apply Vix Mask 248 with the following settings:
Source Luminance
Fit to Canvas
Hide all Mask.
Delete the mask from your layer palette. Answer yes, and merge the group. Give the mask a drop shadow of H -2, V 2, Opacity 55, Blur 3.00. Duplicate the mask. Position them as in my mask above.
Crop and resize to your liking.
Add your copyright info, watermark and your text. If you are not animating, save as JPG or PNG.
If you are animating, highlight the star mess layer. Apply Tramages - Accelerating Glass with the following settings:
Copy merged. Open up Animation Shop. Paste as a new animation in AS.
Back to PSP. Go to edit > undo tramages accelerating glass. Apply tramages again, except this time move the rotation slider to 77. Copy merged. Paste after frame 1 in AS.
Back to PSP. Edit > undo. Apply tramages, but slide the rotation slider to 36. Copy merged. Paste after frame 2 in AS.
Back to PSP. Edit > undo. Apply tramages, but slide rotation to 199. Copy merged. Paste after frame 3 in AS.
Optimize and save as gif.
I hope you enjoyed this tutorial! If you have any questions, just give me a shout!
Subscribe to:
Post Comments (Atom)
0 comments:
Post a Comment