Tuesday, May 3, 2011
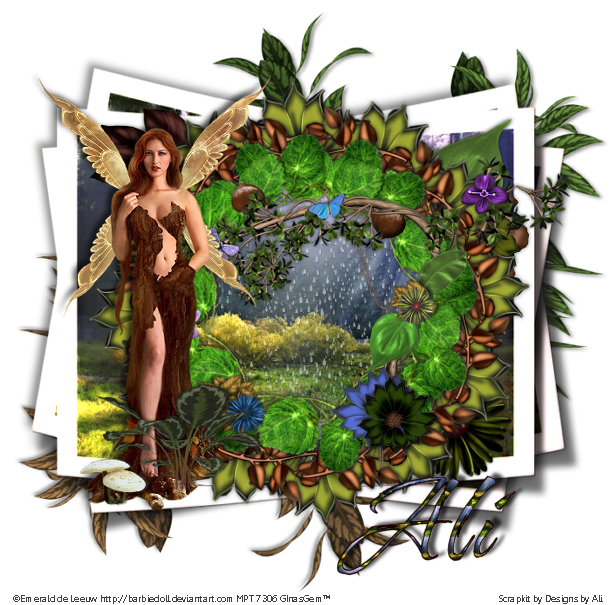
 Guardian of the Forest
This tutorial was written by me on 30 March 2009. Any similarities to other tutorials is purely coincidental.
Supplies Needed:
Tube of choice. I am using the ethereal artwork of Emerald de Leeuw. I got this tube when she was still with MPT. I don't know where you can find her art now, so just use another tube instead.. The kit used, comes with beautiful poser tubes that can be substituted. :-)
Mother Nature Earth scrapkit by Designs by Ali. If you wish to purchase this gorgeous kit, you can here. Thank you, Ali!!
Blue and purple butterfly tubes.
Font of choice. I used Waterbrush ROB. (pay font)
Plugins:
Xero Filters - Soft Mood
Supplies HERE
*~*~*~*~*~*~*~*~*~*~*~*~*~*~*~*~*~*~*~*~*~*~*~*~*~*~*~*~*~*~*~*~*~*~*~*~*~*~*~*~*~*~*~*~*~*~*~*~*~*~*~*~*~*~*~*~*~*~*~*~*~*~*~*~*~*~*~*~*~*~*~*
Ok! Let's begin! Open up a new transparent image 750 x 750. Floodfill with white.
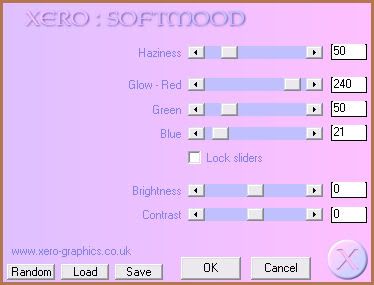
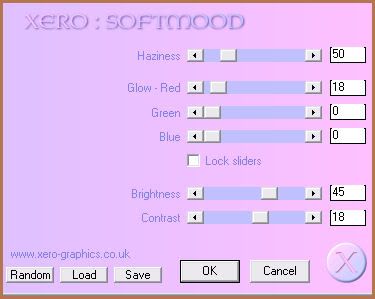
Open up frame 1 from the kit. (the leaf frame) Resize by 65%, smartsize. Copy and paste onto your canvas. Apply Xero Soft Mood with the following settings:
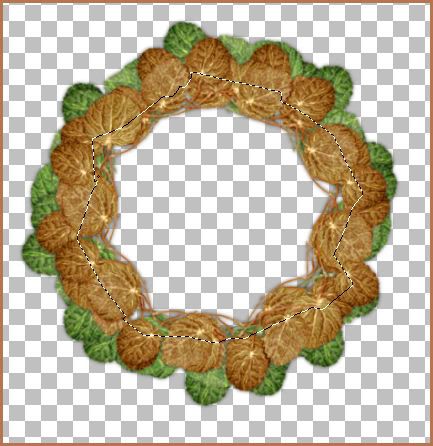
Grab your freehand selection tool, type point to point, feather set at 0.00. Draw out a circle around the emtpy space of the frame like this:
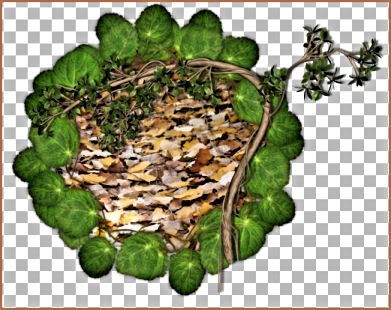
Open up a stacked picture from the kit. Resize by 70%, smartsize. Go to selections > invert. Hit delete on your keyboard. Deselect (CTRL+D). Go to adjust > sharpen > unsharp mask. Apply with radius - 5, Strength 40, Clipping 1, Luminance checked.
Drag the stacked photo layer beneath your frame layer. Highlight your frame layer, and give it a drop shadow of H and V 0, Opacity 55, Blur 8.00.
Open up the vine from the kit. Resize by 60%, smartsize. Apply unsharp mask, same settings as before. Copy and paste onto your canvas. Give the vine a drop shadow of H 3, V -1, Opacity 65, Blur 3.00. Positio the vine like this:
Now we are going to add some embellishments. I colorized a few items, just to add a splash of color. You can do the same, or just leave all elements as they are.
Open up a couple of chestnuts from the kit. Resize them by about 30%, smartsize. Copy and paste them onto your canvas. Give them both a drop shadow of H and V 0, Opacity 60, Blur 3.00. Position on your vine so it looks as if they are "growing" from it.
Open up 2 (single) leaves of choice. Resize the leaves by 15%, smartsize. Copy and paste them onto your canvas. Give them a drop shadow of H and V 0, Opacity 60, Blur 3.00. Position them to your liking on the vine.
Open up a bunch of leaves (leaf 6 - 9) of choice. Resize by 12%, smartsize. Copy and paste onto your canvas. (I colorized my leaves, but this is not necessary) Give them a drop shadow of H 2, V 1, Opacity 65, Blur 3.00. Duplicate the leaves 2 times. Mirror one of the leaf layers. Position them to your liking on the frame and vine.
Open up 3 or 4 flower of choice. Resize them by 10 - 15%, smartsize. I also colorized a couple of my flowers, but again, this is not necessary. Copy and paste the flowers onto your canvas. Give the all a drop shadow of H and V 0, Opacity 65, Blur 3.00. Position them on top of your leaves.
Open up the blue butterfly from the supplies. Resize by 15%, smartsize. Copy and paste onto your canvas. Give it a drop shadow of H and V 0, Opacity 50, Blur 3.00. Position to your liking on the vine or branch.
Open up the purple butterfly from the supplies and resize it by 17%, smartsize. Copy and paste onto your canvas. Give it a drop shadow of H and V 0, Opacity 50, Blur 3.00. Position to your liking on the frame or branch.
Highlight your white background layer. Open up a branch of choice. Resize by 30%, smartsize. Copy and paste onto your canvas. Go to image > free rotate. Rotate left by 90.00, smartsize. Apply Mura Meister Copies with the following settings:
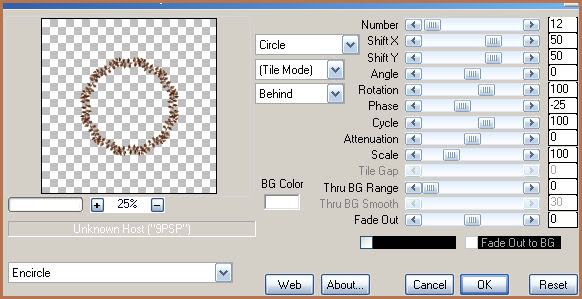
Apply unsharp mask, same settings as before. Give the encircled branches a drop shadow of H and V 0, Opacity 60, Blur 6.00.
Highlight your white background. Open up a flower of choice (flower 4, 5, 6, or 7). Resize by 25%, smartsize. Copy and paste onto your canvas. Apply Mura Meister Copies, same settings as before. Apply Unsharp Mask, same settings. Give the layer a drop shadow of H and V 0, Opacity 65, Blur 7.00.
Open up 2 double flowers of choice. Resize by 30%, smartsize. Copy and paste them onto your canvas. Give them a drop shadow of H 3, V 0, Opacity 55, Blur 3.00. Mirror and flip one of the flowers. Position them so that they are peeking out a bit from underneat the encircled flowers. Drag both flower layers beneath your encircle flowers layer.
Open up 2 (single) leaf elements. Resize them by 20%, smartsize. Copy and paste onto your canvas. Give them a drop shadow of H -3, V 0, Opacity 55, Blur 3.00. Mirror and flip one of the leaves. Position to your liking beneath the double flowers. Drag them beneath your double flower layers.
Open up the same stacked photo you used earlier. Resize it by 95%, smartsize. Apply Xero Soft Mood with the following settings:
You can play around the Red, Green and Blue settings to give a different color tone to the picture. Give the photo a drop shadow of H -6, V 4, Opacity 50, Blur 10.00. Center it behind your encircled flowers layer.
Open up bush 5 and 6 from the kit. Resize them by 85%, smartsize. Copy and paste them onto your canvas. Give both bushes a drop shadow of H and V 3, V 0, Opacity 65, Blur 4.00. Mirror and flip one of the bushes. Position one towards the upper right corner of the photo, and the other in the bottom left corner of the photo. Drag both bush layers beneath your large stacked photo layer. (see my tag for reference)
Add any other embellishments of your choosing. (I add some raindrop to mine).
Open up your tube. Resize as necessary, bicubic. Copy and paste onto your canvas. Give your tube a drop shadow of H -5, V -3, Opacity 65, Blur 10.00. Position to your liking.
Crop and resize to your liking.
Add your copyright info, watermark and your text.
Save as JPG or PNG.
I hope you enjoyed this tutorial! If you have any questions, just give me a shout.
Subscribe to:
Post Comments (Atom)
0 comments:
Post a Comment