Wednesday, May 4, 2011
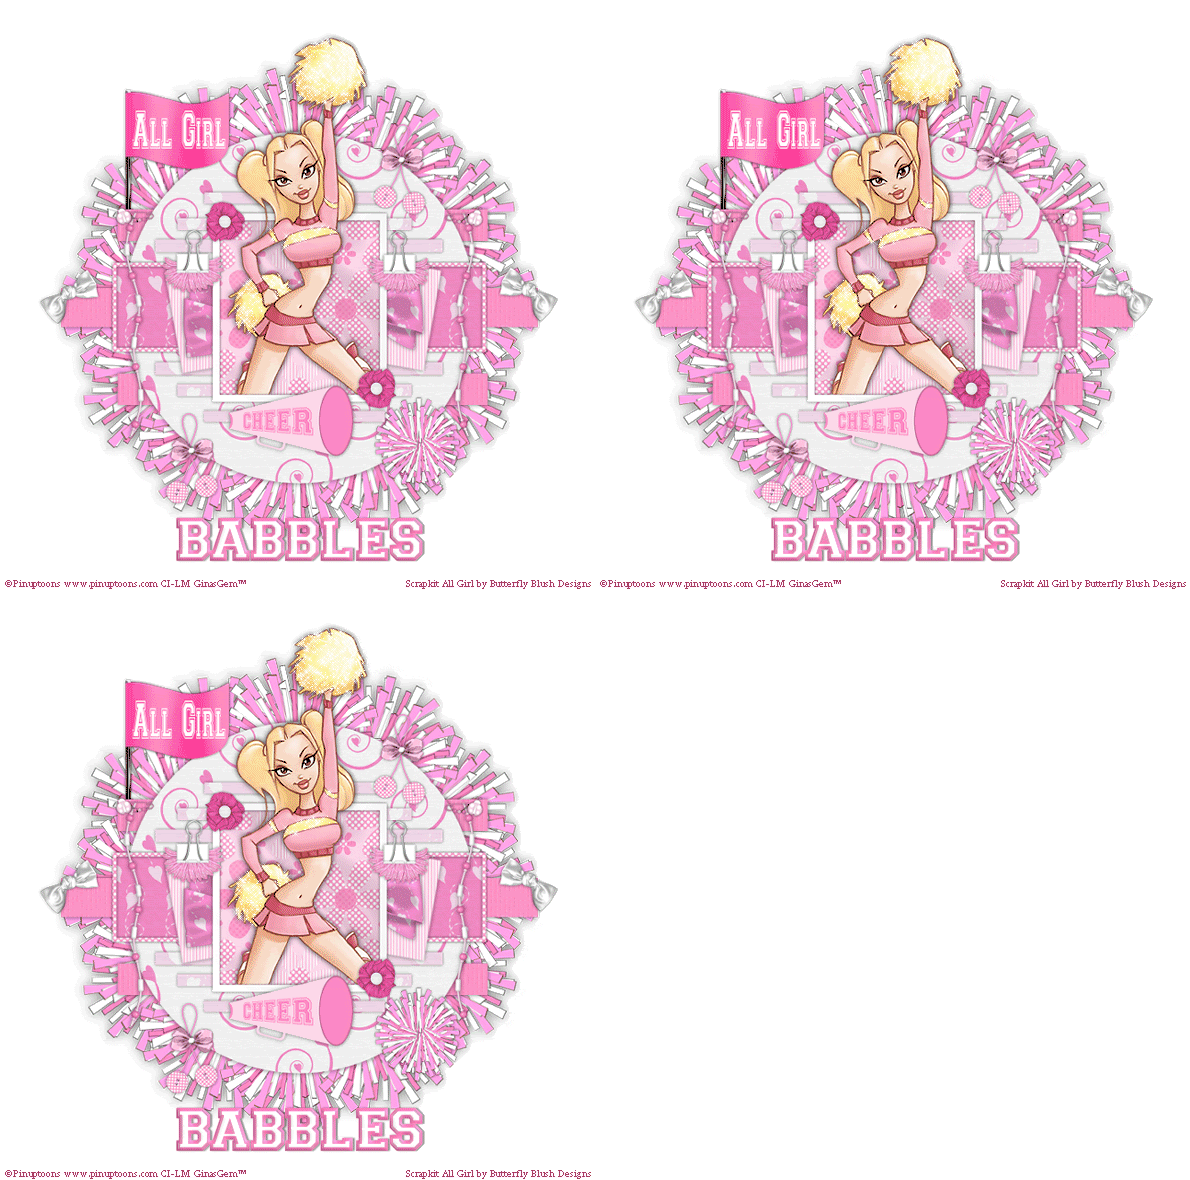
 All Girl
This tutorial was written by me on 3 December 2008. Any similarities to other tutorials is purely coincidental.
Supplies Needed:
Tube of choice. I am using the awesome artwork of Rion Vernon. I bought this tube when CILM was still open. You can find him at CDO now.
Scrapkit All Girl by Butterfly Blush Designs. If you wish to purchase this pinkalicious kit you can here. Thank you, Brooke!
Template 60 made by me which you can get here
Font of choice. I used Varsity which you can download here
Plugins:
Xenofex 2 - Constellation (for ani)
Animation Shop (opt)
No other supplies needed
************************************************************************************************
Let's get started! Open up my template. Hold down shift + d to duplicate. Close the original. Delete the credit info layer.
Highlight the big rectangles layer. Go to selections > select all. Selections > float. Selections > defloat. Open up a paper of choice from the kit. Don't resize. Copy and paste as a new layer onto your canvas. Selections > invert. Hit delete on your keyboard. Deselect (CTRL+D) Give the layer a drop shadow of H and V 0, Opacity 50, Blur 8.00. Delete the gray big rectangles.
Highlight the circle layer. Select, float and defloat. Open up a paper of choice from the kit. Resize by 68%, smartsize. Copy and paste as a new layer onto your canvas. Selections > invert. Hit delete on your keyboard and deselect. Give the layer a drop shadow of H and V 0, Opacity 50, Blur 10.00. Delete the gray circle.
Highlight the rectangle fill layer. Select, float and defloat. Open up a paper of choice from the kit. Resize, 68%, smartsize. Copy and paste onto your canvas. Selections > invert. Hit delete and deselect. Delete the gray rectangle fill.
Highlight the rectangle frame layer. Select, float and defloat. Open up a paper of choice from the kit. Resize by 68%, smartsize. Copy and paste as a new layer onto your canvas. Selections > invert. Hit delete and deselect. Give the frame a drop shadow of H and V 0, Opacity 60, Blur 5.00. Delete the gray rectangle frame.
Highlight the top strips layer. Select, float and defloat. Open up a paper of choice from the kit and resize by 68%, smartsize. Copy and paste onto your canvas. Selections > invert. Hit delete. Deselect. Give the layer a drop shadow of H and V 0, Opacity 50, Blur 5.00. Delete the gray top strips.
Highlight the bottom strips layer. Repeat the sames steps that you did with the top strips, using the same paper.
Highlight the square 1 layer. Select, float and defloat. Open up a paper from the kit and resize by 68%, smartsize. Copy and paste onto your canvas. Selections > invert. Hit delete and deselect. Give the layer a drop shadow of H and V 0, Opacity 50, Blur 7.00. Delete the black square 1 layer.
Highlight the square 2 layer and repeat the same steps you did with the sqaure 1 layer, using the same paper.
Open up a wrap of choice. Resize by 40%, smartsize. Copy and paste onto your canvas. Give it a drop shadow of H and V 0, Opacity 50, Blur 8.00. Position in the middle of your squares (see my tag for reference)
Highlight the picture fill layer. Select, float and defloat. Open up a paper of choice from the kit. Resize by 68%, smartsize. Copy and paste onto your canvas. Selections > invert. Hit delete and deselect. Delete the gray picture fill.
Highlight the picture frame. Select, float and defloat. Open up a paper of choice from the kit. Resize by 68%, smartsize. Copy and paste as a new layer onto your canvas. Selections > invert. Hit delete and deselect. Delete the gray picture frame.
Open up your tube. Resize, bicubic as necessary. Copy and paste as a new layer onto your canvas. Give your tube a drop shadow of H and V 0, Opacity 60, Blur 10.00.
Highlight your picture frame layer. Grab your magic wand tool, tolerance set at 30.00, feather set at 0.00. Click inside the empty space of the frame. Go to selections > modify > expand by 1.00.
Highlight your tube layer and postion to your liking within the selection. Go to selections > invert. Grab your eraser tool, size 25, Opacity 100. Carefully erase the parts of the tube you don't want hanging out of the frame. Deselect.
Highlight your frame layer and give it a drop shadow of H and V 0, Opacity 60, Blur 5.00.
Open up a binder clip of choice. Resize by 25%, smartsize. Copy and paste onto your canvas. Give it a drop shadow of H and V 0, Opacity 50, Blur 5.00. Duplicate the binder clip and mirror. Position them as in my tag above.
Open up a fabric flower of choice. Resize by 35%, smartsize. Copy and paste onto your canvas. Give it a drop shadow of H and V 0, Opacity 60, Blur 3.00. Duplicate the flower and position them to your liking on your frame.
Open up the megaphone. Resize by 40%, smartsize. Copy and paste as a new layer onto your canvas. Give it a drop shadow of H and V 0, Opacity 50, Blur 6.00. Position the megaphone at the bottom of your picture frame (see my tag for reference)
Open up a know bow of choice. Resize by 35%, smartsize. Copy and paste onto your canvas. Give it a drop shadow of H and V0, Opacity 50, Blur 4.00. Duplicate the bow. Go to image > mirror. Position them on the ends of the middle rectangle behind the circle (see my tag for reference)
Open up beads of choice. Resize them by 35%, smartsize. Copy and paste them onto your canvas. Give them a drop shadow of H and V 0, Opacity 50, Blur 5.00. Duplicate the beads. Go to image mirror. Position them on the ends of the top rectangle behind the circle (see my tag for reference)
Open up a ladybug safety pin. Resize by 30%, smartsize. Copy and paste onto your canvas. Give it a drop shadow of H and V 0, Opacity 40, Blur 4.00. Duplicate the pin. Go to image > mirror. Position them at the top of the beads.
Open up a hanging button of choice. Resize by 30%, smartsize. Copy and paste onto your canvas. Give it a drop shadow of H and V 0, Opacity 40, Blur 4.00. Duplicate the hanging buttons. Go to image > mirror. Position them to your liking on the circle.
Open up a bow of choice. Resize by 30%, smartsize. Copy and paste onto your canvas. Give it the same drop shadow you gave your hanging buttons. Duplicate the bow. Position them on the hanging buttons.
Open up a flag of choice. Resize by 50%, smartsize. Copy and paste onto your canvas. Give it a drop shadow of H and V 0, Opacity 50, Blur 7.00. Position it to your liking.
Hide your white background. Merge your visible layers. Resize your merged layer by 90%, bicubic (all layers unchecked). On your merged, resized layer, go to adjust > sharpness > unsharp mask and apply with the following settings:
Radius 5
Strength 10
Clipping 1
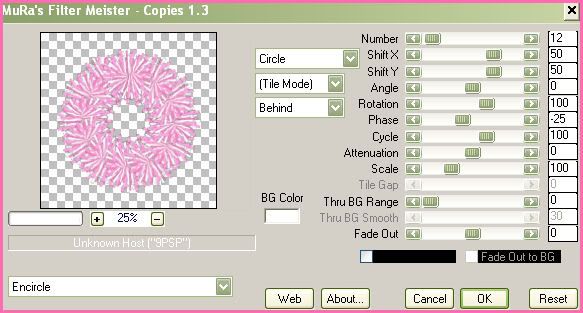
Unhide your white background. Highlight your white background. Open up the pom pom from the kit. Copy and paste as a new layer onto your canvas. Apply Mura Meister Copies with the following settings:
Give the encircled pom poms a drop shadow of H and V 0, Opacity 50, Blur 10.00.
Add any other embellishments of your choosing.
Crop and resize to your liking.
Add your copyright info, watermark and your text. If you are not animating, then save as JPG of PNG.
If you are animating, merge all of your layers together.
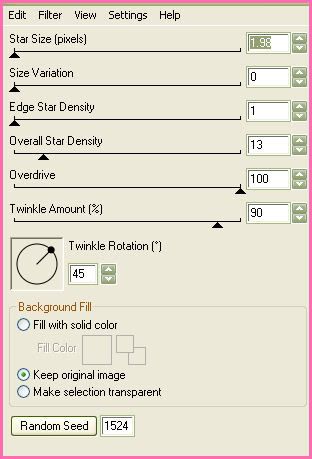
Grab your freehand selection tool, type : point to point, feather set at 1.00. Select around the areas, that you want to sparkle. Apply Constellation with the following settings:
Deselect. Copy. Open up Animation Shop. Paste as a new animation in AS.
Back to Paint Shop Pro. Go to Edit > undo select none. Edit > undo constellation. Apply Constellation again, but this time hit the random seed button. Deselect. Copy and paste after your current frame in AS.
Repeat the above steps one more time for a total of 3 frames.
Optimize and save as gif.
I hope you enjoyed this tutorial. If you have any questions, just give me a shout. :-)
Subscribe to:
Post Comments (Atom)
ANNA MARINE
- Bright Eyes (1)
ELIAS CHATZOUDIS TUTORIALS
- Burning Love (1)
- Dreams Come True (1)
- Faces of Elias (1)
- Fairy Blossom (1)
- Fairy Lights (1)
- Give Thanks (1)
- Kiss Collector (1)
- Lost in Love (1)
- Sexy Naughty Babe (1)
- Show the Way (1)
- Simply Beautiful (1)
- Spring Fling (1)
- Sweet Valentine (1)
EMERALD de LEEUW TUTORIALS
- Christmas Magic (1)
- Guardian of the Forest (1)
- Snow Queen (1)
GENNADIY KOUFAY TUTORIALS
- Blonde Beauty (1)
- Heavenly Bodies (1)
- It's a Jungle Out There (1)
- Sensual Kiss (1)
GORJUSS TUTORIALS
- Close Your Eyes Gorjuss (1)
- Eternally Alone (1)
- Fading Autumn Sun (1)
- Gorjuss Christmas (1)
- Gorjuss Cloudy Day (1)
- Gorjuss Twinkle (1)
- Holiday Sweet Treats (1)
- Snow Buddies (1)
- Snow Falls (1)
- Spring Kisses (1)
- Strawberry Garden (1)
- Sugar and Spice (1)
- Winter Blessings (1)
- Winter Time (1)
ISMAEL RAC TUTORIALS
- All About Attitude (1)
- Apple Pie (1)
- Baby it's Warm Inside (1)
- Cheeky Diva (1)
- Christmas Wish Kiss (1)
- Do I Dazzle You (1)
- Feel the Music Forum Style (1)
- Glitz (1)
- Polka Dots (1)
- Rock Chic Gal (1)
- Rock Revolution (1)
- Thru My Window (1)
- Vivid Rac (1)
- Wickedly Sexy (1)
- You Know You Wanna (1)
JAMIE KIDD TUTORIALS
- Live Out Loud (1)
- Sugar Lips (1)
JENNIFER JANESKO TUTORIALS
- Addictive Pleasure (1)
- Angelic (1)
- Beautify (1)
- Bring Me to Life (1)
- Cowgirl Kisses (1)
- Delightful (1)
- Elegant Green (1)
- Forces of Nature (1)
- Golden New Year (1)
- Gossamer Beauty (1)
- Gossamer Lotus (1)
- It's Gold Outside (1)
- Peace Love Happiness (1)
- Pink Party (1)
- Porcelain (1)
- Reflected Dreams (1)
- Rustic Beauty (1)
- Seduction (1)
- Starry Eyed (1)
- Storybook Romance (1)
- Sweet Snow Flowers (1)
- Time after Time (1)
- Timeless Beauty (1)
- Twilight (1)
- Twisted Diva (1)
- Valentine Bling (1)
- Vintage Autumn (1)
- Wedding Gaze (1)
- Winter Angel (1)
- Winter Beauty (1)
JESSICA DOUGHERTY TUTORIALS
- Autumn (1)
- Beached (1)
- Blue Angel (1)
- Brrrr (1)
- Cloud Nine (1)
- Earthly Delights (1)
- Moonlit Fae (1)
- Peaches and Cream (1)
- Snow Bunny (1)
- Snow Sexy (1)
- Unwrap Me (1)
- Vintage Dreams (1)
JOSE CANO TUTORIALS
- American Babe (1)
- Bad Thing (1)
- Graffiti (1)
- Summer Fun (1)
- Summer Heat (1)
KEITH GARVEY TUTORIALS
- Be Mine Valentine (1)
- Beautiful Sexy Fun (1)
- Butterfly Song (1)
- Can U See Me (1)
- City Girls (1)
- Damn Sexy (1)
- Dazzling Bettie (1)
- Eternal Style (1)
- Flirty Girly Princess (1)
- Garv Girls are Sexy (1)
- Garv's Girl Garden (1)
- Girly Crush (1)
- Here Comes Trouble (1)
- Huggable (1)
- Irish Pride (1)
- Kiss Me (1)
- Lonely Cupid (1)
- Love Softly (1)
- Pouty Christmas (1)
- Purrrfect (1)
- Sexilicious Toon (1)
- Sexy Devil (1)
- Shamrock Frenzy (1)
- Shy Girl (1)
- Spooky Starry Night (1)
- Stop Dreaming (1)
- Sweet Beauty (1)
- Toxic Candy (1)
- Toxic Rock (1)
MAXINE GADD TUTORIALS
- Noelle (1)
- Stocking Stuffer (1)
- Winter's Bride (1)
OLIVIA TUTORIALS
- Days Gone By (1)
- Made for You (1)
- Mermaid Princess (1)
- Total Bettie (1)
- Valentine Fae (1)
PINUPTOONS TUTORIALS
- All Girl (1)
- April Showers (1)
- Blazing Through (1)
- Brighter Days (1)
- Cutie Pie (1)
- Day Dreamer (1)
- Destined Friends (1)
- Eat Your Heart Out (1)
- Falling For Fashion (1)
- Happy Thanksgiving (1)
- I Ate the Gingerbread Man (1)
- Mele Kalikimaka (1)
- Picture Perfect (1)
- Pink Dreams (1)
- Playful (1)
- Purple Rain (1)
- Sassy (1)
- Simply Springalicious (1)
- Snowflake Season (1)
- Strawberry Delight (1)
- Sweet Tooth (1)
- Ye Olde Autumn Maiden (1)
RACHEL ANDERSON TUTORIALS
- Falling Leaves (1)
- Pixie Dreams (1)
- Winter Fae (1)
SCOTT BLAIR TUTORIALS
- Going My Way (1)
- Soldier Chic (1)
STEVE BAIER TUTORIALS
- Adore (1)
- Autumn's Gift (1)
- Love is a Gift (1)
- Waiting for Love (1)
SUZANNE RICHARDS TUTORIALS
- Beeautiful Day (1)
- Lephrechaun Kiss (1)
TED HAMMOND TUTORIALS
- City Lights (1)
- Don't Tread on Me (1)
- Welcome 2009 (1)
ZINDY NIELSEN TUTORIALS
- Angelic Ornament (1)
- Au' Naturale (1)
- Autumn Leaves (1)
- First Snow (1)
- Good Night Moon (1)
- Here Comes Winter (1)
- Intrigue (1)
- Love Fae (1)
- Make A Wish (1)
- Sweetness (1)
- Wise Snow (1)
FORUM STYLE
MISC. ARTISTS TUTORIALS
- After Dark (1)
- Always My Love (1)
- Baby Doll (1)
- Bootiful Sexy (1)
- Dark Angel (1)
- Dress Me Up (1)
- Faerie Pond (1)
- Feel the Heat (1)
- Feel the Music (1)
- Flight of the Fae (1)
- Hero (1)
- I Love my Online Friends (1)
- It's a Girl Thing (1)
- Kisses From Paris (1)
- Love and Kisses (1)
- Love to be Flirty (1)
- Luna Paradise (1)
- Oops (1)
- Oriental Mystique (1)
- Purple Geisha (1)
- Rock Princess (1)
- Sea-crets (1)
- Smell the Flowers (1)
- Snuggle Garden (1)
- Starlit Dreams (1)
- Tainted Cutie (1)
- Thorns (1)
CHRISTMAS/WINTER TUTORIALS
- All I Want (1)
- Angelic Ornament (1)
- Baby it's Warm Inside (1)
- Beautify (1)
- Blazing Through (1)
- Blue Angel (1)
- Brrrr (1)
- Christmas Magic (1)
- Christmas Wish Kiss (1)
- Curly Girly Christmas (1)
- First Snow (1)
- Graceful Skater (1)
- Here Comes Winter (1)
- Holiday Sweet Treats (1)
- I Ate the Gingerbread Man (1)
- It's Gold Outside (1)
- Mele Kalikimaka (1)
- Milk and Cookies (1)
- Naughty Girl (1)
- Nice to be Naughty (1)
- Noelle (1)
- Peace Love Happiness (1)
- Peace on Earth (1)
- Pouty Christmas (1)
- Santa Baby (1)
- Santa Stop (1)
- Santa's Girlfriend (1)
- Sexy Season (1)
- Snow Buddies (1)
- Snow Bunny (1)
- Snow Falls (1)
- Snow Queen (1)
- Snow Sexy (1)
- Snow Vixen (1)
- Snowflake Season (1)
- Stocking Stuffer (1)
- Sweet Snow Flowers (1)
- Twilight (1)
- Unwrap Me (1)
- Winter Angel (1)
- Winter Beauty (1)
- Winter Blessings (1)
- Winter Fae (1)
- Winter Frost (1)
- Winter Magic (1)
- Winter Time (1)
- Winter's Bride (1)
- Winterlicious (1)
- Wise Snow (1)
NEW YEAR'S TUTORIALS
- Golden New Year (1)
- Happy New Year (1)
- New Year Masquerade (1)
- Welcome 2009 (1)
HALLOWEEN TUTORIALS
- After Dark (1)
- Can U See Me (1)
- Sexy Witch (1)
- Spooky Starry Night (1)
THANKSGIVING/AUTUMN TUTS
- Autumn (1)
- Autumn Leaves (1)
- Autumn's Gift (1)
- Fading Autumn Sun (1)
- Falling For Fashion (1)
- Falling Leaves (1)
- Give Thanks (1)
- Happy Thanksgiving (1)
- Vintage Autumn (1)
- Ye Olde Autumn Maiden (1)
VALENTINE'S DAY TUTORIALS
- Adore (1)
- Be Mine Valentine (1)
- Burning Love (1)
- Cupcake (1)
- Huggable (1)
- Lonely Cupid (1)
- Love Fae (1)
- Marco Love (1)
- My Heart (1)
- Pink Dreams (1)
- Pink Party (1)
- Polka Dots (1)
- Show the Way (1)
- Storybook Romance (1)
- Sweet Valentine (1)
- Valentine Bling (1)
- Valentine Fae (1)
ST. PATRICKS DAY TUTORIALS
- Irish Pride (1)
- Lephrechaun Kiss (1)
- Lucky Charms (1)
- Shamrock Frenzy (1)
JULY 4/PATRIOTIC TUTORIALS
- American Babe (1)
- Apple Pie (1)
- Hero (1)
- Soldier Chic (1)
FTU SCRAP KIT TUTORIALS
- Autumn Leaves (1)
- Blazing Through (1)
- Christmas Magic (1)
- Curly Girly Christmas (1)
- Dress Me Up (1)
- It's a Girl Thing (1)
- Kisses From Paris (1)
- Polka Dots (1)
- Toxic Candy (1)
- Welcome 2009 (1)
- Winter Angel (1)
FREE SUPPLIES/NO SCRAPS
Stores I Sell For
Blog Archive
Followers
Powered by Blogger.


0 comments:
Post a Comment