Wednesday, May 4, 2011
 Adore
Adore

This tutorial was written by me on 9 January 2009. Any similarities to other tutorials is purely coincidental.
Supplies Needed:
Tube of choice. I am using the gorgeous artwork of Steve Baier. If you wish to use his artwork, you must purchase a license at Up Your Art.
Scrapkit. I am using the stunning kit Sweetheart's Day by Just a Girl's Designs. If you wish to purchase this kit, you can here.
Template 100 made by me which you can download here.
WSL Mask 202 by Chelle. Check out her site for other great resources!!
White hearts animation
Font of choice. I usede Sweetheart (pay font)
Plugins:
Penta Filters - Dot and Cross
Xenofex 2 Crumple
FM Tile Tools Blend Emboss
Animation Shop (opt)
Supplies HERE
~*~*~*~*~*~*~*~*~*~*~*~*~*~*~*~*~*~*~*~*~*~*~*~*~*~*~*~*~*~*~*~*~*~*~*~*~*~*~*
Ok! Let's get started. Open up my template. Duplicate by holding down shift + d. Close the original. Delete the credit info layer.
Highlight the hearts line layer. Go to selections > select all. Selections > float. Selections > defloat. Open up a paper of choice from the kit. Resize by 84%, smartsize. Copy and paste onto your canvas. Go to selections > invert. Hit delete on your keyboard. Deselect (CTRL+D). Give the layer a drop shadow of H and V 0, Opacity 65, Blur 7.00. Delete the hearts line template layer.
Highlight the rectangles layer. Select, float and defloat. Open up a paper of choice of choice from the kit. Resize by 84%, smartsize. Copy and paste as a new layer onto your canvas. Selections > invert. Hit delete and deselect. Give the layer a drop shadow of H and V 0, Opacity 65, Blur 7.00. Delete the rectangles template layer.
Highlight the ovals layer. Select, float and defloat. Open up a paper of choice from the kit. Resize by 84%, smartsize. Copy and paste as a new layer onto your canvas. Selections > invert. Hit delete and deselect. Give the layer a drop shadow of H and V 0, Opacity 65, Blur 4.00. Delete the ovals template layer.
Highlight the heart layer. Select, float and defloat. Open up a paper of choice. Resize by 84%, smartsize. Copy and paste as a new layer onto your canvas. Selections > invert. Hit delete. Don't deselect yet!
Open up a ribbon wrap from the kit. Resize by 50%, smartsize. Copy and paste onto your canvas. Position in the middle of the heart. Grab your eraser tool, size 30, opacity 100. Erase the top part of the ribbon that is hanging out of the heart. Deselect. Give the ribbon a drop shadow of H and V 0, Opacity 60, Blur 6.00.
Highlight the paper heart. Give it a drop shadow of H and V 0, Opacity 65, Blur 11.00. Delete the heart template layer.
Highlight the circles fill layer. Select, float and defloat. Open up a paper of choice from the kit. Resize by 84%, smartsize. Copy and paste onto your canvas. Selections > invert. Hit delete. Don't deselect yet.
Open up your tube. Resize as necessary, bicubic. Copy and paste as a new layer onto your canvas. Position to your liking within the selection. Hit delete and deselect. Change the blend mode of the tube to Luminance (Legacy) Give the tube a drop shadow of H and V 0, Opacity 60, Blur 8.00. Delete the circles fill template layer.
Highlight the circles frame layer. Select, float and defloat. Open up a paper of choice from the kit. Resize by 84%, smartsize. Copy and paste onto your canvas. Selections > invert. Hit delete and deselect. Give the layer a drop shadow of H and V 0, Opacity 65, Blur 4.00. Delete the circles frame template layer.
Highlight your white background. Open up a label of choice. Copy and paste onto your canvas. Apply Xenofex 2 Crumple with the following settings:

Give the label a drop shadow of H and V 0, Opacity 60, Blur 8.00. Duplicate hte label. Go to image > mirror. Position them as in my tag above.
Highlight your white background. Open up roses of choice. Resize by 60%, smartsize. Copy and paste onto your canvas. Give it a drop shadow of H and V 0, Opacity 60, Blur 5.00. Duplicate the roses. Go to image > mirror. Duplicate the mirrored rose. Go to image > flip. Duplicate the flipped roses. Go to image > mirror. Position the 4 roses layers as in my tag above.
Highlight your white background. Open up the heart bling from the kit. Resize by 60%, smartsize. Copy and paste onto your canvas. Give it a drop shadow of H and V 1, Opacity 50, Blur 1.00. Duplicate the heart bling. Go to image > mirror. Position as in my tag above.
Highlight your top layer. Open up a flower of choice from the kit. Resize by 30%, smartsize. Copy and paste onto your canvas. Give it a drop shadow of H and V 0, Opacity 60, Blur 4.00. Position to your liking.
Add any other embellishments of your choosing.
Hide your white background. Merge your visible layers together. Resize your merged layer by 80%, bicubic. Go to adjust > sharpness > unsharp mask. Apply with the following settings:
Radius 5
Strength 15
Clipping 1
Unhide and highlight your white background. Open up a paper of choice from the kit. Don't resize. Copy and paste as a new layer onto your canvas. Apply WSL Mask 202 with the following settings:
Source Luminance
Fit to Layer
Hide all mask
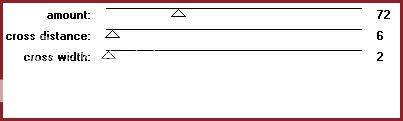
Delete the mask from the layer palette. Answer yes to the pop up box. Merge the group. On your mask layer, go to adjust > blur > gaussian blur. Apply with a radius of 10.00. Apply Penta Dot and Cross with the following settings:
Apply FM Tile Tools Blend Emboss with the default settings.
Crop and resize to your liking.
Add your copyright info, watermark and your text. Copy merged. Open up Animation Shop. Paste as a new animation in AS. Duplicate until you have a total of 8 frames. Select all frames (CTRL+A)
Open up the Hearts animation. Select all frames. (CTRL+A) Copy. Highlight your tag animation. Go to edit > paste into selected frame. Position and left click your mouse.
Highlight the hearts animation again. Go to Animation > Mirror. Select all frames (CTRL+A) Copy. Back to your tag animation. Go to edit > paste into selected frame. Position and left click your mouse.
Back to Paint Shop Pro. Open up your tube. Resize as necessary, bicubic. Give your tube a drop shadow of H and V 0, Opacity 60, Blur 12.00. Copy. Paste as a new animation in AS. Duplicate until you have a total of 8 frames. Select all frames (CTRL+A) Copy. Highlight your tag background/hearts animation. Go to edit > paste into selected frame. Position and left click your mouse.
Optimize and save as gif.
I hope you enjoyed this tutorial. If you have any questions, just give me a shout!
Subscribe to:
Post Comments (Atom)
0 comments:
Post a Comment