Wednesday, May 4, 2011
 Lost in Love
This tutorial was written by me on 12 November 2008. Any similarities to other tutorials is purely coincidental.
Things we need:
Tube of choice. I am using the sexy artwork of Elias Chatzoudis. I bought this tube when he was still with MPT. You can find him at PSP Tubes Emporium now.
Scrapkit Olive Rose by Butterfly Blush Designs. If you wish to purchase this yummy colored kit, you can here. Thank you, Brooke!
Template # 34 made by me. You can download it from my blog here
Mask by Chelle of Weescotslass Tutorials. Check out her site for other great masks and awesome tuts!!
Font of choice. I used Oreos which you can download here
Plugins
Eyecandy 5 Impact Gradient Glow
DSB Flux Bright Noise (opt)
Animation Shop
Let's get started! Open up my template and hold down shift + d to duplicate. Close the original. Delete the credits layer.
Highlight your white background. Open up a paper of choice. Copy and paste as a new layer onto your canvas. (don't resize). Apply WSL_ Mask 197 :
Source Luminance
Fit to Canvas
Hide all mask
Delete the mask from your layer palette. Answer yes to the pop up box. Merge the group.
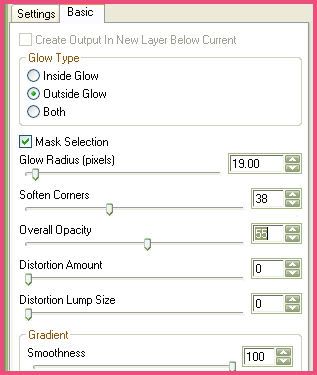
Highlight the squiggly big heart layer. Go to selections > select all. Selections > float. Selections > defloat. Open up another paper from the kit. Resize by 69%, smartsize. Copy and paste as a new layer onto your canvas. Go to selections > invert. Hit delete on your keyboard. Deselect (CTRL+D). Apply Eyecandy Gradient Glow with a color of choice using the following settings:
Delete the squiggly heart template layer.
Highlight the rectangle 1 layer. Select, float and defloat. Open up a paper of choice from the kit. Resize by 69%, smartsize. Copy and paste the paper as a new layer onto your canvas. Selections > invert. Hit delete on your keyboard. Deselect. Give the layer a drop shadow of H and V 0, Opacity 60, Blur 10.00. Delete the rectangle 1 template layer.
Highlight the rectangle 4 layer. Select, float and defloat. Paste the same paper that you used for rectangle 1 onto your canvas. (it should still be on your clipboard) Selections > invert. Hit delete. Deselect. Give it the same drop shadow as rec 1. Delete the rectangle 4 template layer.
Highlight rectangle 2 layer. Selec, float and defloat. Open up another paper of choice from the kit. Resize by 69%, smartsize. Copy and paste onto your canvas. Selections > invert. Hit delete. Deselect. Give the layer a drop shadow of H and V 0, Opacity 60, Blur 10.00. Delete the rec 2 template layer.
Highlight rectangle 3. Select, float and defloat. Paste the same paper that you used for rec 2 onto your canvas. (it should still be on your clipboard) Selections > invert. Hit delete. Deselect. Give the layer the same drop shadow you gave the rec 2 layer. Delete the rec 3 template layer.
Highlight the small gray rectangles. Select, float and defloat. Open up a paper from the kit. Resize by 69%, smartsize. Copy and paste onto your canvas. Selections > invert. Hit delete. Deselect. Give them a drop shadow of H and V 0, Opacity 40, Blur 4.00. Delete the small gray rectangles template layer.
Highlight the middle heart fill layer. Select, float and defloat. Open up a paper of choice from the kit. Resize, 69%, smartsize. Copy and paste as a new layer onto your canvas. Selections > invert. Hit delete. Deselect. Delete the middle heart fill template layer.
Highlight the square layer. Select, float and defloat. Open up a paper that contrasts with the one you just used. Resize, 69%, smartsize. Copy and paste as a new layer onto your canvas. Selections > invert. Hit delete. Deselect. Delete the square template layer.
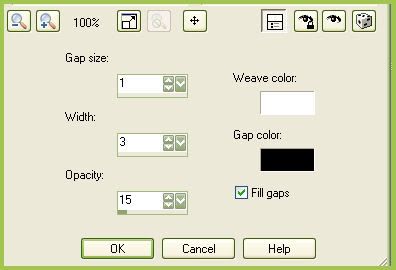
Highlight the middle heart frame layer. You can either leave it white like I did, or floodfill with a color of choice. Go to effects > texture effects > weave and apply with the following settings:
Open up some calla lilies of choice. Resize by 35%, smartsize. Copy and paste onto your canvas. Give them a drop shadow of H and V 0, Opacity 45, Blur 4.00. Position them to your liking within the heart.
Highlight your heart frame layer. Grab your magic wand tool, tolerance set at 30, feather set at 1.00. Click inside the empty space of your heart frame. Go to selections > modify > expand by 1.00. Selections > invert.
Highlight your calla lilies layer. Grab your eraser tool, size 20, Opacity 90. Carefully erase the area of the flowers you don't want hanging out of the frame. Highlight the heart frame and give it a drop shadow of H and V 0, Opacity 55, Blur 5.00.
Highlight the square frame. Select, float and defloat. Add a new raster layer and floodfill with a color of choice. Deselect. Apply texture effects > weave with the same settings as before. Give the layer a drop shadow of H and V 0, Opacity 55, Blur 7.00. Delete the square frame template layer.
Highlight the right heart fill layer. Select, float and defloat. Open up a paper of choice from the kit. Resize, 69%, smartsize. Copy and paste onto your canvas. Selections > invert. Hit delete and deselect. Delete the right heart fill template layer.
Highlight the left heart fill layer. Repeat the same steps you with the right heart fill layer.
Highlight the right heart frame. Select, float and defloat. Open up a paper of choice. Resize, 69%, smartsize. Copy and paste the paper onto your canvas. Selections > invert. Hit delete and deselect. Give the layer a drop shadow of H and V 0, Opacity 50, Blur 4.00. Delete the right heart frame template layer.
Highlight the left heart frame and repeat the same steps you did with the right heart frame.
Open up a fabric flower ribbon of choice. Resize by 20%, smartsize. Copy and paste onto your canvas. Give it a drop shadow of H and V 0, Opacity 40, Blur 3.00. Duplicate the fabric flower. Go to image > mirror. Position them to your liking on the smaller hearts.
Open up 2 different colored knotted ribbons. Resize them by 45%, smartsize. Copy and paste them onto your canvas. Give them both the same drop shadow you gave the fabric flower. Position them to your liking on the middle heart frame.
Open up a delicate flower of choice. Resize by 30%, smartsize. Copy and paste onto your canvas. Give it the same drop shadow you gave the knotted ribbons. Duplicate the delicate flower and position them to your liking.
Add any other embellishments of your choosing.
Hide your white background and your mask layer. Merge your visible layers together.
Resize your merged layer by 80%, smartsize.
Open up up your tube. Resize, bicubic if necessary. Copy and paste onto your canvas. Give the tube a drop shadow of H and V 0, Opacity 60, Blur 10.00. Position to your liking.
Crop to your liking. Add your copyright info and watermark. If you are not animating, then add your text and save as JPG or PNG.
If you are animating, Type out your text and position to your liking. Apply DSB Flux Bright Noise with a value of 35, mix checked. Give your text a drop shadow of H 1, V 0, Opaicty 65, Blur 2.00. Copy merged.
Open up animation shop. Paste as a new animation. Back to Paint Shop Pro. Go to edit > undo drop shadow. Then edit > undo bright noise.
Apply bright noise again but click the mix button. Give your text a drop shadow - H1, V 0, Opacity 65, Blur 2.00. Copy merged and paste after frame 1 in AS. Repeat these steps one more time for a total of 3 frames.
Optimize and save as gif.
I hope you enjoyed this tutorial. If you have any questions, just leave me a shout.
Subscribe to:
Post Comments (Atom)
0 comments:
Post a Comment