Monday, May 2, 2011
 Heavenly Bodies

This tutorial was written my me on 19 April 2010. Any similarities to other tutorials is purely coincidental.
Supplies needed:
3 tubes of choice. I am using the wonderful artwork of Gennadiy Koufay. These tubes were purchased at CILM when they were still open.
Scrapkit. I used Angel's Song made by me. If you would like to purchase this kit, you can here, here, here, here, or here. Don't forget to grab the free add on available on my scrap blog here. :o)
WSL Mask 134 by Wee Scots Lass. You can download this mask, plus lots of other great ones at her blog here. Thank you, Chelle!
Font of choice. I used Lover's Quarrel ROB. (pay font)
Plug ins:
Alien Skin Eye Candy 4000 - Gradient Glow
Alien Skin Xenofex 2 - Constellation (for animation)
Xero Filters - Radiance and Soft Mood
Jasc Animation Shop (opt)
No other supplies needed
*~*~*~*~*~*~*~*~*~*~*~*~*~*~*~*~*~*~*~*~*~*~*~*~*~*~*~*~*~*~*~*~*~*~
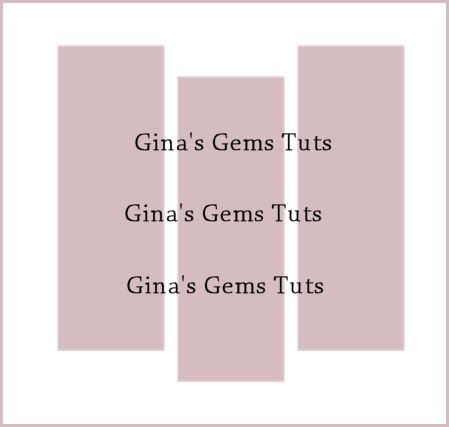
Ok! Let's get started! Open up a new transparent image 700 x 700 pixels. Floodfill with white. Change your foreground color to null. (it doesn't matter what your background color is as long as it isn't white.) Grab your preset shape tool - rectangle. Draw out a long, thin rectangle. Convert it to a raster layer. Position the rectangle towards the right of your canvas. Duplicate the rectangle. Go to image > mirror. Duplicate the rectangle again. Position it in the center of the other two rectangles, slightly lower than the other two like this:
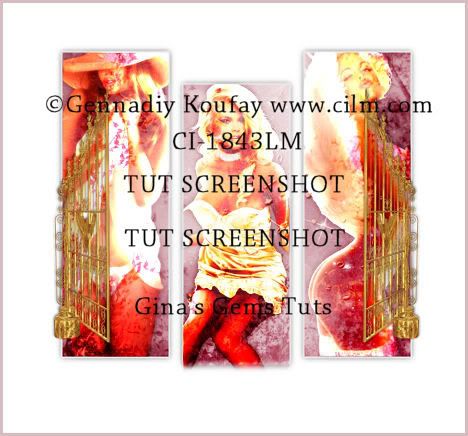
Highlight your left rectangle. Go to selections > select all. Selections > float. Selections > defloat. Open up a paper from the kit. ( I used paper 6) Resize by 70%, smartsize. Copy and paste as a new layer onto your canvas. Position it to your liking within the selection. Go to selections > invert. Hit delete on your keyboard. Don't deselect yet! Open up your first tube of choice. Resize, bicubic, if necessary. Copy and paste as a new layer onto your canvas. Position to your liking within the rectangle. Hit delete on your keyboard. Deselect (CTRL+D). Apply Xero filters - Radiance with the following settings:
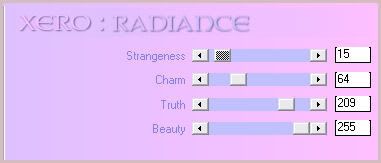
Now apply Xero - Soft Mood with the following settings:
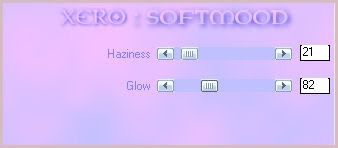
Now these settings are just a guide. You can play around with the settings on both with your different tubes, to get the desired effect.
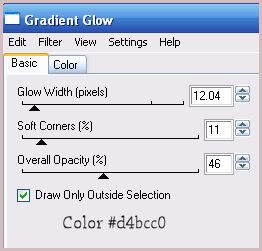
Go to adjust > sharpness > unsharp mask. Apply with radius - 5, strength - 25, clipping 2. Give your tube a drop shadow of H and V 0, Opacity 55, Blur 10.00. Change the blend mode to overlay. (again this is just a guide. If you like, you can use a different layer blend) Highlight the paper rectangle. Apply Gradient Glow with the following settings:
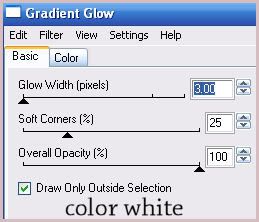
Give the layer a drop shadow of H and V 0, Opacity 55, Blur 10.00. Delete the left color rectangle.
Highlight your middle rectangle. Repeat all the steps that you just did for the left rectangle, using a different tube. Delete the middle color rectangle.
Highlight the right rectangle. Repeat all of the above steps once again using a third tube. Delete the right color rectangle.
Highlight your top layer. Open up the Heaven's Gate from the kit. Resize by 55%, smartsize. Copy and paste as a new layer onto your canvas. Give it a drop shadow of H 1, V -1, Opacity 50, Blur 4.00. Grab your freehand selection tool, rectangle. Select around one of the gates like this:
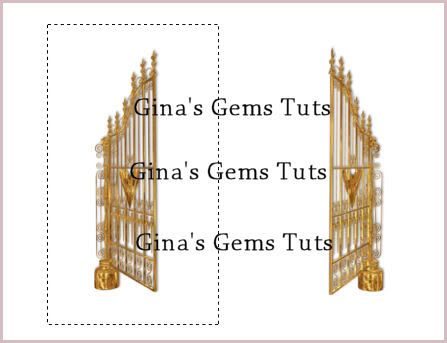
Hit delete on your keyboard. Deselect (CTRL+D). You should be left with the right part of the gate. Move it to so that the right side of the gate lines up with the right side of the right rectangle. Duplicate the gates layer. Go to image > mirror. You should have this:
Open up Cloud 1 from the kit. Resize by 50%, smartsize. Copy and paste as a new layer onto your canvas. Apply Gradient Glow with the following settings:
You don't have to use that color. Repeat the Gradient Glow. Give the cloud a drop shadow of H and V 0, Opacity 20, Blur 8.00. Duplicate the cloud. Go to image > mirror. Duplicate the mirrored cloud again. Go to image > flip. Duplicate the flipped cloud. Go to image > mirror. Arrange them as in my tag above. Drag 2 of the cloud layers beneath your gates layers.
Highlight your top layer. Open up Cloud 2 from the kit. Resize by 50%, smartsize. Copy and paste as a new layer onto your canvas. Give it a drop shadow of H and V 0, Opacity 20, Blur 12.00. Duplicate the cloud. Go to image > mirror. Arrange them to your liking. (these clouds stay above the gates.) You can add more cloud layers if you like, to get your desired result. . . it's all about personal preference.
Open up a Music Notes and Sparkles Deco from the kit. Resize by 20%, smartsize. Copy and paste as a new layer onto your canvas. Give it a drop shadow of H -1, V 0, Opacity 45, Blur 3.00, Duplicate the music notes and sparkles. Duplicate the music notes and sparkles again. Mirror this layer. Arrange them to your liking on top of the clouds. Change the blend mode of all the music notes and sparkle layers to Hard Light. Grab your freehand selection tool, type point to point, feather set to 5. Carefully select around any of the music notes that are hanging over the clouds. Highlight your first music notes and sparkles layer and hit delete. Repeat the remaining 2. Deselect (CTRL+D).
Open up Flower 3 from the kit. Resize by 50%, smartsize. Copy and paste as a new layer onto your canvas. Give it a drop shadow of H -2, V 2, Opacity 50, Blur 6.00. Position it to the right of your clouds (see my tag for reference). Duplicate. Go to image > mirror.
Open up Violin 1 from the kit. Resize by 25%, smartsize. Copy and paste as a new layer onto your canvas. Give it a drop shadow of H -2, V 2, Opacity 45, Blur 5.00. Position it towards the right of the gates on top of the clouds. Duplicate. Go to image > mirror. (see my tag above for reference).
Open up Flower 2 from the kit. Resize by 30%, smartsize. Copy and paste as a new layer onto your canvas. Go to image > free rotate. Rotate right by 90.00 degrees, both boxes UNCHECKED. Give it a drop shadow of H 2, V 0, Opacity 45, Blur 4.00. Duplicate. Go to image > mirror. Position them as in my tag above. Drag both flower layers beneath your violin layers.
Open up a music note deco from the kit. Resize by 35%, smartsize. Copy and paste as a new layer onto your canvas. Give it a drop shadow of H-1, V 0, Opacity 40, Blur 3.00. Position it at the top left corner of the left rectangle. Duplicate. Go to image > mirror.
Open up a bow from the kit. Resize by about 20%, smartsize. Copy and paste as a new layer onto your canvas. Give it a drop shadow of H and V 0, Opacity 45, Blur 5.00. Position it at the top of the left music note deco. Duplicate the bow. Go to image > mirror.
Open up a blossom of choice from the kit. Resize by 15%, smartsize. Copy and paste as a new layer onto your canvas. Give it a drop shadow of H 2, V 1, Opacity 40, Blur 4.00. Duplicate the blossom. Go to image > mirror. Arrange them to your liking on the middle rectangle.
Highlight your white background layer. Open up the sparkle swirl from the kit. Copy and paste as a new layer onto your canvas. Give it a drop shadow of H and V 1, Opacity 35, Blur 2.00. Position the swirl to your liking. Go to selections > select all. Selections > float. Selections > defloat. Add a new raster layer. Floodfill the new layer with a light color of choice. (I used color #d4bcc0). Deselect (CTRL+D). Drag the floodfill layer beneath your swirl layer.
Highlight your white background layer. Open up a paper from the kit. (I used paper 7). Don't resize. Copy and paste as a new layer onto your canvas. Apply WSL Mask 134 with the following settings:
Source Luminance
Fit to Canvas
Hide all Mask
Resize the mask layer by 95%, smartsize. Position it to your liking behind your tag.
Grab your selection tool, type - rectangle, feather set to 0.00. Select around the area of the mask layer that is hanging below your clouds. Hit delete. Now highlight your middle paper rectangle layer. Hit delete. Highlight your middle tube layer. Hit delete. Deselect.
Crop and resize to your liking.
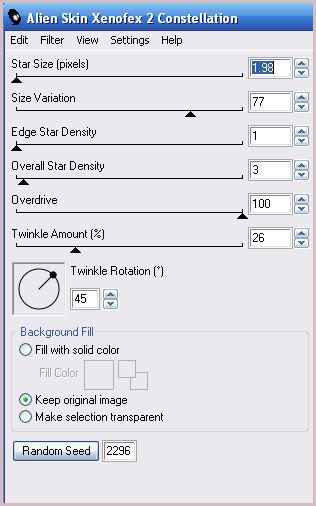
Add your watermark, text and copyright info. If you are not animating, save your tag as a JPG or PNG. If you are animating, highlight the white sparkle swirl layer. Apply Xenofex 2 - Constellation with the following settings:
Copy merged. Open up Animation Shop. Paste your tag as a new animation in AS. Back to Paint Shop Pro. Go to edit > undo constellation. Apply Constellation again, but hit the random seed button one time. Copy merged. Paste after frame 1 in AS.
Back to PSP. Go to edit > undo constellation. Apply constellation, once again, hitting the random seed button. Copy merged. Paste after frame 2 in AS.
Back to Paint Shop Pro. Go to edit > undo constellation. Apply Constellation again, but hit the random seed button one time. Copy merged. Paste after frame 3 in AS. You should have a total of 4 frames in AS.
Optimize and save as gif.
I hope you enjoyed this tutorial! If you have any questions, just give me a shout!
Subscribe to:
Post Comments (Atom)
0 comments:
Post a Comment