Wednesday, May 4, 2011
 Happy Thanksgiving
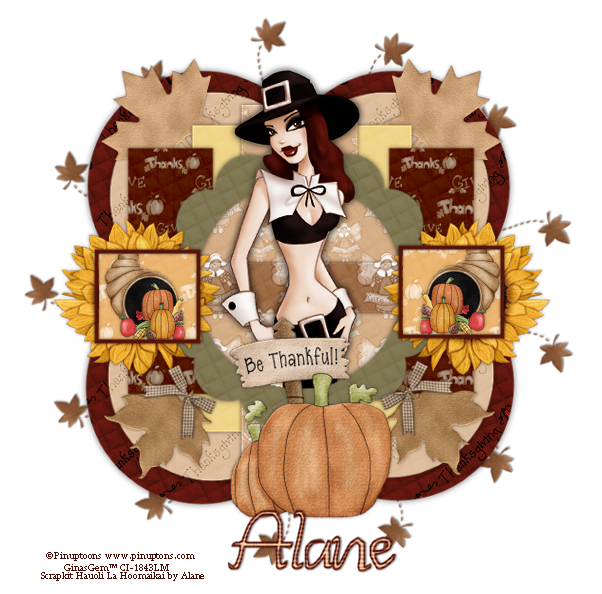
This tutorial was written by me on 22 November 2008. Any similarites to other tutorials is purely coincidental.
Supplies Needed:
Tube of choice. I am using the awesome artwork of Rion Vernon. I bought this tube when CILM was still open. You can find him at CDO now.
Scrapkit Hauoli La Hoomaika by Alane. If you wish to purchase this thankful kit you can here
Template 47 made by me which you can get here
Font of choice. I used Wishes (pay font)
Plugins:
No other supplies needed
Let's get started! Open up my template. Duplicate by holding down shift + d. Close the original layer. Delete the credit info layer.
Highlight the circly square 1. Go to selections > select all. Selections > float. Selections > defloat. Open up a paper of choice from the kit. Resize by 15%, smartsize. Copy and paste onto your canvas. Go to selections > invert. Hit delete on your keyboard. Deselect (CTRL+D) Give the layer a drop shadow of H and V 0, Opacity 60, Blur 10.00. Delete the gray circly square 1.
Highlight the circly square 2 layer. Select, float and defloat. Open up a paper of choice from the kit. Resize by 15%, smartsize. Copy and paste as a new layer onto your canvas. Selections > invert. Hit delete. Deselect. Give the layer a drop shadow of H and V 0, Opacity 60, Blur 8.00. Delete the white circly square 2 layer.
Highlight the medium sized rectangles layer. Select, float and defloat. Open up a paper of choice. Resize, 15%, smartsize. Copy and paste onto your canvas. Selections > invert. Hit delete on your keyboard. Deselect. Give the layer a drop shadow of H and V 0, Opacity 60, Blur 6.00. Delete the gray medium sized rectangles.
Highlight the small rectangles layer. Select, float and defloat. Open up a paper of choice from the kit. Resize, 15%, smartsize. Copy and paste as a new layer onto your canvas. Selections > invert. Hit delete. Deselect. Give the layer a drop shadow of H and V 0, Opacity 60, Blur 8.00. Delete the black small rectangles.
Highlight the center rectangle layer. Select, float and defloat. Open up a paper of choice from the kit. Resize by 15%, smartsize. Copy and paste as a new layer onto your canvas. Selections > invert. Hit delete. Deselect. Give the layer a drop shadow of H and V 0, Opacity 60, Blur 10.00. Delete the black middle rectangle layer.
Highlight the scalloped fill layer. Select, float and defloat. Open up a paper of choice from the kit. Reszie, 15%, smartsize. Copy and paste as a new layer onto your canvas. Selections > invert. Hit delete. Deselect. Delete the black scalloped frame fill layer.
Highlight the scalloped fill strip layer. Select, float and defloat. Open up a paper of choice from the kit. Resize by 15%, smartsize. Copy and paste onto your canvas. Selections > invert. Deselect. Give the layer a drop shadow of H and V 0, Opacity 50, Blur 5.00. Delete the gray strip layer.
Highlight the scalloped frame layer. Select, float and defloat. Open up a paper of choice from the kit. Resize by 15%, smartsize. Copy and paste as a new layer onto your canvas. Selections > invert. Hit delete. Deselect. Delete the gray scalloped frame.
Open up your tube. Resize as necessary, bicubic. Copy and paste as a new layer onto your canvas. Give your tube a drop shadow of H and V 0, Opacity 60, Blur 10.00. Duplicate your tube. Drag one of your tube layers below the frame layer.
Grab your magic wand tool, tolerance 30, feather 0.00. Click inside the empty space of the scalloped frame. Go to selections > modify > expand by 2.00.
Grab your eraser tool, size 30, opacity 90. Highlight your bottom tool layer. Erase the parts of the tube you don't want hanging out of the frame. Deselect.
Highlight your top tube layer. Erase the parts of the tube you don't want hanging out of the frame.
Highlight your scalloped frame. Give it a drop shadow of H and V 0, Opacity 60, Blur 6.00.
Highlight the right frame fill layer. Select, float and defloat. Open up a paper of choice from the kit. Resize by 15%, smartsize. Copy and paste as a new layer onto your canvas. Selections > invert. Hit delete. Do NOT deselect.
Open up the food 3 element from the kit. Resize by 10%, smartsize. Copy and paste onto your canvas. Position to your liking within the selection. Hit delete. Deselect. Give the food a drop shadow of H and V 0, Opacity 50, Blur 4.00.
Highlight the right frame layer. Select, float and defloat. Add a new raster layer. Choose a color from your tube or tag. Floodfill the new layer with this color. Deselect. Give it a drop shadow of H and V 0, Opacity 60, Blur 5.00. Delete the gray frame. Delete the gray fill layer.
Highlight the left frame fill layer. Repeat the same steps as above, but mirror the cornucopia.
Highlight the left frame and repeat the same steps you did with the right frame.
Open up sunflower 2 from the kit. Resize by 10%, smartsize. Copy and paste onto your canvas. Give it a drop shadow of H and V 0, Opacity 50, Blur 5.00. Duplicate the sunflower and mirror. Position them under your frames.
Open up leaf 2 from the kit. Resize by 10%, smartsize. Copy and paste onto your canvas. Give it a drop shadow of H and V 0, Opacity 50, Blur 5.00. Go to image > flip. Duplicate leaf 2. Go to image > mirror. Postion as in my tag above.
Open up leaf 1 from the kit. Resize by 10%, smartsize. Copy and paste onto your canvas. Give the leaf a drop shadow of H and V 0, Opacity 50, Blur 5.00. Go to image > flip. Duplicate the leaf and go to image > mirror. Position as in my tag above.
Open up a bow of choice. Resize by 8%, smartsize. Copy and paste as a new layer onto your canvas. Go to image > free rotate. Rotate right by 45.00, both boxes unchecked. Give the bow a drop shadow of H and V 0, Opacity 50, Blur 5.00. Duplicate the bow and mirror. Position them on the stems of the bottom leaves.
Open up pumpkin 2 from the kit. Resize by 15%, smartsize. Copy and paste as a new layer onto your canvas. Position as in my tag above. Give it a drop shadow of H and V 0, Opacity 5, Blur 5.00.
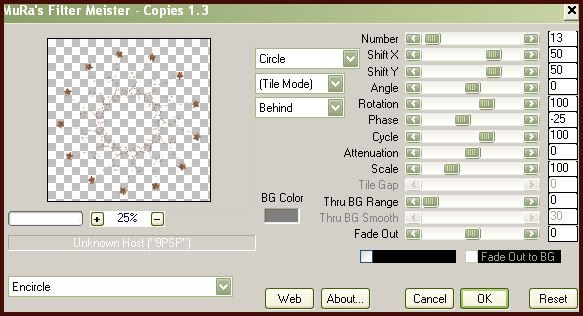
Open up the swirl leaf from the kit. Resize by 9%, smartsize. Copy and paste onto your canvas. Apply Mura Meister copies with the following settings:
Drag this layer to right above your white background. Give it a drop shadow of H 1, V -1, Opacity 50, Blur 2.00. Position to your liking.
Crop and resize to your liking.
Add your copyright info, watermark and your text. Save as JPG or PNG.
I hope you enjoyed this tutorial! If you have any questions, just give me a shout. :-)
Subscribe to:
Post Comments (Atom)
0 comments:
Post a Comment